Dism.exe /online /cleanup-image /restorehealth explained
Содержание:
- What Is DISM?
- SFC /scannow: Проверка и восстановление системных файлов Windows
- Unmounting an image
- Command-line Syntax
- DISM Error 87 FAQ
- Что делает средство готовности к обновлению системы
- /Commit-Image
- Восстановление системных файлов Windows 10
- Dism++: что за программа
- /Apply-SiloedPackage
- /Mount-Image
- Настройка сборки изнутри
- Where is DISM?
- How to run SFC to repair problems on Windows 10
- Basic Syntax for Servicing Commands
- Ошибка 87 при проверке целостности системных файлов
- Get Windows Edition Information
- Устранение ошибок, найденных в файле журнала CheckSUR
- Get Windows PE Information
- Установка Windows второй системой на другом разделе
- Resolution for Windows 8.1, Windows 10 and Windows Server 2012 R2
- /Split-Image
- Что это за команда DISM?
- Limitations
What Is DISM?
DISM, whose full name is the Deployment Image Service and Management, is a built-in tool of Windows, first introduced in Windows 7 and Windows Server R2. It can perform servicing tasks on a Windows installation image, on an online or offline image within a folder, or on WIM files.
The DISM tool can be available from the Command Line or the Windows PowerShell. DISM tool can be used to update files and fix problems when a Windows image becomes unserviceable. However, when running the DISM tool, you may receive the error code 87 or some other codes like DISM error 50, DISM error 2, DISM error 3, DISM error 1639 and so on, as shown in the following picture:
These DISM error codes mean that you cannot proceed. Therefore, do you know what may cause the DISM error 87 or other DISM error codes?
SFC /scannow: Проверка и восстановление системных файлов Windows
Утилиту DISM для восстановления Windows обычно рекомендуется использовать после утилиты проверки целостности системных файлов SFC (System File Checker). Команда sfc /scannow сканирует защищенные системные файлы Windows, и, если они отсутствуют или повреждены, попробует восстановить их оригинальные копии из хранилища системных компонентов Windows (каталог C:WindowsWinSxS).
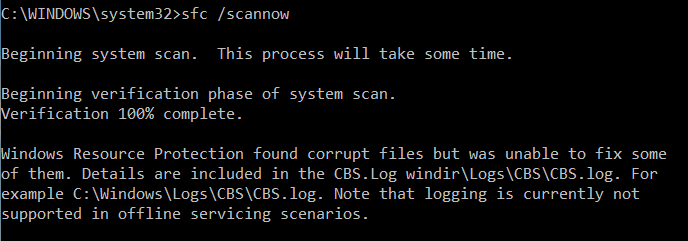
Если команда sfc /scannow возвращает ошибку “ Программа защиты ресурсов Windows обнаружила повреждённые файлы, но не может восстановить некоторые из них / Windows Resource Protection found corrupt files but was unable to fix some of them ”, скорее всего утилита не смогла получить необходимые файла из хранилища компонентов (образа) Windows.
В этом случае вам нужно попробовать восстановить хранилище компонентов (ваш образ Windows) с помощью DISM.
После восстановления образа вы можете повторно использовать утилиту SFC для восстановления системных файлов.
Unmounting an image
Note
This only applies to mounted images. Applied images don’t need to be unmounted.
After you modify a mounted image, you must unmount it. If you mounted your image with the default read/write permissions, you can commit your changes. This makes your modifications a permanent part of the image.
If you modified an applied image, you don’t have to do anything else. You’ll see any changes you made when you boot the PC.
-
Open a command prompt or the Deployment and Imaging Tools Environment with administrator privileges.
-
Unmount the image.
where is the location of the mount directory. If you do not specify the parameters to unmount, this option lists all of the mounted images but does not perform the unmount action.
Important
You must use either the /commit or /discard argument when you use the /unmount option.
Command-line Syntax
The base syntax for servicing a Windows image using DISM is:
DISM.exe {/Image:<path_to_image_directory> | /Online} {servicing_option}
You can use the following edition-servicing options on an offline image to list editions or to change a Windows image to a higher edition:
DISM.exe /Image:<path_to_image_directory> {/Get-CurrentEdition | /Get-TargetEditions | /Optimize-Image /WIMBoot | /Set-Edition | /Set-ProductKey:<product_key>}
The following edition-servicing options are available for a running Windows operating system:
DISM.exe /Online {/Get-CurrentEdition | /Get-TargetEditions | /Set-ProductKey:<product_key> | /Set-Edition:<target_edition> {/GetEula:< path> | /AcceptEula /ProductKey:<product_key>}}
The following table provides a description for how each edition-servicing option can be used. These options are not case-sensitive.
| Option | Description |
|---|---|
|
/Get-Help /? |
When used immediately after an edition-servicing command-line option, information about the option and the arguments is displayed. Additional Help topics might become available when an image is specified. Examples: Dism /Image:C:\test\offline /Get-CurrentEdition /? Dism /Online /Get-CurrentEdition /? |
|
/Get-CurrentEdition |
Displays the edition of the specified image. Examples: Dism /Image:C:\test\offline /Get-CurrentEdition Dism /Online /Get-CurrentEdition |
|
/Get-TargetEditions |
Displays a list of Windows editions that an image can be changed to. Examples: Dism /Image:C:\test\offline /Get-TargetEditions Dism /Online /Get-TargetEditions |
|
/Set-Edition:<target_edition_ID> [{/GetEula:<path | /AcceptEula /ProductKey:<product_key>}] |
Use the /Set-Edition option with no arguments to change an offline Windows image to a higher edition. To change an online Windows Server operation system to a higher edition, you must use the /Set-Edition option with the /AcceptEula and /ProductKey arguments. Important You should not use the /Set-Edition option on an image that has already been changed to a higher edition. It is recommended that you use this option on the lowest edition available in the edition family. Use /GetEula on an online image to copy the end-user license agreement to a specified path. The /AcceptEula argument accepts the end-user license agreement and is required in order to change the Windows edition on an online image. Example: Dism /Image:C:\test\offline /Set-Edition:<edition name> On a running Windows Server operating system only: Dism /online /Set-Edition:<edition name> /GetEula:c:\eulapath Dism /online /Set-Edition:<edition name> /AcceptEula /ProductKey:12345-67890-12345-67890-12345 Where <edition name> is the higher edition that you want to change to. |
|
/Set-ProductKey:<productKey> |
The /Set-ProductKey option can only be used to enter the product key for the current edition in an offline Windows image after you change an offline Windows image to a higher edition using the /Set-Edition option. Example: Dism /Image:C:\test\offline /Set-ProductKey:12345-67890-12345-67890-12345 |
DISM Error 87 FAQ
How do I fix error 87 DISM?
- Use Correct DISM Command.
- Run this command using an elevated command prompt.
- Run Windows update.
- Run System File Checker.
- Use correct DISM version.
- Reinstall Windows.
What is the DISM?
DISM, also called Deployment Image Service and Management, is a Windows built-in tool that can be used to service and prepare Windows image including the online or offline image within a folder or WIM file. Its features include mounting and unmounting images, querying installed device drivers in an offline image and adding a device driver to an offline image.
What does dism online cleanup image RestoreHealth do?
Dism /Online /Cleanup-Image /RestoreHealth attempts to scan and repair corrupted system files that found on your computer.
How do I fix corrupted files on Windows 10?
- Type Command Prompt in the search box of Windows and choose the best matched one.
- Right-click it to choose Run as administrator.
- Type the command sfc /scannow and hit Enter to continue.
- Wait for the process to be finished.
Что делает средство готовности к обновлению системы
Проверка целостности ресурсов
Средство готовности к обновлению системы проверяет целостность следующих ресурсов:
- Файлы, расположенные в следующих каталогах:
- %SYSTEMROOT%\Servicing\Packages
- %SYSTEMROOT%\WinSxS\Manifests
- Данные реестра, расположенные в следующих подкайлах реестра:
- HKEY_LOCAL_MACHINE\Components
- HKEY_LOCAL_MACHINE\Schema
- HKEY_LOCAL_MACHINE\Software\Microsoft\Windows\CurrentVersion\Component Based Servicing
Этот список может быть обновлен в любое время.
Когда средство готовности к обновлению системы обнаруживает неправильные манифесты, кабмины или данные реестра, он может заменить неправильные данные исправленной версией.
Ведение журнала
Средство готовности к обновлению системы создает файл журнала, который фиксирует все проблемы, найденные или исправленные инструментом. Файл журнала расположен здесь:
- %SYSTEMROOT%\Logs\CBS\CheckSUR.log
- %SYSTEMROOT%\Logs\CBS\CheckSUR.persist.log
/Commit-Image
Applies the changes that you have made to the mounted image. The image remains mounted until the /Unmount-Image option is used.
Syntax:
| Parameter | Description |
|---|---|
| /CheckIntegrity | Detects and tracks .wim file corruption when used with capture, unmount, export, and commit operations. /CheckIntegrity stops the operation if DISM detects that the .wim file is corrupted when used with apply and mount operations. |
| /Append | Adds the modified image to the existing .wim file instead of overwriting the original image. The /CheckIntegrity and /Append arguments do not apply to virtual hard disk (VHD) files. |
Example:
Восстановление системных файлов Windows 10
Обычное восстановление (нужен Интернет)
Для сканирования образа Windows на наличие ошибок и их исправления используется параметр DISM /Cleanup-image. Все рассмотренные команды выполняются в классической командной строке или оболочке Windows PowerShell (запущенными от имени администратора).
DISM /Online /Cleanup-Image /CheckHealth
С её помощью проверяем наличие повреждений хранилища компонентов. Команда смотрит только события, ранее записанные в журнале Windows 10. Никаких изменений не вносится. Будет проверено, помечено ли данные образа как повреждённые и можно ли их исправить.
На моём компьютере повреждение хранилища компонентов не обнаружено. Ранее система Windows 10 была перенесена на другой SSD-диск. Судя по всему, очень даже успешно.
DISM /Online /Cleanup-Image /ScanHealth
Выполняет полную проверку хранилища компонентов Windows на наличие повреждений. В зависимости от Ваших комплектующих занимает несколько минут. Мой компьютер справился буквально за две минуты и повреждение хранилища компонентов не было обнаружено.
DISM /Online /Cleanup-Image /RestoreHealth
Эта команда исправляет повреждённые файлы или отсутствующих компоненты исходными версиями. В процессе восстановления берёт участие центр обновления Windows (автоматически загружаются нужные файлы). Ваш компьютер должен иметь доступ в Интернет.
Процесс сканирования и восстановления компонентов может занять продолжительное время (даже до 30 минут). Всё зависит от текущего состояния Вашей операционной системы. В итоге должно появиться сообщение о том, что операция восстановления была успешно завершена.
Восстановление с помощью ISO-файла образа
Если Ваш компьютер не имеет прямого доступа к Интернету или служба обновления Windows отключена, то при попытке восстановления хранилища компонентов появляются ошибки:
- 0x800f0906 — исходные файлы не могут быть загружены (используйте параметр источника, чтобы указать расположение файлов, необходимых для восстановления функции);
- 0x800f0950 — ошибка использования DISM (операция не проводилась);
- 0x800F081F — исходные файлы были не найдены (используйте опцию источника, чтобы указать расположение файлов, необходимых для восстановления функции).
Вы можете указать WIM или ESD-файл исходного установочного образа Windows, который будет использоваться для восстановления (в качестве источника файлов системных). Например, давайте смонтируем оригинальный ISO-образ диска Windows 10 на виртуальный диск (G:).
DISM /Online /Cleanup-Image /RestoreHealth /Source:G:\Sources\Install.wim
Предотвратить использование служб обновления Windows (только локальный файл):
- DISM /Online /Cleanup-Image /RestoreHealth /Source:G:\Sources\Install.wim /LimitAccess
- Dism /Online /Cleanup-Image /RestoreHealth /LimitAccess
Важно! Сборка и выпуск Windows в образе WIM / ESD должны совпадать с таковыми в Вашей системе. Журнал восстановления системных файлов смотрите здесь: C:\Windows\Logs\CBS.log и C:\Windows\Logs\DISM \DISM.log
После восстановления можно запустить проверку sfc /scannow.
Как бонус — вот Вам ещё несколько команд:
| DISM /Get-WimInfo | просмотреть информацию об образе в WIM-файле |
| DISM /Add-Package | установка файлов обновлений форматов MSU и CAB |
| DISM /Get-Drivers | получение полного списка установленных драйверов |
| DISM /Add-Driver | добавление драйверов в образ операционной системы |
| DISM /Add-Capability | используется для установки компонентов и RSAT |
| DISM /StartComponentCleanup | очистка старых версий компонентов (папка WinSxS) |
| DISM /Set-Edition | переход на полную версию Windows без переустановки |
В оболочке Windows PowerShell можно использовать команды: Repair-WindowsImage -Online —CheckHealth (-ScanHealth или -RestoreHealth) для быстрой проверки (полной или восстановления). Какой от этого профит непонятно, но такая возможность присутствует.
Заключение
Зачастую средство DISM используется для восстановления системных файлов Windows 10. Его команды отлично работают как в командной строке, так и в Windows PowerShell. Для офлайн-восстановления понадобится оригинальный дистрибутив Windows 10 с сайта Майкрософт.
Dism++: что за программа
Dism++ — это бесплатная портативная программа, созданная командой китайских разработчиков Chuyu Team. Являет собой графический интерфейс для штатной консольной утилиты Windows DISM.exe, служащей для подготовки и обслуживания установочных образов этой операционной системы. Штатно работа с DISM.exe осуществляется посредством командной строки или PowerShell. Графический интерфейс, реализованный в Dism++, даёт возможность работать с образами Windows без привязки к консольным командам. С помощью интерфейса Dism++ сможем редактировать дистрибутив Windows и вносить в него кое-какие корректировки, делать системный бэкап и восстанавливаться из него, конвертировать форматы системных образов WIM и ESD, добавлять сведения о Windows в загрузчик, редактировать файл hosts и выполнять прочие операции.

При участии программы сможем устанавливать Windows путём развёртывания непосредственно из её образов — файлов WIM или ESD. Будь они в составе чистого официального дистрибутива от Microsoft, или же это наши созданные сборки системы.
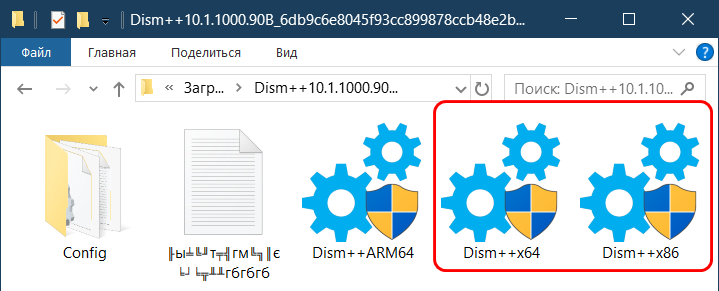
Скачать Dism++ можно на сайте Chuyu Team:
При запуске 64-битной редакции утилиты важно не спутать её с редакцией ARM64
Как с помощью Dism++ устанавливать Windows в различных ситуациях?
/Apply-SiloedPackage
Applies one or more siloed provisioning packages (SPPs) to a specified image. This option is only available after running CopyDandI.cmd from the ADK for Windows 10, Version 1607, and running from the target folder created by CopyDandI.cmd.
Note: /Apply-SiloedPackage can only be run once against a Windows image, but /PackagePath can used more than once in the same command to apply multiple SPPs. SPPs will be applied in the specified order, so a dependency should be specified before the SPP that depends on it.
For more information about siloed provisioning packages, and how to use CopyDandI.cmd, see Siloed provisioning packages.
To find out how to work with siloed provisioning packages, see Lab 10: Add desktop applications and settings with siloed provisioning packages (SPPs).
| Parameter | Description |
|---|---|
| /PackagePath | Specifies the path of a siloed provisioning package file. |
| /ImagePath | Specifies the path of the Windows image where you are applying the SPP. |
Example:
/Mount-Image
Mounts an image from a .ffu, .wim, .vhd or .vhdx file to the specified directory so that it is available for servicing.
When mounting an image, note the following:
- The mount directory must be created, but empty.
- An index or name value is required for all image types. WIMs can contain more than image. For FFU and VHD, use .
Syntax:
| Parameter | Description |
|---|---|
| /ReadOnly | Sets the mounted image with read-only permissions. Optional. |
| /Optimize | Reduces initial mount time. |
| /CheckIntegrity | Detects and tracks .wim file corruption when used with capture, unmount, export, and commit operations. /CheckIntegrity stops the operation if DISM detects that the .wim file is corrupted when used with apply and mount operations. |
Examples:
Настройка сборки изнутри
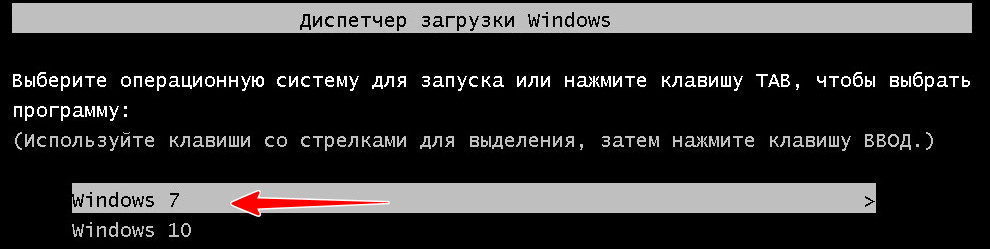
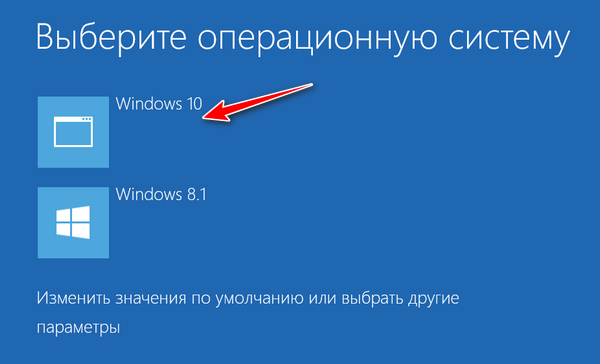
Выполнив или пропустив предварительную настройку сборки, перезагрузите компьютер и выберите в загрузочном меню установленную на виртуальный диск Windows.
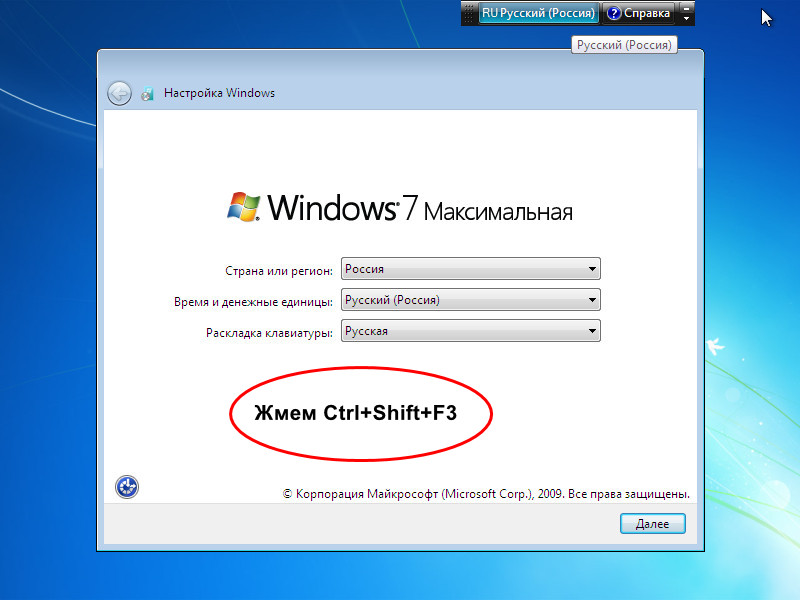
После того как система определит устройства и установит драйвера, на этапе региональных настроек нажмите Ctrl+Shift+F3, чтобы войти в учетную запись встроенного Администратора.
Далее выполняем необходимые действия — устанавливаем программное обеспечение, производим локальные настройки и т.д.
Обратите внимание, что при входе в учетную запись Админа у вас автоматически запустится утилита Sysprep, не закрывайте ее, она понадобится для отвязки сборки от аппаратных комплектующих вашего компьютера. Завершив настройки, перезагрузите компьютер через утилиту Sysprep, выбрав в ее параметрах «Переход в окно приветствия (OOBE)», «Подготовка к использованию» и «Перезагрузка»
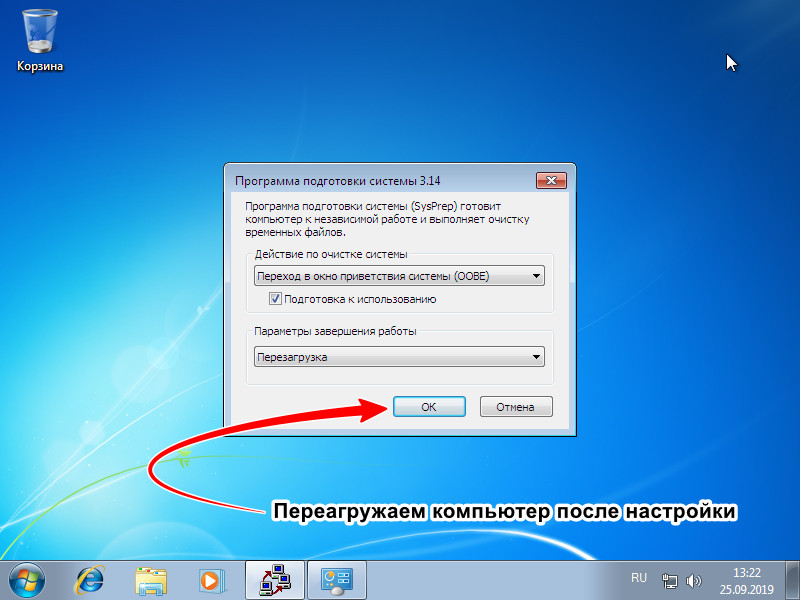
Нажмите «ОК» и загрузитесь в рабочую систему.
Примечание: если устанавливаемая во время настройки сборка программа потребует перезагрузки, в параметрах Sysprep необходимо выбрать «Режим аудита» и снять галку с чекбокса «Подготовка к использованию».
Окончательная же перезагрузка выполняется в режиме окна приветствия.
Where is DISM?
Deployment Image Servicing and Management (DISM.exe) is a command-line tool that can be used to service a Windows image or to prepare a Windows Preinstallation Environment (Windows PE) image. For more information about DISM see What is DISM?
DISM in Windows 10
DISM comes with Windows 10, in the folder, but you can run DISM in the command prompt from any location. You have to be running from a Command Prompt as administrator to use use DISM.
DISM in the ADK
If you are running an older version of Windows, or you need a different version of DISM on your PC, download and install the Windows Assessment and Deployment Kit (Windows ADK), see Windows Assessment and Deployment Kit (Windows ADK) Technical Reference.
DISM appears in the Windows ADK here:
where <version> can be 8.0, 8.1, or 10, and <arch> can be x86 or amd64.
If you need to copy and ADK version of DISM to a PC that does not have the ADK, see Copy DISM to another computer.
How to run SFC to repair problems on Windows 10
The instructions outlined above are meant to fix issues with the system image, not the problems with the actual installation of Windows 10. After the image has been restored to a healthy state, you have to use the System File Checker (SFC) command tool to repair the current setup.
To use the SFC command tool to repair the Windows 10 installation, use these steps:
- Open Start.
- Search for Command Prompt, right-click the top result, and select the Run as administrator option.
-
Type the following command to repair the installation and press Enter:
Source: Windows Central
Quick tip: If errors are found, you may want to run the command around three times to ensure that everything was fixed correctly.
Once you complete the steps, the System File Checker tool will repair the system files using the local image files to fix issues with Windows 10, and the log files will be saved on and , which you can view to get more details about the repaired files.
You can use this guide to learn more ways to use the SFC tool to fix problems on Windows 10.
More Windows 10 resources
For more helpful articles, coverage, and answers to common questions about Windows 10, visit the following resources:
- Windows 10 on Windows Central – All you need to know
- Windows 10 help, tips, and tricks
- Windows 10 forums on Windows Central
Get those goldies
Best Destiny 2 Exotic weapons and armor in 2021
Destiny 2’s sandbox is filled with plenty of unique and powerful Exotic weapons and armor pieces. Here’s a breakdown of which Exotics are the most effective in 2021.
This is getting deep
‘Hidden Depths’ DLC is now available on all Minecraft Dungeons platforms
Minecraft Dungeons is officially releasing its fifth premium content expansion, ‘Hidden Depths,’ on all platforms Minecraft Dungeons is available on. You can purchase Minecraft Dungeons on its own, buy the Season Pass for access to the last three expansions, or simply enjoy the massive free update launching alongside ‘Hidden Depths.’
Bethesda + Xbox
Microsoft’s Xbox E3 2021 event is officially scheduled for June 13
Microsoft’s Xbox E3 2021 event finally has an official date. This year’s E3 2021 showcase should be a little bit more traditional than last year’s scattered events, and we expect gameplay footage to take center stage.
Honey I shrunk the computer!
These are the best PC sticks when you’re on the move
Instant computer — just add a screen. That’s the general idea behind the ultra-portable PC, but it can be hard to know which one you want. Relax, we have you covered!
Basic Syntax for Servicing Commands
After you have mounted or applied a Windows image so that it is available offline as a flat file structure, you can specify any DISM global options, the servicing option that will update your image, and the location of the offline image. You can use only one servicing option per command line.
If you are servicing a running computer, you can use the /Online option instead of specifying the location of the offline Windows image. The commands and options that are available for servicing an image depend on which Windows operating system you are servicing. They also depend on whether the image is offline or a running operating system. All commands work on an offline Windows image. Subsets of the commands are available for servicing a running operating system.
The base syntax for DISM servicing commands is:
DISM.exe {/Image:<path_to_image> | /Online} {servicing_option}
For more information about servicing commands, see Deployment Image Servicing and Management (DISM) Command-Line Options.
Ошибка 87 при проверке целостности системных файлов
Время от времени Windows 7, 8, 8.1 и даже последняя версия начинает некорректно работать. Иногда компьютер внезапно перезагружается или попросту часто зависает. В такой ситуации обычно пользователям советуют не только проверить ПК на вирусы, но и выяснить, нет ли каких-либо повреждений в системных файлах.
Чтобы произвести такую проверку, используется командная строка, где вводится sfc /scannow. Если всё хорошо, то пользователь получает соответствующий текст. Однако в некоторых случаях вы получите сообщение о том, что система нашла повреждённые файлы, но ничего не может с ними сделать.
В этот момент в игру вступает DISM — следует открыть его от имени администратора и ввести такие команды:
- DISM /Online /Cleanup-image /ScanHealth — если у вас седьмая версия Windows;
- Та же команда + DISM.exe /Online /Cleanup-image /RestoreHealth — две команды для Windows 8, 10. Первая необходима для поиска повреждений, вторая команда запускает их исправление.
Именно после первой комбинации из списка, которая разработана для седьмой версии системы, всплывает ошибка 87 в командной строке DISM с сопутствующим текстом «Параметр ScanHealth не распознан в этом контексте».
Как её исправить? Первое очень простое решение — проверить правильность ввода комбинации. Поскольку эта командная строка очень требовательна к каждому знаку, убедитесь, что ставите только один пробел перед каждым слешем.
Не помогло? Тогда вам следует скачать обновление под названием KB2966583 на сайте Майкрософт и установить его на своём компьютере.
После успешной установки вы сможете снова запустить командную строку DISM и выполнить восстановление целостности файлов Windows.
Get Windows Edition Information
You can use the edition-servicing commands to obtain information about which editions of Windows are available for upgrade.
Target editions are the editions of Windows that you can upgrade to. You can display information about the current edition or the target edition of an offline Windows image or a running operating system.
For more information about Windows edition servicing commands available in DISM, see DISM Windows Edition-Servicing Command-Line Options.
To get information about the current Windows editions
-
Click Start, and type deployment. Right-click Deployment and Imaging Tools Environment and then select Run as administrator.
-
To list information about the current edition of the offline Windows image, type the following command:
For a running operating system, type the following command:
To get information about target editions of Windows
-
Click Start, and type deployment. Right-click Deployment and Imaging Tools Environment and then select Run as administrator.
-
To list information about the target edition of the offline Windows image, type the following command:
For a running operating system, type the following command:
Устранение ошибок, найденных в файле журнала CheckSUR
Чтобы вручную устранить ошибки коррупции, которые обнаруживает средство готовности к обновлению системы, но не может исправить, выполните следующие действия:
-
Откройте %SYSTEMROOT%\Logs\CBS\CheckSUR.log.
Примечание
%SYSTEMROOT% — это переменная среды, которая сохраняет папку, Windows установлена. Например, обычно папка %SYSTEMROOT% — это C:\Windows.
-
Определите пакеты, которые средство не может исправить. Например, в файле журнала можно найти следующее:
В этом случае поврежден пакет KB958690.
-
Скачайте пакет из Центра загрузки Майкрософт или каталога обновлений Майкрософт.
-
Скопируйте пакет (.msu) в каталог. По умолчанию этот каталог не существует, и необходимо создать каталог.
-
Перезахоранить средство готовности к обновлению системы.
Подробнее об устранении ошибок в CheckSUR.log см. в журнале CheckSUR.log.
Get Windows PE Information
You can mount a Windows Preinstallation Environment (Windows PE) image for servicing in the same way you would any Windows image. There are also Windows PE servicing commands that are specific to a Windows PE image. These commands can be used to list Windows PE settings such as scratchspace, targetpath, and profiling information. For more information about Windows PE servicing commands available in DISM, see DISM Windows PE Servicing Command-Line Options.
To list all settings in the mounted Windows PE image.
-
Click Start, and type deployment. Right-click Deployment and Imaging Tools Environment and then select Run as administrator.
-
To list information about all of the Windows PE settings in the mounted Windows PE image, at the elevated command prompt, type:
The report generated includes the following information:
| Field | Description | Example |
|---|---|---|
|
Profiling |
Reports whether Windows PE profiling is enabled or disabled. |
Disabled |
|
Scratch Space |
The amount of writeable space available on the Windows PE system volume when booted in ramdisk mode. |
32MB |
|
TargetPath |
The path to the root of the Windows PE image at boot time. |
X:</p> |
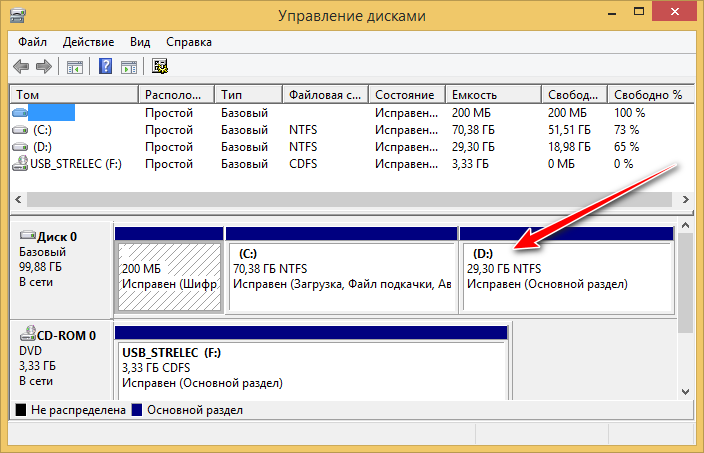
Установка Windows второй системой на другом разделе
Процесс установки Windows на другой раздел немногим отличается от переустановки системы. В среде первой системы подготавливаем раздел для второй Windows.
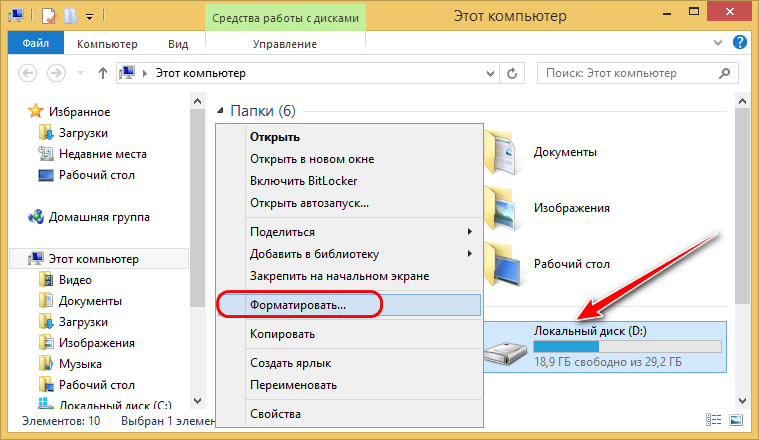
Форматируем его.
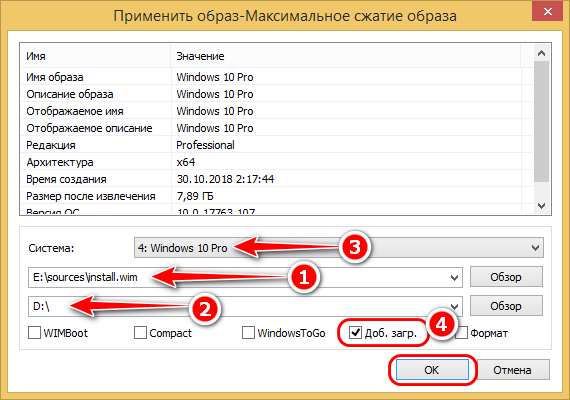
Монтируем установочный ISO-образ. Запускаем Dism++. Как и при переустановке, в меню «Файл» выбираем «Применить образ». Кстати, форму развёртывания образа Windows можно запускать также через меню «Восстановление», пункт «Восстановление». Эта форма идентична и для установки системы с файлов WIM/ESD дистрибутива, и для восстановления из бэкапа в формате этих же файлов.

Указываем путь к файлу install.wim или install.esd. Указываем раздел второй системы. Выбираем редакцию. И вот тут важный момент – ставим галочку опции «Доб.загр.». Она нужна для добавления второй системы в меню загрузки. Жмём «Ок».
Dism++ выдаст уведомление о добавлении сведений о загрузке новой системы в загрузчик и попросит нажать «Ок» для старта операции.

О завершении развёртывания образа программа уведомит.
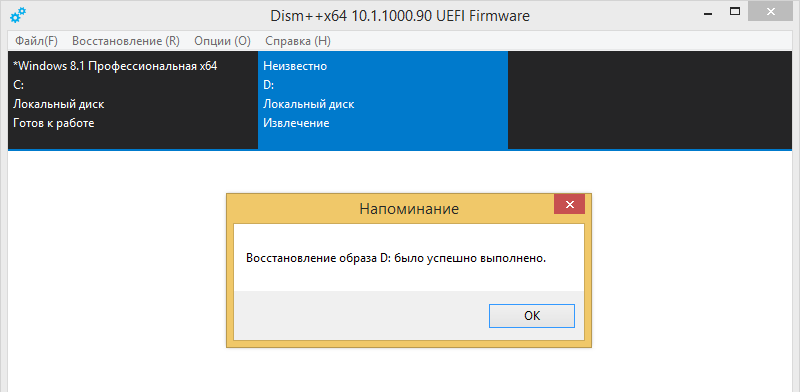
Далее можем перезагружаться. При запуске нас уже будет встречать меню загрузчика. Выбираем новую установленную систему.
И продолжаем установку уже внутри неё самой.
Примечание: Dism++ умеет добавлять запись о загрузке новой системы в существующий загрузчик Windows. Но программа не умеет создавать для системы на другом жёстком диске свой автономный загрузчик. Если вопрос стоит в установке Windows на другом диске со своим отдельным загрузчиком, потребуется вручную создать системный загрузочный раздел — «Зарезервировано системой» на MBR-диске или EFI-раздел на GPT-диске. И, соответственно, также вручную создать для второй системы её загрузчик. Но это уже отдельная история.
Resolution for Windows 8.1, Windows 10 and Windows Server 2012 R2
To resolve this problem, use the inbox Deployment Image Servicing and Management (DISM) tool. Then, install the Windows update or service pack again.
-
Open an elevated command prompt. To do this, open Start menu or Start screen, type Command Prompt, right-select Command Prompt, and then select Run as administrator. If you are prompted for an administrator password or for a confirmation, type the password, or select Allow.
-
Type the following command, and then press Enter. It may take several minutes for the command operation to be completed.
Important
When you run this command, DISM uses Windows Update to provide the files that are required to fix corruptions. However, if your Windows Update client is already broken, use a running Windows installation as the repair source, or use a Windows side-by-side folder from a network share or from a removable media, such as the Windows DVD, as the source of the files. To do this, run the following command instead:
Note
Replace the C:\RepairSource\Windows placeholder with the location of your repair source. For more information about using the DISM tool to repair Windows, reference Repair a Windows Image.
-
Type the command and press Enter. It may take several minutes for the command operation to be completed.
-
Close the command prompt, and then run Windows Update again.
DISM creates a log file (%windir%/Logs/CBS/CBS.log) that captures any issues that the tool found or fixed. %windir% is the folder in which Windows is installed. For example, the %windir% folder is C:\Windows.
/Split-Image
For WIM, this command splits an existing .wim file into multiple read-only split .swm files.
This option creates the .swm files in the specified directory, naming each file the same as the specified path_to_swm, but with an appended number. For example, if you set path_to_swm as , this option creates a Data.swm file, a Data2.swm file, a Data3.swm file, and so on, defining each portion of the split .wim file and saving it to the C:\ directory.
This command-line option does not apply to virtual hard disk (VHD) files.
Syntax for WIM:
| Parameter | Description |
|---|---|
| /FileSize | Specifies the maximum size in megabytes (MB) for each created file. If a single file is larger than the value specified in the /FileSize option, one of the split .swm files that results will be larger than the value specified in the /FileSize option, in order to accommodate the large file. |
| /CheckIntegrity | Detects and tracks .wim file corruption when used with capture, unmount, export, and commit operations. /CheckIntegrity stops the operation if DISM detects that the .wim file is corrupted when used with apply and mount operations. |
| /ImageFile | Specifies the path of an image file, example: install.wim. |
Example:
Что это за команда DISM?
Инструмент «Deployment Image Servicing and Management» (Обслуживание и управление размещениями образов) также известный как DISM появился в функционале семейства Виндовс начиная с версии Виндовс Виста (SP1).
Первоначально DISM позиционировался как инструмент для создания и управления образами Виндовс на основе файлового формата .wim (сокращённо от «Windows image» – образ Виндовс). С внедрением в функционал Виндовс 8 зашифрованного и компрессированного файлового формата .esd (акроним от «Electronic Software Download») DISM получил возможность напрямую работать и с файлами упомянутого формата.
Использования слова «обслуживание» (servicing) в функционале DISM включает широкое разнообразие функций, в частности:
- Захват образов дисков (разделов);
- Использование образов дисков;
- Установка и модификация образов;
- Создание образов 32 или 64-битной Виндовс в едином .wim файле;
- Создание образов сепаратных данных и другие возможности.
Ныне возможности DISM позволяют проводить операции по проверке, сканированию и восстановлению файлов образа Виндовс, уменьшению размеров инсталляционных файлов Виндовс (отмечу работу с компонентом WinSXS), добавление в ручном режиме апдейтов к Виндовс 10, идентификацию образов Виндовс et cetera.
Limitations
-
If you do not enter the product key when you set the edition of your offline image, you must either enter the product key during OOBE, or use an unattended answer file to enter the product key during the specialize configuration pass.
-
You cannot use edition-servicing commands on a Windows Preinstallation Environment (Windows PE) image.
-
To maintain edition-specific customizations, you should apply edition-specific answer files after the edition upgrade.
-
If you want to run the /Set-Edition option against a 64-bit image with more than 30 language packs, you must run it from a 64-bit computer. Otherwise, you might receive an out-of-memory error. This limitation only exists if you are manipulating a 64-bit image from a 32-bit computer. This limitation does not exist when you run this option on a computer that matches the architecture of the image.
-
You cannot set a Windows image to a lower edition. The lowest edition will not appear when you run the /Get-TargetEditions option.
-
You should not use the /Set-Edition option on an image that has already been changed to a higher edition.