Установка гостевых дополнений virtualbox
Содержание:
- Почему вы должны использовать гостевые дополнения VirtualBox?
- What Do the Guest Additions Do?
- How to Install VirtualBox’s Guest Additions
- Общая информация по VirtualBox Guest Additions
- Установка гостевых дополнений из Virtual Box Manager
- What Are Guest Additions in VirtualBox?
- Using VirtualBox Guest Addition features
- How to Install VirtualBox Guest Additions on Windows Guest
- How to Install Guest Additions on Ubuntu VirtualBox
- Some Problems with Installing Guest Additions for VirtualBox
- Non-Issues[edit]
- Footnotesedit
- Поддерживаемые операционный системы:
- Гостевые дополнения VirtualBox
- Enable Shared Folder
- Introduction[edit]
- Почему не удаётся подключить виртуальный оптический диск в VirtualBox
- Uninstall virtualbox-guest-additions-iso[edit]
- Guest Additions Make VirtualBox Even Better
Почему вы должны использовать гостевые дополнения VirtualBox?
С включенными гостевыми дополнениями VirtualBox использование виртуальной машины становится намного удобнее. Не веришь мне? Вот важные функции, которые предлагает гостевые дополнения:
- Интеграция указателя мыши: вам больше не нужно нажимать какие-либо клавиши, чтобы «освободить» курсор от гостевой ОС.
- Общий буфер обмена: с установленными гостевыми дополнениями вы можете копировать и вставлять данные между гостевой и хост-операционной системами.
- Перетаскивание: вы также можете перетаскивать файлы между хостом и гостевой ОС.
- Общие папки: Моя любимая функция; эта функция позволяет обмениваться файлами между хостом и гостем. Вы можете указать VirtualBox обрабатывать определенный каталог хоста как общую папку, и программа сделает его доступным для гостевой операционной системы как сетевой ресурс, независимо от того, есть ли у гостевой системы сеть.
- Улучшенная поддержка видео: пользовательские драйверы видео, которые устанавливаются с гостевыми дополнениями, предоставляют вам сверхвысокие и нестандартные режимы видео, а также повышенную производительность видео. Это также позволяет изменить размер окна виртуальной машины. Разрешение видео в гостевой системе будет настроено автоматически, как если бы вы вручную вводили произвольное разрешение в настройках дисплея гостевой системы.
- Бесшовные окна: отдельные окна, которые отображаются на рабочем столе виртуальной машины, могут быть сопоставлены на рабочем столе хоста, как если бы основное приложение фактически выполнялось на хосте.
- Общие каналы связи хоста/гостя: гостевые дополнения позволяют вам контролировать и мониторить действия гостевой системы. «Свойства гостя» предоставляют общий механизм на основе строк для обмена битами данных между гостем и хостом, некоторые из которых имеют особые значения для управления и контроля гостевой системы. Приложения могут быть запущены на гостевой машине с хоста.
- Синхронизация времени: благодаря гостевые системы будут регулярно синхронизировать время с хост-машиной. Параметры механизма синхронизации времени могут быть настроены.
- Автоматические входы в систему: это может быть полезной функцией.
Под впечатлением от функций, которые предоставляет гостевое дополнение? Давайте посмотрим, как вы можете установить VirtualBox Guest Additions в Ubuntu Linux.
What Do the Guest Additions Do?
Now that we know what Guest Additions are, let’s look at what the VirtualBox Guest Additions actually do for you.
Chances are that you’ll eventually want to move some content between your virtual machine (the guest) and your actual computer (the host). With the Guest Additions installed, VirtualBox packs a few features to make this easy.
First is the shared clipboard/drag and drop support. This allows you to copy items on one platform and paste them on the other, as well as dragging files between them. To adjust this, select your VM on the VirtualBox home page and choose Settings.
In the General section, switch to Advanced tab and you can choose options for Shared Clipboard and Drag’n’Drop. You can choose Disabled, Host to Guest, Guest to Host, or Bidirectional for both of them.
Unless you have a specific reason to choose something else, Bidirectional is the most convenient.
Once you have this enabled, both copy/paste and dragging will work across systems.
If you’d rather make folders on your host system accessible in the VM, you can utilize shared folders. This Guest Additions feature lets you mount host folders as «network resources» in the guest OS without actually using a network.
To use it, click Settings on a VM and jump to the Shared Folders section. Select the Add Share button on the right side, then choose a folder on your computer to share with the guest.
Give it a name, choose Auto-mount if you want it to connect automatically, and hit OK.
Now, that folder will appear as a network drive in the guest OS.
3. Improved Graphics Support
As mentioned earlier, virtual machines don’t support high-resolution graphics from the start. Once you install the Guest Additions, though, you’ll have full control over the resolution options in the guest OS’s settings menu. For instance, if you have a 1920×1080 monitor, you can display the VM in full-screen at 1080p.
That’s not the only graphical enhancement that the Guest Additions add. Using them, the guest OS’s resolution will dynamically resize as you adjust the VirtualBox window on your computer. This lets you use the VM at any size you like without playing with resolution options.
Finally, with Guest Additions, the guest OS can take advantage of your computer’s graphics hardware. If you’re playing games or using other graphically intensive software in a WM, this makes a huge difference.
4. Seamless App Windows
Another neat benefit of the Guest Additions is a seamless mode. This lets you run app windows from the guest alongside apps from your host OS, so it feels like they’re all part of one system. It’s a lot like how Parallels runs Windows apps on a Mac.
To use this mode, press the Host key + L when your virtual machine is in focus. If you haven’t changed it, the default Host key in VirtualBox is the right Ctrl key.
Once you’ve done this, the VM will go full-screen and VirtualBox will remove its background. You’re then free to use its windows with your regular desktop software. Hit Host + L again to turn this off—if it doesn’t seem to work, make sure you select the VirtualBox VM first.
5. Other Benefits of VirtualBox Guest Additions
The above functions are the main features of VirtualBox’s Guest Additions. There are a few other useful perks to installing them, though these are not as generally useful.
One that may affect you, depending on the guest OS, is seamless mouse integration. With most modern OSes, VirtualBox allows you to seamlessly move your mouse between your host and guest system. However, some older OSes require exclusive control of your keyboard and mouse.
If this is the case, your mouse pointer will become «trapped» inside the VirtualBox window after you click inside it. This means that you must hit the Host key (right Ctrl by default) to bring the mouse control back to the host OS.
Otherwise, the Guest Additions bring time synchronization with your host machine, the option for automated logins, and can monitor communications between the guest and host. None of this has much use for the average user.
How to Install VirtualBox’s Guest Additions
It’s easy to install the Guest Additions on your VirtualBox system. In fact, every time VirtualBox receives an update, it includes a new version of the Guest Additions too. You don’t necessarily need to update the Guest Additions every time you update VirtualBox, but Oracle recommends it for best performance.
Keep in mind that the Guest Additions are available for Windows and Linux, but not macOS. You’ll need other workarounds if you’re running macOS in a virtual machine.
Install Guest Additions on Windows VMs
To install the Guest Additions for VirtualBox in a Windows VM, boot into your guest OS as normal. On the toolbar at the top, select Devices > Insert Guest Additions CD Image. This mounts a virtual disc to the VM.
When you do this, Windows will respond as if you’ve just inserted a physical disc. If it doesn’t prompt you to run it, open a File Explorer window and go to This PC. You should see a device in the CD Drive named something like VBox_GAs_x.
Double-click this to open the disc’s contents. Inside, run the VBxWindowsAdditions file (or VBxWindowsAdditions-x86 on a 32-bit VM).
From there, simply walk through the steps to install the Guest Additions like you would any other software. After it completes, you’ll be prompted to reboot the VM, which you should do as soon as possible.
Once you’re done, you can go to Devices > Optical Drives > Remove disk from virtual drive to «eject» the virtual Guest Additions disc.
Install Guest Additions on Linux VMs
The process to install VirtualBox’s Guest Additions into a Linux VM is quite similar. Once you’ve booted up, select Devices > Insert Guest Additions CD Image from VirtualBox’s menu bar. Depending on your flavor of Linux, you may see a message to automatically run the CD’s contents.
You can accept this, but if you don’t, you’ll find the CD available on the taskbar in many Linux distros. If it doesn’t appear there, open the file browser and look for VBox_GAs_x on the left sidebar.
On Ubuntu, a Run Software button appears at the top-right of the window. Click this to start the install process, then provide your admin password to continue. A Terminal window will open to keep you updated with its progress.
Once it’s done, reboot the VM and you’re all set. You can then eject the disk using the Devices > Optical Drives > Remove disk from virtual drive option, or by right-clicking it in your OS and choosing Eject.
Общая информация по VirtualBox Guest Additions
Для более эффективной работы и взаимодействием между реальной и виртуальной машиной, созданной в VirtualBox, используется специальное дополнение к последнему – Guest Additions. Данный пакет расширений открывает дополнительные возможности, среди которых:
- Создание реальной сети в виртуальной машине. Благодаря ней из операционной системы, которая установлена в VirtualBox можно выходить в интернет, производить обмен данными между основной машиной и виртуальной;
- Добавляет поддержку видеодрайверов. Благодаря этому вы можете менять разрешение экрана, на установленной виртуальной системе, проверять производительность программ, требующих наличие графических драйверов и т.д;
- Более удобная интеграция курсора мыши между операционными системами. Например, теперь не нужно нажимать дополнительные кнопки, чтобы курсор переместился из виртуальной системы, что стоит в VirtualBox, в вашу основную;
- Синхронизация времени между основной операционной системой и виртуальной;
- Возможность автоматического входа в виртуальную систему.
Монтирование образа VirtulBox Guest Additions
По умолчанию все пакеты этого дополнения уже внесены в VirtualBox, поэтому нет смысла скачивать что-либо дополнительно с официального сайта разработчика. Для установки нужно только подключить уже скаченный пакет:
- Остановите уже запущенную виртуальную машину в интерфейсе VirtualBox. Для этого нажмите правой кнопкой мыши по нужной операционной системе и выберите из контекстного меню пункт «Отключить».
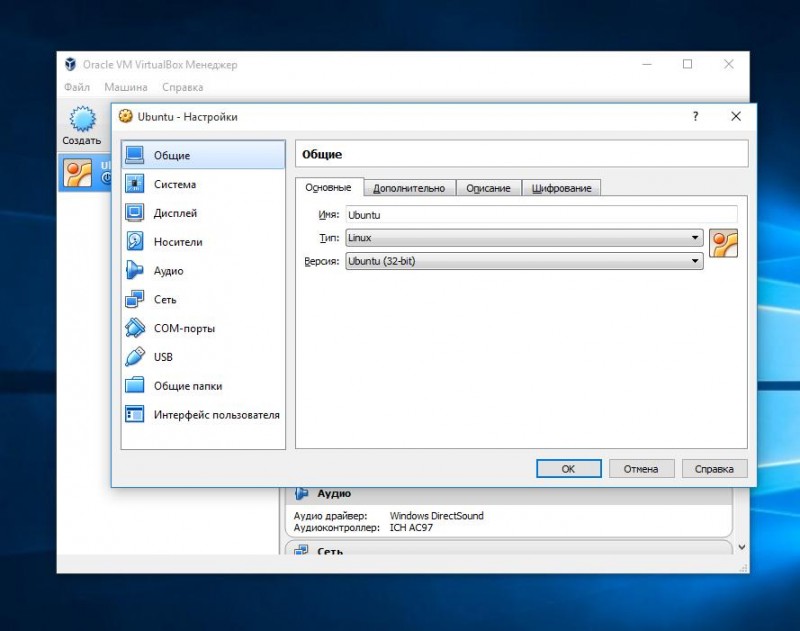
- Выберите нужную машину и нажмите на кнопку «Настройки», что расположена в верхнем меню интерфейса.
В окне «Настроек» перейдите во вкладку «Носители».
Обратите внимание на форму «Носители информации». Под «Контроллер IDE» выберите виртуальный диск.
Если в 4-м пункте вы не нашли образ виртуального диска, то нажмите на иконку диска, расположенную напротив «Привод».
В выпавшем меню нажмите «Выбрать образ оптического диска».
Откроется окно стандартного «Проводника» Windows, где вам придётся выбрать образ. В данном случае нужно перейти в корневую папку VirtualBox и найти там элемент с наименованием «VBoxGuestAdditions.iso».
Когда образ отобразится в «Контроллер IDE» перейдите к запуску виртуальной машины.
Теперь нужно перейти в папку «Компьютер», если в качестве виртуальной машины выступает ОС Windows. Под «Устройства со съёмными носителями» должен отобразится смонтированный образ.
В качестве альтернативы этой инструкции можно воспользоваться ещё этой, но при этом виртуальная машина должна быть запущена и полностью работоспособна:
- В интерфейсе запущенной виртуальной машины нажмите на пункт «Устройства».
- Откроется контекстное меню, где нужно нажать по «Подключить образ диска дополнительной гостевой ОС…».
Подключение займёт некоторое время. После перейдите в папку «Компьютер» и обратите внимание на «Устройства со съёмными носителями». Там должен быть образ.
Установка из образа
Процесс установки выглядит следующим образом:
- Откройте смонтированный образ.
- Здесь запустите файл установщика. Всего их три: универсальный, для 64-битных систем и 32-битных систем. Последние два имеют соответствующие приписки в наименовании файла.
Откроется окно с приветствием. Здесь нужно просто нажать «Next».
Следующее окно предлагает выбрать место для установки. Здесь можно оставить всё по умолчанию. Для перехода на следующий шаг нажмите «Next».
Рекомендуется снять галочку напротив пункта «Direct 3D Support», так как установка этого драйвера возможна только в «Безопасном режиме».
Начнётся установка, в ходе которой может несколько раз появится окно, где вас просят дать соглашение на установку. Везде жмите на «Установить».
Когда завершится установка «Guest Additions» установите маркер напротив пункта «Reboot now» и нажмите на «Finish».
В установки дополнения VirtualBox Guest Additions нет ничего сложного, особенно, если у вас есть опыт взаимодействия с виртуальными машинами.
Установка гостевых дополнений из Virtual Box Manager
В случае, если гостевые дополнения не будут собраны, нам, возможно, придется установить заголовки ядра Linux (см. Как установить файлы заголовков ядра?) Или build-essential инструменты в дополнение. Также рекомендуется иметь ДКМС установлен (см. ниже — Примечание 4). Вы можете запустить эту команду в терминале, чтобы установить оба:
При выборе Устройства -> Установить гостевые дополнения (или нажмите Host + D в диспетчере виртуальных ящиков) компакт-диск гостевых дополнений.iso будет загружен, но не установлен в гостевой ОС. Для установки нам нужно запустить скрипт установщика как пользователь root или из запроса автозапуска (см. ниже).
GNOME Shell
Для установки гостевых дополнений у нас будет значок компакт-диска на рабочем столе, как только будет смонтирован виртуальный привод:
Следующий шаг — запустить скрипт autorun.sh (с правами root) на этом смонтированном компакт-диске, открыв диск и нажав кнопку «Запустить программное обеспечение». Это соберет и установит необходимые модули ядра vbox.
Единство
Гостевые дополнения монтируются как виртуальный компакт-диск, видимый на панели запуска:
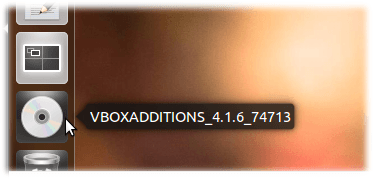
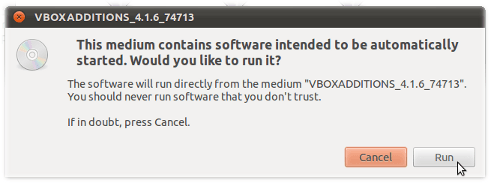
Если система настроена на автозапуск компакт-диска, она должна просто открыть следующее диалоговое окно автозапуска (если не выбрать символ компакт-диска, выберите «Открыть», затем выберите » Открыть запрос автозапуска»).
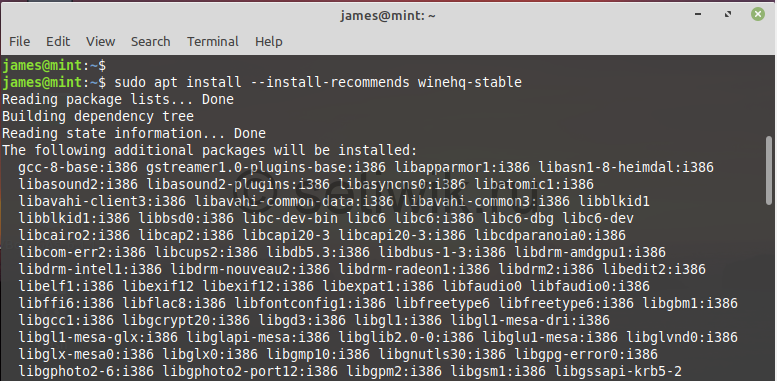
После ввода ваших учетных данных для root-доступа гостевые дополнения будут создаваться, как видно из вывода терминала:
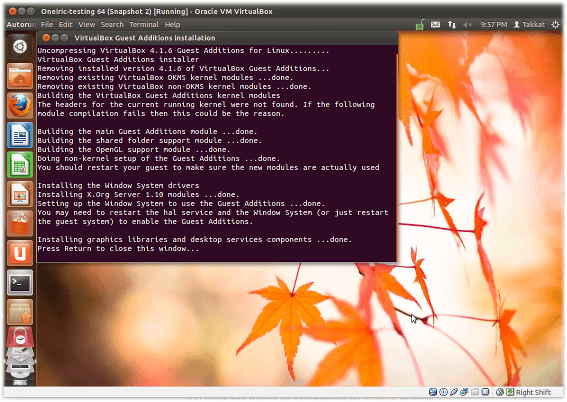
Нажмите Return, чтобы закрыть терминал.
What Are Guest Additions in VirtualBox?
The VirtualBox Guest Additions are extra pieces of software, included with your copy of VirtualBox, that enable better performance and functionality in virtual machines. You install Guest Additions inside the virtual machine to activate this functionality.
As you probably know, VirtualBox is a hypervisor, which allows you to create and use virtual machines. This means that you can install Windows and other operating systems inside VirtualBox and have them think that they’re running on actual hardware.
Read our full guide to using VirtualBox to get up to speed if you’re not familiar.
However, just because you get a working virtual machine running in VirtualBox doesn’t mean the experience is perfect from the start. There are certain elements of running an OS in an app window that are frustrating.
For example, on your main computer, Windows knows what resolutions it can display using the drivers from your graphics card. A virtual machine can’t do this, though, so it displays in a low resolution (such as 800×600) by default.
The Guest Additions of VirtualBox contain display drivers and other useful tools that make your virtual machine much more usable.
Using VirtualBox Guest Addition features
Here are some screenshots for enabling/using helpful features of VirtualBox Guest Additions in use:
Configure Drag And Drop (any files)
You can enable drag and drop from the top menu -> Devices ->Drag and Drop -> Bidirectional.
With Bidirectional, you can drag and drop from guest to host and from host to guest, both.
Drag and Drop
Similarly, you can enable shared clipboard from the top menu -> Devices -> Shared Clipboard -> Bidirectional.
Shared Clipboard
Uninstalling VirtualBox Guest Additions (if you don’t want to use it anymore)
Navigate to the CD image and open it in terminal (Right Click inside directory > Open in Terminal):
Open in Terminal
Now enter:
However, in some cases you might have to do some more cleanup. Use the command:
Note: Replace VBoxGuestAdditions-version with the right version (you can hit tab to autocomplete; in my case it is VBoxGuestAdditions-6.0.4).
How to Install VirtualBox Guest Additions on Windows Guest
The procedure is straightforward. You need to boot into your guest. Then go to VirtualBox menu. Click the option of “Install Guest Additions” under Devices.
This action will pop up a wizard in your guest window. Follow it through. Now reboot and enjoy.
Once you have restarted, look for the VirtualBox icon in the system tray. It’s all smooth sailing.
How to Install Guest Additions on Ubuntu VirtualBox
The procedure for installing Guest Additions on Linux guest is again very simple. You need to repeat the first step for Ubuntu as well for mounting VirtualBox Guest Additions ISO in the form of CD ROM drive in the virtual machine.
You will see a file manager window popping up, depending on the configuration of your guest, showing all the available options. It will also show the options for including Guest Additions for 32-bit and 64-bit systems, creating similar versions for Windows and Ubuntu. It may even include Solaris considering the fact the VirtualBox is owned by Sun. The system will automatically mount CD ROMs and will run the browsers/managers.
You need to choose the right package for your hardware architecture for example x86. Open a terminal window and run the script with root privileges.
“sudo sh ./<script-relevant-for-your-architecture>”
Now wait for some time till the completion of installation. Now reboot.
This completes the procedure.
Some Problems with Installing Guest Additions for VirtualBox
In general, whenever the users click the option of “Install Guest Additions”, Guest Additions ISO is supposed to be mounted by the VirtualBox. There are plenty of methods to rectify the situation.
First of all, if you don’t find the Guest Additions, VirtualBox may prompt you to access internet and then download the ISO file. This might be required to be done only once. You can also download the image by yourself and then mount manually as a CD ROM, under the Settings for the selected virtual machine.
The next time you run the virtual machine, the Guest Additions should be mounted as a virtual CD ROM. To install the Guest Additions on Windows, you need to double-click the executable. For Linux, you have to run the scripts as mentioned above.
,
It must be kept in mind that the installation of Guest Additions is even easier than VMware tools. The procedure is fast, simple and convenient. Only a little amount of playing with the commands is involved.
Non-Issues[edit]
If the following message appears during a kernel upgrade, it is a non-issue.
/etc/kernel/postinst.d/vboxadd:
VirtualBox Guest Additions: Building the modules for kernel 5.6.0-0.bpo.2-amd64.
Failed to rename process, ignoring: Operation not permitted
update-initramfs terminated by signal TERM.
Footnotesedit
- Host -> Whonix-Gateway clipboard sharing enable by default?
-
https://forums.whonix.org/t/security-risks-of-virtualbox-shared-folders/10119
-
To learn more about VirtualBox shared folders, see: .
-
Admittedly, this recommendation does not have a strong rationale. Disabling additional features in other virtualizers or general applications will similarly lead to less code paths being utilized and arguably increasing security. VirtualBox software is not special in this regard.
- Because otherwise you cannot change VirtualBox VM settings.
- Using /lib/systemd/system/mnt-shared-vbox.service .
-
If the option is unavailable, upgrade VirtualBox.
-
Alternatively folder can be chosen. The VirtualBox default means that folder would be owned by owner and group .
-
This is specific to the VirtualBox version; newer versions do not have this option anymore.
Check if this setting should persist after restart of the virtual machine. Otherwise this setting will be temporary. -
This step is required. Quote :
-
Installation of VirtualBox guest additions from CD might also cause issues.
- http://www.webcitation.org/6HqJVN0br
- https://www.whonix.org/w/index.php?title=Ga&action=edit
Whonix is Supported by Evolution Host DDoS
Protected VPS. Stay private and get your VPS with Bitcoin or Monero.
Search engines: YaCy | Qwant | ecosia | MetaGer | peekier | Whonix Wiki
Follow:
Support:
Donate:
Please help us to improve the Whonix Wikipedia Page. Also see the feedback thread.
This is a wiki. Want to improve this page? Help is welcome and volunteer contributions are happily considered! Read, understand and agree to , then Edit! Edits are held for moderation. Policy of Whonix Website and Whonix Chat and Policy On Nonfreedom Software applies.
Copyright (C) 2012 — 2021 ENCRYPTED SUPPORT LP. Whonix is a trademark. Whonix is a licensee of the Open Invention Network . Unless otherwise noted, the content of this page is copyrighted and licensed under the same Freedom Software as Whonix itself. (Why?)
The personal opinions of moderators or contributors to the Whonix project do not represent the project as a whole.
Whonix is a derivative of and not affiliated with Debian . Debian is a registered trademark owned by Software in the Public Interest, Inc .
Whonix is produced independently from the Tor anonymity software and carries no guarantee from The Tor Project about quality, suitability or anything else.
By using our website, you acknowledge that you have read, understood and agreed to our Privacy Policy, Cookie Policy, Terms of Service, and E-Sign Consent. Whonix is provided by ENCRYPTED SUPPORT LP. See Imprint, Contact.
Поддерживаемые операционный системы:
Windows:
- Windows XP SP3 (32-bit и 64-bit)
- Windows Vista SP1 и выше (32-bit и 64-bit).
- Windows Server 2008 (64-bit)
- Windows Server 2008 R2 (64-bit)
- Windows 7 (32-bit и 64-bit)
- Windows 8 (32-bit и 64-bit)
- Windows 8.1 (32-bit и 64-bit)
- Windows 10 RTM build 10240 (32-bit и 64-bit)
- Windows 10 RTM build 10586 (32-bit и 64-bit)
- Windows Server 2012 (64-bit)
- Windows Server 2012 R2 (64-bit)
Mac OS X (64-bit):
- 10.8 (Mountain Lion)
- 10.9 (Mavericks)
- 10.10 (Yosemite)
- 10.11 (El Capitan)
Linux (32-bit и 64-bit):
- Ubuntu 10.04 до 15.04
- Debian GNU/Linux 6.0 («Squeeze») и 8.0 («Jessie»)
- Oracle Enterprise Linux 5, Oracle Linux 6 и 7
- Redhat Enterprise Linux 5, 6 и 7
- Fedora Core / Fedora 6 до 22
- Gentoo Linux
- openSUSE 11.4, 12.1, 12.2, 13.1
- Mandriva 2011
Solaris hosts (64-bit):
- Solaris 11
- Solaris 10 (U10 и выше
Гостевые дополнения VirtualBox
Для улучшения работы с виртуальной машиной, и взаимодействия с ней, в виртуально установленной операционной системе нужно установить специальный набор инструментов, который называется «Гостевые дополнения» («Guest Additions»). Данный набор инструментов выпускается для следующих операционных систем:
- Windows (начиная с Windows NT 4.0, и заканчивая Windows 10);
- Linux (официально поддерживаются Oracle Linux, Fedora, Red Hat Enterprise Linux, SUSE (в том числе openSUSE), Ubuntu);
- Oracle Solaris;
- OS/2.
Для установки гостевых дополнений VirtualBox необходимо выполнить следующие действия:
- Включаем виртуальную машину и ждем загрузки ОС.
- В верхнем меню VirtualBox выбираем пункт «Устройства — Подключить образ диска Дополнений гостевой ОС…».
Дальнейшие действия зависят от того, какая операционная система установлена в VirtualBox:
Windows
- Если в системе не отключен автозапуск, то должен запуститься установщик дополнений гостевой ОС. Если же в системе выключен автозапуск, нужно запустить установщик вручную, найдя его на подключившемся диске в виртуальной машине, под именем VBoxWindowsAdditions.exe.
- Как и установка самого VirtualBox, установка гостевых дополнений максимально упрощена, и по сути представляет из себя нажатие кнопок «Next». С первым окном именно так и следует поступить.
- На следующем будет предложено выбрать место для установки гостевых дополнений. По умолчанию, рассматривается обычная для всех программ директория Program Files.
- Последним шагом, перед непосредственно самой установкой, будет выбор устанавливаемых компонентов:
- VirtualBox Guest Additions — собственно, сами гостевые дополнения VirtualBox;
- Start menu entries — ярлыки в меню «Пуск».
- Direct3D Support — третий компонент, который не выбран по умолчанию, является экспериментальной функцией по включению полноценного 3D ускорения в виртуальной машине. Для «простой» работы он не нужен.
- После нажатия на кнопку «Next» начнется установка гостевых дополнений, во время которой может появится окно с запросом на разрешения установки программного обеспечения для устройства (драйвер), которую необходимо одобрить.
- После установки дополнений потребуется перезагрузка компьютера, которую можно выполнить сразу (оставив отмеченным пункт «Reboot now»), или выполнив её позже самостоятельно (для этого нужно отметить пункт «I want to manually reboot later»).
- После перезагрузки произойдет множество полезных изменений — появится поддержка двухстороннего буфера обмена (о том, как его включить можно прочитать здесь), функция drag-n-drop между основной операционной системой и операционной системой в виртуальной машине, автоматический выбор разрешения экрана на основе размера окна VirtualBox и т. д.
Linux
В операционных системах семейства Linux, графический установщик гостевых дополнений отсутствует, вся установка происходит через терминал. Современные дистрибутивы прекрасно сами распознают файл автозапуска на образе с гостевыми дополнениями, и предлагают его запустить автоматически.
Можно так же запустить файл установки гостевых дополнений вручную. Для этого, нужно открыть терминал, и перейти в каталог, куда смонтирован виртуальный образ с файлами установки дополнений. Там же, нужно выполнить команду запуска файла установки:
После выполнения данной команды, начнется установка гостевых дополнений Linux, по завершению которой, понадобится перезагрузка системы.
Now you can also share files between host and guest OS via the shared folder feature. Go to the virtual machine settings. In the left pane, select . Then click on the button to add a shared folder.
- In the field, select a folder on your host OS.
- Tick on the checkbox so that the shared folder will be automatically mounted to the guest OS when virtual machine boots up.
- In the Mount-point field, enter a path on the guest OS, such as a sub-directory in your user’s home directory.
- Tick on the checkbox.
After saving the settings, you will find the shared folder appears in your home directory in the Linux Mint virtual machine, but only the root user and members of the vboxsf group have read and write access to this shared folder. So what we need to now is add your user to vboxsf group. Open up a terminal in Linux Mint and run the following command. Replace username with your real username.
sudo adduser username vboxsf
Log out of the current session and log back in. Now you should be able to access the shared folder.
Introduction[edit]
In Whonix , VirtualBox guest additions are installed by default.
To avoid any issues with the guest additions, users are highly recommended to:
- Use the Recommended VirtualBox Version for use with Whonix .
- Leave installation of the recommended version of VirtualBox guest additions to Whonix as dcoumented and to avoid manual installation. This documentation will be updated as required. Check back later in case you have issues.
VirtualBox guest additions from package installation helper by Whonix developers ( ) will keep guest additions updated when Whonix is updated.
There might be a few odd messages during updates which are actually . Unless actual functionality is broken, please do not ask about odd messages as per .
In case of issues, see also VirtualBox troubleshooting and consider a bug report.
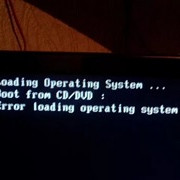
Почему не удаётся подключить виртуальный оптический диск в VirtualBox
Как известно, «VirtualBox» от «Oracle» является программным продуктом для осуществления виртуализации операционных систем. Он позволяет создать на вашем ПК виртуальную машину, установить виртуальную операционную систему и удобно переключаться между действующей и виртуальной ОС. Последняя может понадобиться главным образом для тестинга различных программных инструментов, которые нельзя выполнить на основной операционной системе.
Создав такую виртуальную машину, вам может понадобиться подключить к ней диск с дополнениями — VirtualBox Guest Additions. Последний существенно расширяет возможности гостевой операционной системы по взаимодействию с хост-системой и системой виртуализации. При попытке подключения диска вы можете получить ошибку «Не удалось подключить виртуальный оптический диск» и предложение принудительно подключить такой диск. При нажатии на «Желаю» каких-либо изменений не происходит.
Причины дисфункции можно свести к следующему:
- В виртуальном приводе уже установлен какой-то образ;
- Ваша версия VB устарела;
- Вы работаете на системе Mac OS X и установили «Ubuntu» как гостевую операционную систему;
- Вы пробует добавить guest additions, которые не соответствуют установленной на ПК версии VirtualBox (не идут в комплекте с программой);
Давайте разберёмся, как исправить ошибку подключения виртуального оптического диска в вашем VirtualBox.
Uninstall virtualbox-guest-additions-iso[edit]
This is discouraged and should not be required. However, if you wish to uninstall VirtualBox guest additions as installed by by Whonix developers, follow the steps below.
-
Purge package . This will result in by Whonix developers in future doing effectively nothing.
sudo apt purge virtualbox-guest-additions-iso
sudo apt purge virtualbox-guest-additions-iso
-
Remove VirtualBox guest additions (previously installed by Whonix from . Run VirtualBox guest additions uninstaller by VirtualBox developers.
sudo /usr/sbin/vbox-uninstall-guest-additions
sudo /usr/sbin/vbox-uninstall-guest-additions
Guest Additions Make VirtualBox Even Better
As we’ve seen, the Guest Additions make running virtual machines with VirtualBox much smoother. You should always take a few moments to install the Guest Additions when setting up a new VM, as there’s no drawback to doing so.
If VirtualBox isn’t working for you, check out how VirtualBox compares to other virtualization tools.
Need to Buy Microsoft Office? Here’s How to Get a Huge Discount
Looking for deep discounts on Microsoft Office? In this article, we’ll show you where to get the cheapest price on Microsoft Office.
Read Next
About The Author
Ben Stegner
(1703 Articles Published)
Ben is a Deputy Editor and the Onboarding Manager at MakeUseOf. He left his IT job to write full-time in 2016 and has never looked back. He’s been covering tech tutorials, video game recommendations, and more as a professional writer for over seven years.
More
From Ben Stegner