Изучаем sublime text 3: плагины для веб-разработчиков
Содержание:
Installation
Note with either method, you may need to restart Sublime Text for the plugin to load properly.
Package Control
Installation through package control is recommended. It will handle updating your packages as they become available. To install, do the following.
- In the Command Palette, enter
- Search for
Manual
Clone or copy this repository into the packages directory. Ensure it is placed in a folder named . By default, the Packages directories for Sublime Text 2 are located at:
- OS X: ~/Library/Application Support/Sublime Text 2/Packages/
- Windows: %APPDATA%/Roaming/Sublime Text 2/Packages/
- Linux: ~/.config/sublime-text-2/Packages/
By default, the Packages directories for Sublime Text 3 are located at:
- OS X: ~/Library/Application Support/Sublime Text 3/Packages/
- Windows: %APPDATA%/Roaming/Sublime Text 3/Packages/
- Linux: ~/.config/sublime-text-3/Packages/
Using Dropbox
Dropbox is another popular choice for syncing settings. It has the benefit
of automatically syncing files and not having to worry about privacy. In
order to use this properly, symlinks must be set up via the command line.
The following instructions should provide some guidance.
Windows
These instructions work for Windows Vista and newer, but unfortunately do
not work for Windows XP. If your Dropbox folder is not in the default
location, you’ll need to change to
your location.
- Close Sublime Text
- Open PowerShell by right-clicking and selecting Run as administrator
First Machine
On your first machine, use the following instructions.
cd "$env:appdata\Sublime Text 3\Packages\"
mkdir $env:userprofile\Dropbox\Sublime
mv User $env:userprofile\Dropbox\Sublime\
cmd /c mklink /D User $env:userprofile\Dropbox\Sublime\User
cd "$env:appdata\Sublime Text 2\Packages\"
mkdir $env:userprofile\Dropbox\Sublime
mv User $env:userprofile\Dropbox\Sublime\
cmd /c mklink /D User $env:userprofile\Dropbox\Sublime\User
Other Machine(s)
On your other machine(s), use the following instructions. These
instructions will remove your User/ folder and all contents!
cd "$env:appdata\Sublime Text 3\Packages\"
rmdir -recurse User
cmd /c mklink /D User $env:userprofile\Dropbox\Sublime\User
cd "$env:appdata\Sublime Text 2\Packages\"
rmdir -recurse User
cmd /c mklink /D User $env:userprofile\Dropbox\Sublime\User
Mac
If your Dropbox folder is not in the default location, you’ll need to
change to your location.
- Close Sublime Text
- Open Terminal
First Machine
On your first machine, use the following instructions.
cd ~/Library/Application\ Support/Sublime\ Text\ 3/Packages/
mkdir ~/Dropbox/Sublime
mv User ~/Dropbox/Sublime/
ln -s ~/Dropbox/Sublime/User
cd ~/Library/Application\ Support/Sublime\ Text\ 2/Packages/
mkdir ~/Dropbox/Sublime
mv User ~/Dropbox/Sublime/
ln -s ~/Dropbox/Sublime/User
Other Machine(s)
On your other machine(s), use the following instructions. These
instructions will remove your User/ folder and all contents!
cd ~/Library/Application\ Support/Sublime\ Text\ 3/Packages/
rm -r User
ln -s ~/Dropbox/Sublime/User
cd ~/Library/Application\ Support/Sublime\ Text\ 2/Packages/
rm -r User
ln -s ~/Dropbox/Sublime/User
Linux
If your Dropbox folder is not in the default location, you’ll need to
change to your location.
- Close Sublime Text
- Open Terminal
First Machine
On your first machine, use the following instructions.
cd ~/.config/sublime-text-3/Packages/
mkdir ~/Dropbox/Sublime
mv User ~/Dropbox/Sublime/
ln -s ~/Dropbox/Sublime/User
cd ~/.config/sublime-text-2/Packages/
mkdir ~/Dropbox/Sublime
mv User ~/Dropbox/Sublime/
ln -s ~/Dropbox/Sublime/User
Other Machine(s)
On your other machine(s), use the following instructions. These
instructions will remove your User/ folder and all contents!
cd ~/.config/sublime-text-3/Packages/
rm -r User
ln -s ~/Dropbox/Sublime/User
cd ~/.config/sublime-text-2/Packages/
rm -r User
ln -s ~/Dropbox/Sublime/User
Formatter-specific notes
Following are notes specific to individual formatters that you should be aware of:
PHP
PHP — Used phpF by @subins2000
Getting and installing PHP — http://www.php.net/manual/en/install.general.php
You must install 5.6 or above ()
On Linux/OSx after installation of package, you must set chmod +x to file fmt.phar in folder %PACKAGESDIR%/CodeFormatter/codeformatter/lib/phpbeautifier
You can list all available transformations from Command Palette: CodeFormatter: Show PHP Transformations
Examples of many transformations can be found here: PHP Transformation Examples
Language specific options:
“js
«codeformatter_php_options”:
{
“syntaxes”: “php”, // Syntax names which must process PHP formatter
“php_path”: “”, // Path for PHP executable, e.g. “/usr/lib/php” or “C:/Program Files/PHP/php.exe”. If empty, uses command “php” from system environments
“format_on_save”: false, // Format on save. Either a boolean (true/false) or a string regexp tested on filename. Example : “(?!.min.|vendor.)*$”
“psr1”: false, // Activate PSR1 style
“psr1_naming”: false, // Activate PSR1 style — Section 3 and 4.3 — Class and method names case
“psr2”: true, // Activate PSR2 style
“indent_with_space”: 4, // Use spaces instead of tabs for indentation
“enable_auto_align”: true, // Enable auto align of = and =>
“visibility_order”: true, // Fixes visibility order for method in classes — PSR-2 4.2
“smart_linebreak_after_curly”: true, // Convert multistatement blocks into multiline blocks
// Enable specific transformations. Example:
    // You can list all available transformations from command palette: CodeFormatter: Show PHP Transformations
    // You can also see examples of many transformations at https://github.com/akalongman/sublimetext-codeformatter/blob/master/PHP-Transformations.md
    "passes": [],

    // Disable specific transformations
    "excludes": []
}
### Javascript/JSON
Javascript/JSON - used  (http://jsbeautifier.org/) by Einar Lielmanis

Language specific options:
```js
    "codeformatter_js_options":
    {
        "syntaxes": "javascript,json", // Syntax names which must process JS formatter
        "format_on_save": false, // Format on save. Either a boolean (true/false) or a string regexp tested on filename. Example : "^((?!.min.|vendor).)*$"
        "indent_size": 4, // indentation size
        "indent_char": " ", // Indent character
        "indent_with_tabs": false, // Indent with one tab (overrides indent_size and indent_char options)
        "eol": "\n", // EOL symbol
        "preserve_newlines": false, // whether existing line breaks should be preserved,
        "max_preserve_newlines": 10, // maximum number of line breaks to be preserved in one chunk
        "space_in_paren": false, // Add padding spaces within paren, ie. f( a, b )
        "space_in_empty_paren": false, // Add padding spaces within paren if parent empty, ie. f(  )
        "e4x": false, // Pass E4X xml literals through untouched
        "jslint_happy": false, // if true, then jslint-stricter mode is enforced. Example function () vs function()
        "brace_style": "collapse", // "collapse" | "expand" | "end-expand". put braces on the same line as control statements (default), or put braces on own line (Allman / ANSI style), or just put end braces on own line.
        "keep_array_indentation": false, // keep array indentation.
        "keep_function_indentation": false, // keep function indentation.
        "eval_code": false, // eval code
        "unescape_strings": false, // Decode printable characters encoded in xNN notation
        "wrap_line_length": 0, // Wrap lines at next opportunity after N characters
        "break_chained_methods": false, // Break chained method calls across subsequent lines
        "end_with_newline": false, // Add new line at end of file
        "comma_first": false // Add comma first
    }
HTML
HTML — used custom python port, please use it with caution, feature in early beta
Language specific options:
“js
«codeformatter_html_options”:
{
“syntaxes”: “html,asp,xml”, // Syntax names which must process HTML formatter
“format_on_save”: false, // Format on save. Either a boolean (true/false) or a string regexp tested on filename. Example : “(?!.min.|vendor.)*$”
“indent_size”: 4, // indentation size
“indent_char”: “ ”, // Indentation character
“indent_with_tabs”: false, // Indent with one tab (overrides indent_size and indent_char options)
“exception_on_tag_mismatch”: false, // If the last closing tag is not at the same indentation level as the first opening tag, there’s probably a tag mismatch in the file
“expand_javascript”: false, // Expand JavaScript inside of
Installation
Download or clone the contents of this repository to a folder named exactly as the package name into the Packages/ folder of ST.
Troubleshooting Installation:
- First please note this package only adds a context menu to the “Folders” section and not to the “Open Files” section.
- Open the package folder. Main menu -> Preferences -> Browse Packages.
- Close Sublime Text.
- Remove the folder “Packages/SideBarEnhancements”
- Remove the folder “User/SideBarEnhancements”
- Navigate one folder up, to “Installed Packages/”, check for any instance of SideBarEnhancements and remove it.
- Open ST, with Package Control go to : Remove Package, check for any instance of SideBarEnhancements and remove it.
- Restart ST
- Open ST, check if there is any entry about SideBarEnhancements in Package Control(in sections: “Remove Package” and just in case in “Enable Package”)
- Repeat until you find there no entry about SideBarEnhancements
- Restart ST
- Install it.
- It works
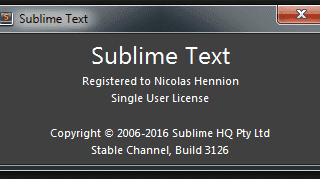
Активация Sublime Text 3
Чтобы активировать Сублайн текст 3 откройте текстовый документ License Key, скопируйте из него один из ключей, далее запустите Сублайн и перейдите во вкладку «Справка» («Help«) — «Ввести лицензию» («Enter license«) вставляем ключ и жмем «Use License»
Установка Emmet на sublime text 3 и добавление в него Package Control.
Запускаем редактор и нажимаем Ctrl+ или «Вид» — «Показать/скрыть консоль» («View» — «Show console«), после чего снизу откроется панелька для ввода, вставьте в нее нижеприведенный код, нажмите «Enter«, немного подождите и перезапустите редактор.
import urllib.request,os,hashlib; h = 'df21e130d211cfc94d9b0905775a7c0f' + '1e3d39e33b79698005270310898eea76'; pf = 'Package Control.sublime-package'; ipp = sublime.installed_packages_path(); urllib.request.install_opener( urllib.request.build_opener( urllib.request.ProxyHandler()) ); by = urllib.request.urlopen( 'http://packagecontrol.io/' + pf.replace(' ', '%20')).read(); dh = hashlib.sha256(by).hexdigest(); print('Error validating download (got %s instead of %s), please try manual install' % (dh, h)) if dh != h else open(os.path.join( ipp, pf), 'wb' ).write(by)
Теперь заходим во вкладку «Опции» — «Package Control» или нажимаем сочетание клавиш «Ctrl» + «Shift» + «P«, после чего всплывет окошко в котором выбираем «Install Package» (если не ошибаюсь 6 строка).
После чего всплывет еще окошко, в котором необходимо ввести «Emmet«, появится масса предложений, нажимаем на первое (где просто Emmet).
Ждем немного, пока не откроется вкладка с содержимым, что Эммет успешно установлен, закрываем все вкладки и перезапускаем редактор. Все можно пользоваться!
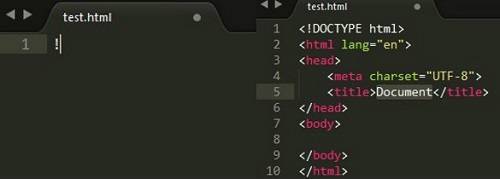
В трех словах, о том, как работает Эммет
Приведу несколько примеров для Emmet. Допустим нам нужно базовый каркас веб-страницы на html5, для этого достаточно ввести «!» и нажать «Tab».
Чтобы быстро построить к примеру блок с классом col-sm-6, необходимо ввести «.col-sm-6» и нажать «Tab», получим «<div class=»col-sm-6″></div>»
Для того чтобы построить вот такую конструкцию:
<div class="row">
	<div class="col-md-3">Lorem ipsum dolor sit amet, consectetur adipisicing elit. Nesciunt natus quidem qui, obcaecati dolorem optio nulla voluptates suscipit eligendi laboriosam quisquam odio provident facilis laudantium. Non, tempora mollitia consequuntur laborum!</div>
	<div class="col-md-3">Incidunt fugiat beatae non voluptatum at iste inventore obcaecati rem tenetur officiis reprehenderit soluta, magnam est consequatur accusantium, fuga aperiam nesciunt exercitationem dignissimos aut, ut. Voluptatibus id explicabo, suscipit porro.</div>
	<div class="col-md-3">Iste magni, nam id a, maxime incidunt aperiam hic, aliquid suscipit aspernatur maiores quaerat sequi asperiores perferendis eum delectus consectetur sint excepturi laboriosam, error. Ratione voluptatum similique sunt sequi maiores!</div>
	<div class="col-md-3">Officiis doloremque cumque ab quae similique totam voluptates? Molestias rerum eos dolor nulla quidem nam pariatur, quisquam reiciendis tenetur. Dolorum, at, illum! Corporis, itaque, impedit repellendus natus accusantium sit sunt.</div>
</div>
достаточно ввести вот такую небольшую строчку «.row>.col-md-3*4>lorem» и нажать «Tab«.
Как вы видите Emmet очень крутое дополнение, которое очень ускоряет процесс верстки, главное уметь правильно им пользоваться) Советую почитать документацию.
На сегодня все!
Что такое копирайтинг?
Сборка на основе Bootstrap 3 >
Features
- Familiar syntax: as a web-developer, you already know how to use Emmet. Abbreviation syntax is similar to CSS Selectors with shortcuts for id, class, custom attributes, element nesting and so on.
- Dynamic snippets: unlike default editor snippets, Emmet abbreviations are dynamic and parsed as-you-type. No need to predefine them for each project, just type to convert any word into a tag.
- CSS properties shortcuts: Emmet provides special syntax for CSS properties with embedded values. For example, will be exampled to .
- Available for most popular syntaxes: use single abbreviation to produce code for most popular syntaxes like HAML, Pug, JSX, SCSS, SASS etc.
Suppress build results panel
The built-in build results view will display momentarily. To disable this, use
the User preference setting:
{
    ...
    "show_panel_on_build": false,
    ...
}
Known Issues/TODO
- pin/unpin location, so that subsequent builds scrolls to the same location
- build view is “forgotten” after restarting Sublime
- improve disabling/enabling options (eg whitelists, blacklists)
-
improve namespacing of settings into a dictionary, once sublime supports
merging of settings dictionaries through the hierarchy. For example, if
buildview hypothetically read settings from a dictionary, and you had in your{
…
“buildview”: {
“enabled”: false,
“scroll”: “top”
}
…
}
and you then did this in the project’s file
{
       ...
       "folders":
       "settings": {
           "buildview": {
               "enabled": true
           }
       }
       ...
   }

buildview would behave as though the `"scroll"` setting was not defined
because sublime does not automatically merge settings dictionaries through
the settings hierarchy, so the `"scroll"` setting does not bubble up.
Pull requests welcome!
Hacking notes
- after editing , restart Sublime or re-save
for the changes to take effect. -
who’s view is it anyway? A variety of names are used for views in the
source code, according to their different roles:- source view: the built-in view that shows up when you click Show Build
Results - destination view: the view that mirrors the build output, the one with the
title “Build Output” - otherwise, a view should generally refer to one holding the source for the
build
- source view: the built-in view that shows up when you click Show Build
Blackd Mode
Sublack supports blackd. If option black_use_blackd is to true, Sublack will use blackd (and not black) according to the ‘host’ and ‘port’ configuration.
You can run blackd from SublimeText manually via Start Blackd Server command or automatically at SublimeText start via setting black_blackd_autostart to true.
Blackd server started via SublimeText can be stopped manually via the Stop Blackd Server command or automatically at sublime’s exit.
Unlike «standalone» blackd, using sublack with blackd will continue to take care of the pyproject file.
Using standard mode ou blackd mode in sublack should always have the same result…or it’s a bug 🙂
Blackd is faster than Black.
Diff is always run with black.
Features
Backup/Restore
This allows you to backup the installed packages list & the user settings for each package. This backup can then be restored to any other device using PackageSync.
- Backup/Restore via a Zip file (Recommended) — Backs up the installed packages list & their settings into a zip file. The zip file is the best portable format for offline syncing.
- Backup/Restore via folder — Works the same way as the zip file, with the only difference that the contents are placed in a folder instead of an archived zip file.
- Backup/Restore only Package List — Backs up only the installed packages list to a file. User settings for packages are ignored in this option.
Do note that this Backup/Restore operation only syncs your packages list and your user settings offline. But the actual installation of missing/new packages requires a working Internet connection.
Also, while restoring from PackageSync backup, please ensure that all files are closed. Files in open state would interrupt the restore operation, resulting in unforeseen errors.
Sync Online
This allows you to sync the packages & user settings in real time across different devices. For this, the installed packages list & user settings are be saved to & synced via a folder monitored by Dropbox, Google Drive or SkyDrive etc.
-
First Machine
Turn on PackageSync’s online syncing module by setting the sync folder via “PackageSync: Sync Online — Define Online Sync Folder” from the command palette or Tools menu. In the ensuing input panel, give the complete path to any directory on your computer inside your Dropbox or Google Drive sync folder. -
Second Machine (or after a fresh installation of Sublime Text)
On your second machine please wait until all the backup files are available and then simply set the sync folder and PackageSync will automatically pull all available files from that folder. The following message dialog should appear which you just have to confirm.
Restart Sublime Text & Package Control will check for missing packages and install them automatically. From now on everything should work very smoothly.
Installation
Using Sublime Package Control
:whitecheck_mark: _recommended
If you are using Sublime Package Control, you can easily install the bundle via the menu item.
Using Git
:robot: Alternatively you can install the bundle and keep up to date by cloning the repo directly into your directory in the Sublime Text application settings area.
Go to your Sublime Text directory and clone the repository using the command below:
Download Manually
:arrowdown: _not recommended – you won’t get updates! :rotating_light:
— Download the files using the GitHub .zip download option
— Unzip the files and rename the folder to ‘GDL’
— Copy the folder to your Sublime Text directory i.e.
— Windows
— OS X:
State of the Art
Below are some of the most important improvements compared to the existing
syntax highlighters:
-
Added better number highlighting:
- All types of floating point notations are working now;
- All types of complex number notations are working now;
- New types of binary and octal-number notations are supported;
- Long integer is removed.
- The syntax notation of is supported now.
- Declaration rules are extended with .
- Ex-statements-now-functions (like ) are updated.
- New Exception highlighting added.
- New keywords and added.
- Function annotations are now supported.
- Conventional-language variable added.
-
Optional-comment-based string highlighting:
- Better regex support (multiline, grouping, comments and more are improved).
- Format specifier mini-language
- Template strings
- Matrix multiplication operator
-
String and byte literals:
- Byte notation added;
- Proper string prefixes added.
- All the unused built-in and magic functions/methods are now removed.
- All the unused keywords and notations are now removed.
Usage
NOTE: In Windows or Linux use ctrl instead of ⌘
☐ ⌘ + enter or ⌘ + i: new task
☐ ⌘ + d: toggle task as completed.
☐ ctrl + c: toggle task as cancelled on Mac. alt + c on Windows/Linux.
☐ ⌘ + shift + a will archive the done tasks, by removing them from your list and appending them to the bottom of the file under Archive project
☐ ⌘ + shift + o will archive in Org-Mode style, removing the entire subtree after cursor and appending it to new file next to original one, e.g. if original is then new would be
☐ ⌘ + shift + u will open the url under the cursor in your default browser, other than http(s) schemes must be enclosed within , e.g.
☐ Anything with colon at the end of the line is a project title, you can also nest projects by indenting them.
☐ You can write plain text as notes or descriptions wherever you want. Use or for italic and bold just like in Markdown.
☐ You can add tags using sign
You can place cursors on tags, click right mouse button and Filter by tags under cursors:
pending tasks with selected tags will remain visible (and their notes and projects they belong to), but everything else will be hidden/folded; to unfold all press ⌘+k, ⌘+j or ⌘+k, ⌘+0
☐ You can navigate tags in current document via ⌘+shift+r.
☐ PlainTasks comes with a simple snippet for creating separators, if you feel that your task list is becoming too long you can split it into several sections (and fold some of them) using this snippet:
and then tab will give you this:
☐ Completion rules (ctrl+space or alt+/ to see list of them):
- type , press tab — it’ll become — this one is highlighted differently than other tags;
- , tab — ;
- , tab — ;
- , tab — ;
- , tab — — press tab again and current date will be inserted, when you’ll complete or cancel a task with such tag, you’ll know how many time has passed since start; if you have to change done/cancelled/started time, then you can recalculate the time spent on task by pressing tab while cursor is placed on a tag;
- , tab, tab work in the same manner as , but inserts — so you can pause and resume to get more correct result when done/cancel; each toggle tag is either pause or resume depending on its place in sequence;
- , tab, tab — (⌘ + shift + enter creates a new task with this tag);
-
, tab —
If you press tab again, it’ll insert current date, same for .
You can type short date (similar to OrgMode’s date prompt, but not the same) and then press tab to expand it into default format.
Short date should be ___
Dot can be used instead of hyphen, but should be consistent _-
year, month, minute, hour can be omitted:
Notation Meaning 1st day of next month always 1st day of current month always 5th day of current month (or next month if current day is 5th or older) February 3rd of current year or next one 31st day of current/next month at 23 hours and minutes are equal to current moment January 1st of 2016 at 01:01 -
relative period of time starts with a plus sign or two
____ — number is optional as well as letter for days or letter for weeks.Notation Meaning tomorrow as well as or one week since current date, i.e. 3 weeks since current date, i.e. one day since if any, otherwise it is equal to two hours since current date 555 minutes since current date 2 days and 12 hours since current date
-
☐ You can create a link to a file within your project by prefixing the file name with a dot and (back)slash like: or .
The line and column can be specified by colons: .
In SublimeText 3 you can specify a symbol inside that file by using > character like: .
In SublimeText 2 you can specify a text inside that file by using inch characters like: .
Pressing ctrl + o (alt + o on Windows/Linux) will open the file in Sublime and scroll to specific position if any.
Also in SublimeText 3 link may point to directory, open such link will add the directory to current project (sidebar).
In addition, Markdown and “wiki” (Org-Mode, NV, etc.) styles are supported as well, examples:
[](path)
[](path ":11:8")
[](path ">symbol")
[](path "any text")
`path`
]
]
]
`path` ":11:8"
`path` ">symbol"
`path` "any text"
☐ To convert current document to HTML, bring up the command palette ⌘ + shift + p and type — it will be opened in default webbrowser, so you can view and save it. ask if you want to save and if yes, allow to choose directory and filename (but won’t open it in webbrowser).
Editor Useful Tools:
☐ Use ⌘ + control + up/down (ctrl + shift + up/down on Windows) to move tasks up and down.
☐ Use ⌘ + r to see a list of projects and quickly jump between them
★ See the Tutorial for more detailed information.