Конвертация диска из mbr в gpt и наоборот
Содержание:
- The differences between MBR and GPT disks
- Как преобразовать из MBR в GPT через командную строку
- Преобразование в MBR при установке Windows через командную строку
- Method 3. MBR to GPT Conversion using DiskPart
- Solution 2. Convert GPT to MBR with Windows Disk Management
- Использование сторонних программ
- Подготовительный этап
- How to convert a disk from MBR to GPT with DiskPart?
- Convert MBR to GPT During Windows Installation FAQ
- MBR против GPT
- Преобразование с сохранением данных
- Convert MBR to GPT
- FAQs About MBR to GPT Conversion
- Method 1. How to Convert MBR to GPT Using EaseUS Partition Master
- Установка Win7 с GPT-диск с имеющейся разметкой
- GPT VS. MBR
- Tip 1. Convert MBR to GPT Without Data Loss in Windows 10/8.1/8/7
- Как преобразовывать MBR и GPT в Windows 10?
The differences between MBR and GPT disks
There are two different ways of storing the partitioning information on a hard drive, called MBR (Master Boot Record) and GPT (GUID Partition Table). So what’s the difference between MBR and GPT disks and why do you need to convert MBR to GPT?
MBR, the master boot record disk, uses the standard BIOS partition table and supports up to 2 TB per single partition in Windows operating systems. It only supports up to 4 primary partitions, so If you want to create more partitions on an MBR disk, you have to change one of the primary partitions into an extended partition. With an extended partition you can create up to 128 logical drives, therefore, extending your limit beyond 4 partitions. GPT, the GUID partition table disk, uses EFI instead of BIOS, and its volume limit is bigger than MBR disks so you can use it on drives with more than 2TB disk space and create a theoretically unlimited number of partitions. Unfortunately, it can only support Windows 64bit systems from Windows Vista onwards. You can still use GPT disks in 32-bit versions of Windows XP, 2003, 2000, etc.
Note: Removable flash drives are the exception as they are recognized as MBR by default and can’t be converted to GPT.
Generally speaking, GPT disks have better performance than MBR, so, many users currently want to convert their master boot record (MBR) disk into GUID partition table (GPT) disk. If you want to know more about difference between MBR and GPT please read the linked article.
Как преобразовать из MBR в GPT через командную строку
Во время установки Windows на компьютер, в окне выбора диска для установки операционной системы появляется сообщение об ошибке: «Невозможно установить Windows в раздел Х диска Х. (Показать подробности)».
Для просмотра сообщения откройте окно, в котором вы увидите запись: «Установка Windows на данный диск невозможна. На выбранном диске находится таблица MBR-разделов. В системе EFI Windows можно установить только на GPT-диск».

В окне установки Windows нажмите на клавиши клавиатуры «Shift» + «F10» (на некоторых моделях ноутбуков может быт «Shift» + «Fn» + «F10»).
В окне командной строки запустите утилиту Diskpart, которая предназначена для работы с дисками. Последовательно вводите команды, после ввода каждой команды нажимайте на клавишу «Enter».
Diskpart
В окне консоли введите команду для отображения списка всех дисков на компьютере:
List disk
Теперь необходимо выбрать номер диска. Если на компьютере несколько жестких дисков, смотрите на размер диска, чтобы отличить диски друг от друга.
Select disk X (X — номер диска)
Введите команду для очистки диска от содержимого. После выполнения команды, все данные и разделы на диске будут удалены.
Затем введите команду для преобразования диска в стиль разделов GPT:
Convert gpt
Для выхода из приложения Diskpart введите последнюю команду:
Закройте командную строку.
На жестком диске проведена конвертация из MBR в стиль GPT.
Обновите окно установки Windows. В окне для выбора диска появится незанятое пространство. Нажмите на кнопку «Далее». Программа установки Windows самостоятельно создаст необходимые разделы, а затем продолжится установка операционной системы.
Преобразование в MBR при установке Windows через командную строку
Windows система
Важная информация! При конвертации форматов вся информация с жесткого диска будет стерта.
Старый формат GPT на новый, MBR, можно изменить, воспользовавшись стандартным средством — командной строкой. Для конвертации выполните следующие шесть действий:
Действие 1Когда вы устанавливаете операционную систему и выбираете разделы (не обязательно в этом месте), вызовите командную строку комбинацией клавиш: Shift + F10
. Если операционная система уже установлена, командная строка может быть запущена от имени администратора.
Действие 2Выполните две команды: первая — diskpart
, вторая — list disk
. Эти команды покажут все физические диски, которые подключены к этому компьютеру.
Действие 3Выполните команду select disk N
(вместо N впишите номер конвертируемого диска).
Действие 4Это действие можно выполнить двумя методами. Первый метод: выполните команду clean
(все данные на диске будут полностью удалены, и тома тоже). Второй метод заключается в том, что разделы можно удалять не целиком, а по отдельности. Этот метод занимает время. Если вам спешить некуда, выполните следующие команды поочередно: detail disk
, select volume
, delete volume
.
Действие 5Команда convert mbr
запустит конвертацию формата.
Действие 6Чтобы выйти из Diskpart, введите Exit
. Когда командная строка закроется, установка операционной системы продолжится, но уже без уведомлений об ошибках. А для создания разделов выберите «Настройку диска».

Method 3. MBR to GPT Conversion using DiskPart
Applies to: Convert data disk MBR to GPT using DiskPart command, cleaning partitions is a must-to-do step.
As MBR to GPT conversion using DiskPart requries to clean up the whole disk, remember to back up your disk data first. And then follow the steps below to convert your MBR disk to GPT:
Step 1. Click the «Start» button and type cmd.
Step 2. Right-click «Command Prompt» and choose «Run as administrator».
Step 3. Type diskpart and hit Enter.
When you see a dialog box asking you for permission, click «Yes».
Step 4. Enter the following commands one by one and hit Enter each time:
- list disk
- select disk 2 (Replace 2 with the disk number of your MBR disk.)
- clean
- convert gpt
DiskPart will delete all the partitions on your disk and then convert it to GPT during the process.
Step 5. Type exit when the conversion process completes.
After this, you can use the new GPT disk to create partitions, install new UEFI system, etc. withou out any obstacles.
Tip: If you forgot to back up files and want to undo the clean command, EaseUS partition recovery software can retrieve your partitions and files.
Solution 2. Convert GPT to MBR with Windows Disk Management
Before you convert a disk, back up important data to an external hard drive and close any programs that are accessing the disk. Also, you must have an administrator privilege to do this in Windows. Disk Management is installed by default and it’s available on your Windows 10/8.1/8/7/XP/Vista computer.
Step 1. Open Disk Management as an admin by navigating to Control Panel > System and Security > Administrative Tools. Click Computer Management to open a new window.
Step 2. Under Storage, select Disk Management.
Step 3. To convert a disk from GPT to MBR here, you need to delete every volume. Right-click on a volume and select Delete Volume. Do this for all partitions.
Step 4. After deleting all partitions on the GPT disk, right-click on the disk and select Convert to MBR Disk.
After you convert GPT disk to MBR disk, you can create partitions on the now MBR disk if you like.
Использование сторонних программ
Оба приведённых выше способа имеют один существенный недостаток, а именно неизбежную потерю сохранённых на диске данных. К счастью, существуют программы, позволяющие производить конвертацию диска GPT в MBR без потери данных. Из коммерческого ПО наиболее известными являются приложения Acronis Disk Director и Paragon Hard Disk Manager Professional, среди бесплатных – AOMEI Partition Assistant Standard Edition. Последовательность действий во всех этих программах примерно одна и та же.
В случае работы с несистемными физическими дисками достаточно выделить носитель мышкой и выбрать в меню опцию преобразования диска из GPT в MBR, причем всё это в работающей Windows.
Переделать диск из GPT в MBR можно также с помощью созданных в этих программах загрузочных носителей. Их преимуществом является возможность конвертирования стиля разметки на ПК с одним физическим диском, так как для выполнения операции программе необходим монопольный доступ к нему.
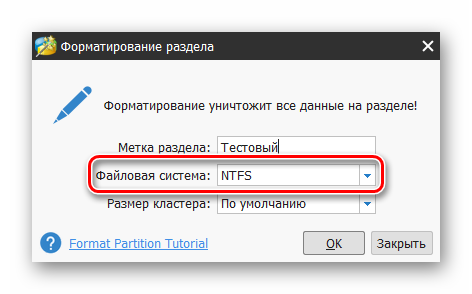
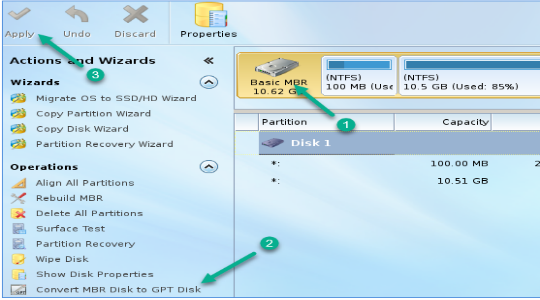
Рассмотрим для примера как преобразовать GPT в MBR без потери данных с помощью загрузочного диска AOMEI Partition Assistant. После того, как компьютер будет с него загружен, выделите нужный диск и выберите в меню слева «Преобразовать в MBR».
В открывшемся диалоговом окошке подтвердите операцию и нажмите в левом верхнем углу кнопку «Применить».
Затем в новом диалоговом окне выберите Перейти – Да.
Разметка будет изменена.
А теперь немного внимания. Рассмотренные нами способы изменения GPT на MBR с помощью сторонних инструментов применимы по большей части к несистемным дискам. Если вы без должной подготовки сконвертируете GPT-диск с установленной операционной системой, она может перестать загружаться.
Подготовительный этап
Прежде чем приступить к процессу конвертирования, необходимо проверить кое-какие моменты и подготовить рабочие инструменты. Нужно:
- Убедиться, что BIOS действительно поддерживает интерфейс UEFI;
- Записать загрузочную флешку UEFI с установочным процессом 64-битных Windows 7, 8.1 и 10 (делается с помощью программы Rufus или утилиты для скачивания дистрибутива версий системы 8.1 и 10 Media Creation Tool);
- Сохранить важные данные текущей Windows, в частности, файлы в папках пользовательского профиля, экспортировать настройки значимых программ, извлечь лицензионные ключи и проделать прочие действия, как перед обычным процессом переустановки операционной системы;
- Скачать с официального сайта и установить на компьютер (в текущую Windows на MBR-диске) программу AOMEI Partition Assistant , с помощью которой и будет осуществлен процесс конвертирования жесткого диска из MBR в GPT. Программу можно скачать в бесплатной редакции Standard Edition, она в числе прочего функционала предусматривает возможность преобразования стилей разделов диска.
How to convert a disk from MBR to GPT with DiskPart?
Windows Disk Management is a built-in tool that provides users with a way to convert disks to GPT within the Windows operating system. If you would prefer to use command prompt to convert the disks, then the DiskPart utility will be able to assist you. It should be noted that both the Disk Management tool and the DiskPart utility can only convert an empty MBR disk to GPT (and vice versa). To convert a disk from MBR to GPT using command prompt (cmd), you can follow the steps below:
Before you do, here are some helpful tips: Backup the MBR disk that you want to convert in order to keep the data safe.
You can only convert basic MBR disks without any partitions or volumes into a GPT disk. If there are partitions or volumes, then you need to backup the data, and then delete all partitions or volumes before converting between MBR and GPT.
If you want to convert from MBR to GPT disk during the Windows installation, you should open command prompt by pressing Shift + F10.
Step 1. Click Start, type «cmd», and right-click it, select «Run as Administrator», or press «WIN+R», type «cmd» and press Enter to open Command Prompt. Then, enter «diskpart» to run the utility.
Step 2. Type «list volume» to find out if there are any partitions or volumes on the MBR disk you want to convert to GPT. If there are, you need to use diskpart delete partition first.
Then, type «list disk», and press Enter, it will show you all the disks on your computer. Make note of the disk number that you want to convert to a GPT disk. Here we will take disk 1 as our example.
Step 3. Type «select disk 1», press «Enter», it will remind you that the disk 1 is selected.
Step 4. Type “clean” and press “Enter” to remove all the partitions and volumes on the selected disk. This will erase all data on the selected disk.
Step 5. Type «convert gpt», press «Enter» to begin the operation. After a few moments, you will find that Command Prompt says DiskPart successfully converted the selected disk to the GPT format. Please have a look at the below screenshot.
If you want to convert a GPT disk to MBR, you can also use the following diskpart convert mbr commands.
Convert MBR to GPT During Windows Installation FAQ
How do I convert MBR to GPT after installing Windows?
To convert MBR to GPT after installing Windows, you can try the following 3 tools.
- Use MiniTool Partition Wizard. You can complete this conversion by following the tutorial in the part ‘Convert MBR to GPT via MiniTool Partition Wizard’ in this post. This will not cause data loss.
- Use Disk Management or Diskpart. Both two tools require you delete all the partitions on the hard drive and then convert it from MBR to GPT. Therefore, it is highly recommended that you try MiniTool Partition Wizard.
Can Windows 10 install on MBR partition?
Certainly, you can install Windows 10 on MBR partition. Windows 10 supports two installation methods:
- The system can be installed on the hard disk of MBR partition table when the boot record method is set to Legacy in BIOS.
- The system can be installed on the hard disk of GPT partition table when the boot record method is set to UEFI in BIOS.
To know the layout of the MBR and GPT partition tables, you can read What Are the Two Different Methods for Partitioning Hard Drives.
How do I change partition style from GPT to MBR?
To convert partition style from GPT to MBR, you can also try the following three tools.
- Use MiniTool Partition Wizard without data loss during the conversion. Click here to get the detailed tutorial.
- Use Disk Management or Diskpart with data loss during the conversion.
Should I use GPT or MBR?
To ensure which partition style you should use, please take the following principles into consideration.
- hard disk capacity: use GPT if the disk space is more than 2TB.
- boot recode method: use MBR if your computer only supports the Legacy mode.
- partition numbers: use GPT if you create more primary partitions (more than 4).
MBR против GPT
Прежде всего, рассмотрим различия между MBR и GPT, и почему некоторые системы используют одну, а другие вторую.
MBR
MBR является более старым и поэтому совместим с более широким спектром систем. MBR был разработан для ПК IBM, и был основным выбором таблицы разделов для машин Windows. Основная загрузочная запись берет свое имя из своего местоположения в начале диска, содержащего загрузчик для операционной системы и информацию о разделах дисков. MBR работает только с дисками размером до 2 ТБ. Диск MBR может иметь только четыре основных раздела. Это было хорошо, когда 2 ТБ были редкостью, но теперь вы можете взять 8-терабайтный диск.
GPT
GPT является более новым. GPT тесно связан с UEFI (графический bios) модернизирующим старую альтернативу BIOS. Таблица разделов GUID присваивает каждому разделу на вашем диске глобально уникальный идентификатор (GUID), который является 128-битным номером для идентификации только вашего оборудования. С правильными настройками диск GPT на 256 ТБ будет работать нормально. В системе Windows, жесткие диски GPT могут иметь до 128 различных разделов без использования расширенного раздела. Еще одно существенное отличие заключается в том, что накопители GPT хранят загрузочные данные. В отличие от диска MBR, GPT-диск хранит несколько копий загрузочных данных на нескольких разделах, что значительно облегчает восстановление системы.
Совместимость
Не все версии Windows могут загружаться с диска GPT, причем многие из них требуют систему на основе UEFI (новый bios).
- Для 64-разрядных версий Windows 10, 8 / 8.1, 7 и Vista требуется, чтобы на платформе GPT загружалась система на основе UEFI (новый bios).
- Для 32-разрядных Windows 10 и 8 / 8.1 требуется, чтобы система на основе UEFI загружалась с диска GPT.
- 32-разрядная версия Windows 7 и Vista не могут загружаться с диска GPT.
Другие операционные системы также используют системы GPT. Например, Apple использует GPT, а не таблицу Apple Partition Table (APT). Кроме того, Linux имеет встроенную поддержку GPT-накопителей.
Преобразование с сохранением данных
Единственный доступный способ, который может быть использован, чтобы не пришлось удалять всё – это программные средства. По большей части приложения являются платными, что также накладывает неприятный отпечаток, но существует несколько бесплатных решений. Одной из лучших программ такого характера является MiniTool Partition Wizard. Она обладает полным функционалом и ничего не стоит.
Использование утилиты может происходить на двух уровнях: в формате LiveCD и стандартный способ с Windows. Никаких особых отличий в обычном использовании и с флешки нет, поэтому рассмотрим более удобный вариант. Для выполнения процедуры вам необходимо иметь флешку и доступ к интернету с компьютера.
Итак, конвертируем GPT в MBR:
- Загрузите программу;
- При помощи любой программы для записи LiveCD, монтируем её. К примеру можно использовать UltraISO, где в разделе «Самозагрузка» выбрать «Монтировать образ HDD» и перезапускаем компьютер;
- В процессе запуска, обычно, когда появляется БИОС окно, нажмите F Здесь нужно указать запуск с носителя или изменить приоритет в БИОС – UEFI;
- В главном окне приложения выделите логический диск, который нужно конвертировать;
- Затем клик по элементу меню «Convert GPT Disk to MBR Disk» и «Apply»;
Возможно, для выполнения действия прежде потребуется удалить элемент «Зарезервировано системой», но только, если вызываются ошибки. Также, если появились какие-либо затруднения с использованием приложения, можете воспользоваться аналогичным — Aomei Partition Assistant. Оно также бесплатно и функционально, а интерфейс довольно понятен.
Таким образом изменится стиль разделов и можно смело установить Windows 7 или выполнить другую интересующую процедуру, при этом сохраняя данные.
Convert MBR to GPT
One of the main challenges that we face while converting MBR to GPT is that conversion is possible from MBR to GPT, only if there are no partitions or volumes present in the disk – which makes it impossible to convert without data loss. I still don’t know why Microsoft hasn’t offered a simpler solution to this problem.
Luckily there are some of these solutions that will help you in converting MBR to GPT, without data loss.
- Convert MBR to GPT using Diskpart
- Convert MBR to GPT without data loss using Gptgen
- Convert MBR to GPT without losing data using a third-party freeware
- Use MBR2GPT Disk Conversion Tool.
Before you start, it is in any case, always a good idea to BACK UP YOUR DATA first to a safe place.
1. Convert MBR to GPT using Diskpart
Backup all your data and then use the DISKPART command.
- Open command prompt and type in DISKPART and press Enter
- Then type in list disk (Note down the number of the disk that you want to convert to GPT)
- Then type in select disk number of disk
- Finally, type in convert gpt.
2. Convert MBR to GPT without data loss using Gptgen
You can convert MBR to GPT without losing data – using a command-line utility called gptgen.
Gptgen is a tool designed to non-destructively convert hard disks partitioned in the common, “MSDOS-style” MBR scheme (including extended partitions) to use a GUID partition table (GPT).
It’s a very extensive tool but a bit complicated to run. According to the tool’s ‘read me’ file, the syntax of the tool is “gptgen \\.\physicaldriveX”,
- Here X is the drive number reported by the Disk Management console or the “list disk” command of the DISKPART utility.
- The -w switch makes gptgen write the generated GUID partition tables to the disk – otherwise, the primary table will be written to a file named “primary.img“, and the secondary table to “secondary.img“, in the directory that the program was invoked from.
- You can then use dd to write the tables to the disk.
3. Convert MBR to GPT without losing data using Partition Assistant
The last method is using a tool called AOMEI Partition Assistant Lite Edition. It’s a free multifunction partition management software. This tool’s feature can help you convert a disk with data into GPT or MBR style without data loss.
NOTE: It appears that now the free version of Partition Assistant does not allow converting MBR to GPT.
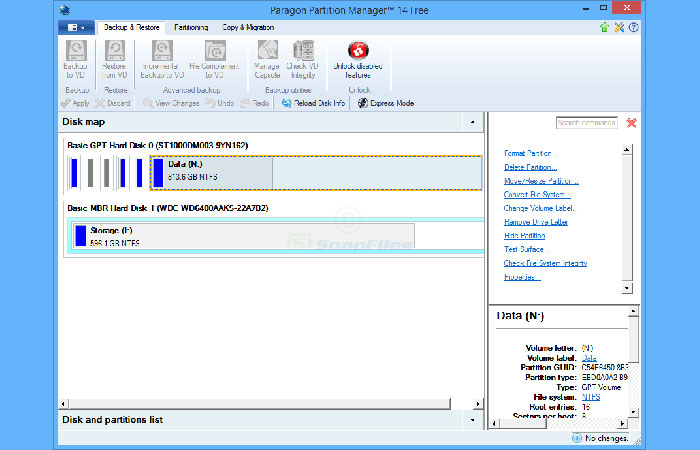
To convert a disk to MBR/GPT disk:
- Select the disk to convert;
- Right-click the disk and select Convert to GPT/MBR Disk;
- Confirm your operation, by clicking “OK” to continue;
- Click Apply button on the toolbar to commit the changes.
4] Use MBR2GPT Disk Conversion Tool
To convert MBR to GPT using the built-in MBR2GPT.exe tool:
Boot into Advanced Startup Options screen > Troubleshoot > Advanced options > Command Prompt.
Execute the following command to validate that the drive meets the requirements:
mbr2gpt /validate
Execute the following command to convert the drive from MBR to GPT:
mbr2gpt /convert
Restart your computer.
Do note that MBR2GPT can only be used from the Windows Preinstallation Environment. To use it from your Desktop, you have to use /allowFullOS to override.
Read more about the new MBR2GPT Disk Conversion Tool in Windows 10. Using this built-in tool, you can safely and non-destructively convert a Windows 10 computer from legacy BIOS to UEFI disk partitioning.
This post will help you if you receive MBR2GPT disk layout validation failed, cannot find OS partition, etc. errors.
If you know of any other method to safely convert MBR to GPT, please do share it with us under the comments session.
FAQs About MBR to GPT Conversion
Read on and check the answer to your question here now:
1. Is GPT or MBR better?
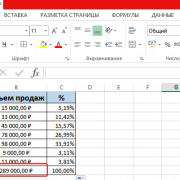
Here is a comparison table of MBR vs. GPT, from which you will learn which partition style you should use for your disk:
MBR vs. GPT, Which Is Better?
| Comparison | MBR (Master Boot Record) | GPT (GUID Partition Table) |
|---|---|---|
| Maximum Partitions | 4 Partitions. | 128 Partitions. |
| Maximum Disk Capacity | 2TB (for 512B sector), 16TB (for 4Kn sector) | No disk capacity limit (2^64 logical blocks for 512B or 4Kn sector) |
| Boot Mode | BIOS | UEFI |
Conclusion: GPT Disk Exceeds MBR Disk in Many Aspects
According to the comparison table, it’s clear that the GPT disk exceeds MBR disk in the many aspects, for example:
- Faster Boot Speed: GPT UEFI can load the operating system faster than traditional MBR BIOS boot mode.
- Better Operating System Compatibility: GPT has better OS compatibility than MBR as it supports most operating systems, including Windows Server and macOS.
- Advanced Data Protection: GPT contains the backup of the primary GPT header and partition entries that protects data on the disk better.
In a word, if you need to install the latest operating system on your disk with a fast boot speed, GPT is better. GPT supports UEFI boot mode which loads the operating system faster than the traditional BIOS mode on MBR disk.
2. Should My SSD be MBR or GPT?
According to the MBR vs. GPT comparison table at the beginning of this page, we have reasons to believe that GPT is more suitable for an SSD disk.
GPT supports more than four primary partitions on SSD. It supports more than 2TB storage (compare to MBR). Also, it is more compatible with the newer UEFI-based systems.
3. What Happend If I Convert MBR to GPT?
Basically, when you convert MBR to GPT is highly based on which method you would like to use for MBR to GPT conversion.
If you use EaseUS Partition Master as recommended in on this page, you’ll see that only the partition style changes. Your data and partitions are all the same as before.
However, if you used Windows Disk Management or DiskPart to change MBR to GPT disk for free, three things will happen to your disk:
- 1. Data loss;
- 2. Partition loss;
- 3. Partition style change: from MBR to GPT.
Method 1. How to Convert MBR to GPT Using EaseUS Partition Master
Applies to: Converting both data and OS drive from MBR to GPT without data loss nor Windows reinstallation.
Reliable disk conversion tool — EaseUS Partition Master enables you to convert your disk from MBR to GPT directly in only a few clicks. It exceeds both Disk Management and DiskPart in the following two aspects:
- Keep All Partitions: EaseUS Partition Master doesn’t delete any partitions for disk conversion.
- No Data Loss: EaseUS Partition Master keeps all data safely stored on the disk while converting it from MBR to GPT, or vice versa.
- Notice:
- To convert a boot disk to GPT (the disk contains your system), make sure the motherboard supports the UEFI boot mode.
- Otherwise, you will encounter boot failure on your computer after MBR to GPT conversion.
Steps to Convert MBR to GPT Without Data Loss:
Step 1. Download and launch EaseUS Partition Master on your Windows computer.
Step 2. Right-click the MBR disk that you want to convert and choose «Convert to GPT».
Step 3. After that, find and click the «Execute 1 Operation» button on the toolbar and choose «Apply» to start the conversion.
Optional Steps: Enable UEFI Mode After Convert System Boot Disk to GPT
If you converted a Windows system disk to GPT, remember to enable the UEFI boot mode on your computer to make the OS bootable. Here are the steps:
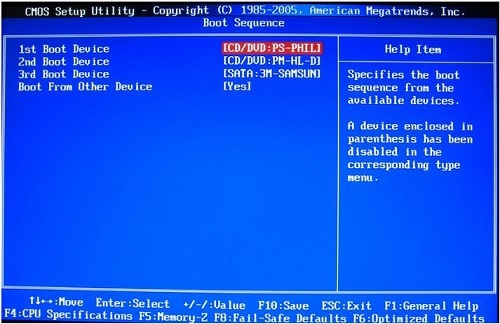
Step 1. Restart PC and press F2, F8, F12, Del to enter the BIOS boot menu.
Step 2. Locate the boot options menu and enable the UEFI mode.
- Set Launch CSM to Enabled. If CSM is set to Disabled, you can skip to Step 4 below
- Set Boot Device Control to UEFI Only
- Set Boot from Storage Devices to UEFI driver first
Step 3. Set the USB UEFI OS Boot option is at the top of the Boot Priority List.
Step 4. Save the changes and exit BIOS, reboot PC from the GPT disk.
After this, wait patiently. Your computer will automatically reboot from the GPT disk by then.
- Important
- Note that both Method 2 and Method 3 only work to change a data disk to GPT. If it’s a boot disk, you may encounter OS boot failure error.
- Also, the below two methods require you to delete all partitions on your disk. If you have useful files on the disk, back them up in advance.
- For quick and free backup software, EaseUS Todo Backup is fast and effective to help.
Установка Win7 с GPT-диск с имеющейся разметкой
Установка «Семёрки» на рабочий GPT-диск — с существующей разметкой, с техразделами EFI-систем (если до этого стояли уже Win8.1 или Win10), с данными на других разделах – будет проходить гораздо проще. Здесь нам нужно запустить программу WinNTSetup и, как и в предыдущем случае, указать:
• Путь к WIM-образу, • Путь к EFI-разделу; • Путь к будущему диску С; • Редакцию Win7, если дистрибутив предусматривает их несколько.
Где взять EFI-раздел? В предыдущем случае с помощью Bootice создался раздел с меткой ESP. Но Windows 8.1 и 10 при обычной установке создают техразделы по-другому. Это может быть схема с двумя разделами – EFI и MSR. А может быть с тремя – EFI, MSR и WRE. При любом раскладе нас интересует только раздел EFI, что с файловой системой FAT32.
Именно его нужно указывать во второй графе WinNTSetup.
Указанные программе WinNTSetup разделы форматируем. Для первого EFI-раздела это нужно, чтобы в загрузчике не болтались записи о несуществующих ОС. По итогу кликаем «Установить».
Задаём параметры загрузчика и в конце запускаем установку.
GPT VS. MBR
GPT (GUID Partition Table) disks use unified extensible firmware interface (UEFI).
GPT can make use of a very large space that is more than 2TB limit of MBR disks. GPT
disks allow an almost unlimited number of partitions. Each GPT partition has a
unique identification GUID and a partition content type. And you can have more primary partitions.
MBR (Master Boot Record) disks use the standard BIOS partition table. MBR disks do
not support more than four primary partitions on each disk. The MBR partition method is not recommended for disks larger than 2 terabytes. If partition size surpasses
2TB, the surpassed part cannot be used.
Tip 1. Convert MBR to GPT Without Data Loss in Windows 10/8.1/8/7
The partition tool — EaseUS Partition Master perfectly meets your demands of changing MBR to GPT without data loss. Whether you want to convert MBR to GPT or convert GPT to MBR, you can apply this software to get it done without deleting the volumes on your disk.
Whether you’re a computer novice or an expert, you can easily apply this tool to simply change MBR to GPT without losing any data in Windows 10/8/7 now. To convert GPT to MBR vice versa, check the specific tutorial.
Step 1. Download and launch EaseUS Partition Master on your Windows computer.
Step 2. Right-click the MBR disk that you want to convert and choose «Convert to GPT».
Step 3. After that, find and click the «Execute 1 Operation» button on the toolbar and choose «Apply» to start the conversion.
Important: There is one thing you need to pay attention to. If the disk you want to convert is the system disk, make sure the motherboard of the computer supports the boot mode of the target partition style. Remember that MBR supports BIOS and GPT supports UEFI.
Как преобразовывать MBR и GPT в Windows 10?
Для пользователей Windows 10 существует два способа преобразования MBR в GPT и обратно. Рассмотрим детально.
Управление дисками
Управление дисками (Disk Management) – это встроенный инструмент Windows 10, который даёт вам возможность изменять (создавать, удалять, увеличивать, сокращать) разделы, преобразовывать их в GPT или MBR.
Воспользуйтесь данным инструментом:
- Откройте окно кликнув «Этот компьютер» > «Управление» > «Управление дисками»;
- Правой кнопкой мышки укажите диск, который необходимо преобразовать (например, «Диск 0»). Во всплывающем окне, вы увидите неактивную функцию «Преобразовать в GPT диск».
С помощью этого инструмента можно преобразовать в MBR или GPT только если на диске нет разделов. Вам нужно удалить все разделы на Диске 0 и после этого преобразовывать MBR в GPT и обратно.
Командная строка
Командная строка – это встроенный инструмент Windows 10, который может упорядочить разделы и преобразовывать MBR в GPT. Командная строка позволяет преобразовывать MBR в GPT и обратно, только если на диске, с которым вы планируете работать нет разделов.
Итак, делаем следующее:
- Кликните «Пуск» > введите «Командная строка» в строке поиска и нажмите «Ввод», чтобы открыть окно;
- Введите «diskpart»
и нажмите «Ввод»
; - Введите «list disk» и нажмите «Ввод»;
- Введите «select disk N» и нажмите «Ввод». «N» – это номер диска, который вы хотите преобразовать (например, «Диск 0»);
- Введите «clean» и нажмите «Ввод» чтобы удалить все разделы или тома на выбранном диске;
- Введите «convert mbr» и нажмите «Ввод» чтобы завершить преобразование с GPT в MBR формат.
Оба указанных метода дают возможность преобразовать MBR диск в GPT и обратно. Но оба метода требуют удаления всех разделов с диска, и Вы находитесь под риском утери данных. Поэтому, прежде чем запустить процесс конвертации, сделайте резервную копию всех данных, которые будут удалены, а затем восстановите их.