Animation
Содержание:
- Definition and Usage
- CSS Properties
- Работа с @keyframes уровня бог:
- Более подробная работа с @keyframes:
- Создание дерева
- Flying birds
- CSS Advanced
- Creating CSS3 Animations
- transition-delay
- Squigglevision
- CSS transitions
- Анимация листьев
- CSS Reference
- CSS Properties
- CSS Reference
- CSS Properties
- 25 Cool CSS Animation Examples for Your Inspiration
- 1. Flying Birds
- 2. Morphing Cube Animation
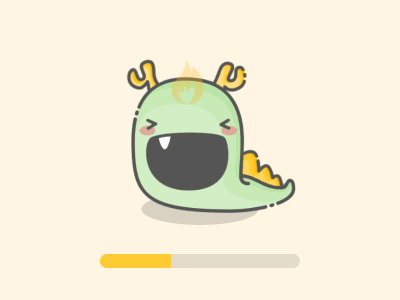
- 3. Dragon Loading Animation
- 4. Falling Snow
- 5. Poster Circle Animation
- 6. CSS3 Image Accordion
- 7. CSS3 Hover Animation
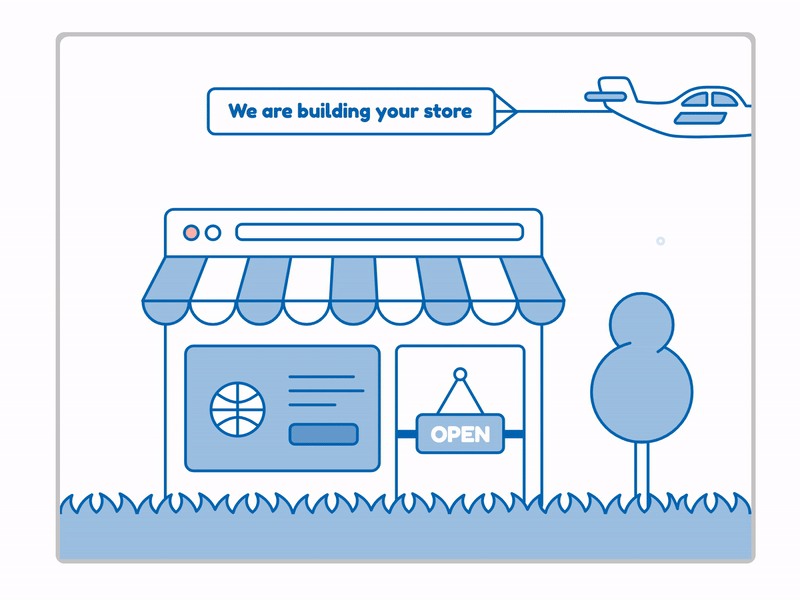
- 8. Store Loading Animation
- 9. Login Eye Animation
- 11. Responsive CSS3 Content Navigation Animation
- 12. Animated CSS Card
- 13. Perspective Split Text Menu Animation
- 14. Retro Clickable Accordion Menu
- 15. CSS Ghost Loading Animation
- Summary
- Функция плавности вывода анимируемых кадров
Definition and Usage
The rule specifies the animation code.
The animation is created by gradually changing from one set of CSS styles to another.
During the animation, you can change the set of CSS styles many times.
Specify when the style change will happen in percent, or with the keywords «from» and
«to», which is the same as 0% and 100%. 0% is the beginning of the animation, 100% is when the animation is complete.
Tip: For best browser support, you should always define both the 0% and the 100% selectors.
Note: Use the animation properties to control the appearance of the animation, and also to bind the animation to selectors.
Note: The !important rule is ignored in a keyframe (See last example on this page).
CSS Properties
align-contentalign-itemsalign-selfallanimationanimation-delayanimation-directionanimation-durationanimation-fill-modeanimation-iteration-countanimation-nameanimation-play-stateanimation-timing-functionbackface-visibilitybackgroundbackground-attachmentbackground-blend-modebackground-clipbackground-colorbackground-imagebackground-originbackground-positionbackground-repeatbackground-sizeborderborder-bottomborder-bottom-colorborder-bottom-left-radiusborder-bottom-right-radiusborder-bottom-styleborder-bottom-widthborder-collapseborder-colorborder-imageborder-image-outsetborder-image-repeatborder-image-sliceborder-image-sourceborder-image-widthborder-leftborder-left-colorborder-left-styleborder-left-widthborder-radiusborder-rightborder-right-colorborder-right-styleborder-right-widthborder-spacingborder-styleborder-topborder-top-colorborder-top-left-radiusborder-top-right-radiusborder-top-styleborder-top-widthborder-widthbottombox-decoration-breakbox-shadowbox-sizingbreak-afterbreak-beforebreak-insidecaption-sidecaret-color@charsetclearclipclip-pathcolorcolumn-countcolumn-fillcolumn-gapcolumn-rulecolumn-rule-colorcolumn-rule-stylecolumn-rule-widthcolumn-spancolumn-widthcolumnscontentcounter-incrementcounter-resetcursordirectiondisplayempty-cellsfilterflexflex-basisflex-directionflex-flowflex-growflex-shrinkflex-wrapfloatfont@font-facefont-familyfont-feature-settingsfont-kerningfont-sizefont-size-adjustfont-stretchfont-stylefont-variantfont-variant-capsfont-weightgapgridgrid-areagrid-auto-columnsgrid-auto-flowgrid-auto-rowsgrid-columngrid-column-endgrid-column-gapgrid-column-startgrid-gapgrid-rowgrid-row-endgrid-row-gapgrid-row-startgrid-templategrid-template-areasgrid-template-columnsgrid-template-rowshanging-punctuationheighthyphens@importisolationjustify-content@keyframesleftletter-spacingline-heightlist-stylelist-style-imagelist-style-positionlist-style-typemarginmargin-bottommargin-leftmargin-rightmargin-topmax-heightmax-width@mediamin-heightmin-widthmix-blend-modeobject-fitobject-positionopacityorderoutlineoutline-coloroutline-offsetoutline-styleoutline-widthoverflowoverflow-xoverflow-ypaddingpadding-bottompadding-leftpadding-rightpadding-toppage-break-afterpage-break-beforepage-break-insideperspectiveperspective-originpointer-eventspositionquotesresizerightrow-gapscroll-behaviortab-sizetable-layouttext-aligntext-align-lasttext-decorationtext-decoration-colortext-decoration-linetext-decoration-styletext-indenttext-justifytext-overflowtext-shadowtext-transformtoptransformtransform-origintransform-styletransitiontransition-delaytransition-durationtransition-propertytransition-timing-functionunicode-bidiuser-selectvertical-alignvisibilitywhite-spacewidthword-breakword-spacingword-wrapwriting-modez-index
Работа с @keyframes уровня бог:
Вот тут уже разберём кое что интересное.
Профессиональный пример работы с @keyframes:
Тут почти не чего не поминалось, а HTML вообще не поменялся.
Default
|
1 2 3 4 5 6 7 8 9 10 11 12 13 14 15 16 17 18 19 20 21 22 23 24 25 26 27 28 29 30 31 32 33 34 35 |
.square{ width100px; height100px; background-colorblue; animation-duration5s,10s; animation-iteration-countinfinite; animation-directionalternate; animation-timing-functionlinear,ease-in-out; animation-namesquareSize,squareColor; } @keyframessquareSize{ 90%{ width200px; } to{ width500px; height150px; } } @keyframessquareColor{ 25%{ background-colorred; } 75%{ background-colorblue; } to{ background-colorgreen; } } |
Разбор кода:
Вот тут всё уже по интереснее, как видите судя по свойству animation-name, мы применяем две анимации, одна отвечает за размер, вторая за цвет, задаём их через запятую.
Применять две анимации нужно для того, что бы, в разные моменты менять свойства, к примеру, как у нас, размер меняется только два раза, в 90% и к to, тогда как цвет меняется три раза, на 25%, 75% и к to.
Остальные свойства точно также задаём, первый параметр свойства будет для работать для первой анимация, второй для второй анимации, и т.д
и неважно сколько у вас этих анимаций, но если только один параметр у свойство задан, то он будет применяться для всех анимаций
Более подробная работа с @keyframes:
В этой части статьи будут только новые свойства «animation-…» и всё, новых способов работы с @keyframes не будет.
Ещё больше свойств «animation-…» для @keyframes:
- animation-direction — определяет, как должна воспроизводится анимация, вперёд, назад или переменно вперед и назад;
- animation-timing-function — это грубо говоря меняет задаёт как происходит анимация, про неё надо писать отдельно;
Теперь я показал на мой взгляд самые важные свойства, но ниже будут ещё, которые могут пригодится.
Пример более продвинутой работы с @keyframes:
Почти точно такой же блок div мы создаём и работаем с ним.
Тут только поменялся CSS.
CSS
|
1 2 3 4 5 6 7 8 9 10 11 12 13 14 15 16 17 18 19 20 21 22 |
.square { width100px; height100px; background-colorred; animation-duration10s; animation-iteration-countinfinite; animation-directionalternate; animation-timing-functionlinear; animation-namesquare2; } @keyframes square2 { 90% { background-colorblue; } to { width500px; height200px; background-colorgreen; } } |
Разбор кода:
Про код тут нечего говорить, разве что мы не используем from и добавилось два новых свойств, для настройки анимации.
Для animation-direction используется параметр alternate, который говорит, что анимация, после того как проиграется до конца, сразу же начнёт проигрываться в обратном порядке.
Для animation-timing-function используется параметр linear, который делает так, чтобы скорость анимации была равномерной, то есть не как по умолчания, сначала быстро, а потом медленно.
Больше тут не чего сказать.
Создание дерева
1. Разметка
Начнём всё же с HTML, без него никак. Нам понадобится создать простую разметку для описания будущего дерева.
Рисуют обычно на холсте, и нам он тоже понадобится, поэтому для начала создадим блок . Внутри этого блока будет находиться непосредственно дерево . У дерева будет ствол и несколько веток — элементы с классом . По сути ветви — это части ствола, и мы отразим это в разметке, сделав их дочерними элементами блока . То же самое с листьями — элементы будут вложены в родительский элемент своей ветки.
Вот так выглядит фрагмент разметки дерева с одной веткой, остальные — по аналогии:
Конечно, пока это просто несколько пустых блоков, но каркас мы уже сформировали. Двигаемся дальше.
2. Подготовка
Переходим к CSS. Для начала нужно спозиционировать наше будущее дерево на холсте. Сделаем флекс-контейнером и выровняем вложенный элемент по центру. Также определим размеры холста и зададим ему фоновый цвет.
Возможно, вы пока не знакомы с флексбоксами, но это не страшно. Сейчас мы используем их только чтобы отцентровать элемент. Если будет интересно, интерактивный курс про флексбоксы поможет разобраться в теме.
3. Рисуем ствол и ветки
Всё, теперь мы точно добрались до рисования.
И ствол, и ветки будут одинакового цвета и формы, поэтому сразу объединим все CSS-свойства, с помощью которых добьёмся нужного эффекта. Цвет зададим с помощью градиента, чтобы элементы казались менее плоскими, а ещё добавим небольшое скругление на концах веток и ствола. Так будет выглядеть код:
Чтобы элементы, наконец, отобразились, нужно задать им размеры. Ствол сделаем шириной , а ветки в два раза тоньше — по . Плюс зададим стволу высоту и выровняем его по центру. На следующем шаге мы будем распределять ветки по своим местам на стволе дерева, а для этого нужно задать стволу относительное позиционирование, а веткам — абсолютное. Это позволит задавать положение каждой конкретной ветки относительно ствола свойствами , , , и имитировать рост веток.
4. Ставим ветки на место
Пришло время нашей заготовке превратиться в то, что действительно будет похоже на дерево.
-
Для начала часть веток должна быть слева, а другая — справа. Мы будем выбирать нужные ветки с помощью селектора — для чётных элементов и — для нечётный, а затем вращать их с помощью свойства и функции на 60 градусов влево и вправо.
Здесь есть одна тонкость. По умолчанию элемент вращается относительно своего центра, а это не то поведение, которое нам нужно от веток. Они должны вращаться относительно нижней точки элемента — места прикрепления к стволу. И есть хорошая новость — мы можем переопределить поведение по умолчанию, используя свойство с подходящим значением, тогда ветки будут вращаться относительно своей нижней точки, а не вокруг центра. Добавим элементу нужное свойство в дополнение к уже существующим:
Чтобы лучше понять, как работает свойство , посмотрите эту демку.
-
Теперь нам нужно учесть, что ветки расположены несколькими ярусами, и их длина становится тем меньше, чем ближе к верхушке дерева они растут. Укажем для каждой ветки расстояние от верхушки и её длину. Ниже фрагмент кода для первых трёх веток, а дальше зададим значения для остальных веток по аналогии:
5. Рисуем листья
Как видите, мы соблюдаем логику, заложенную природой — ветки выросли из ствола, а листья будут расти из веток. Листья — дочерние элементы, поэтому снова позиционируем их относительно родительского элемента .
Ещё добавили листикам размер и цвет с помощью градиента, а также закруглили края. Осталось расположить каждый ряд на своём уровне, задав свойство с соответствующими значениями. Вот код для первых двух рядов:
На этом с созданием дерева мы закончили, осталось только разместить листочки на своих местах и, наконец, добавить анимацию.
Flying birds
- Author: Steven Roberts
We start with completely straight vector lines, drawing each frame of our animation, depicting the bird in a different state of flight. We then manipulate the vector points and round the lines and edges. Finally, we put each frame into an equally sized box and place them side-by-side. Export the file as an SVG.
The HTML setup is really simple. We just need to wrap each bird in a container in order to apply multiple animations – one to make the bird fly and the other to move it across the screen.
We apply our bird SVG as the background to our bird div and choose the size we want each frame to be. We use the width to roughly calculate the new background position. The SVG has 10 cells, so we multiply our width by 10 and then alter the number slightly until it looks correct.
CSS animation has a couple of tricks you may not be aware of. We can use the animation-timing-function to show the image in steps – much like flicking through pages in a notebook to allude to animation.
Now we’ve created our fly cycle, our bird is currently flapping her wings but isn’t going anywhere. In order to move her across the screen, we create another keyframe animation. This animation will move the bird across the screen horizontally while also changing the vertical position and the scale to allow the bird to meander across more realistically.
Once we’ve created our animations, we simply need to apply them. We can create multiple copies of our bird and apply different animation times and delays.
CSS Advanced
CSS Rounded CornersCSS Border ImagesCSS BackgroundsCSS ColorsCSS Color KeywordsCSS Gradients
Linear Gradients
Radial Gradients
CSS Shadows
Shadow Effects
Box Shadow
CSS Text EffectsCSS Web FontsCSS 2D TransformsCSS 3D TransformsCSS TransitionsCSS AnimationsCSS TooltipsCSS Style ImagesCSS Image ReflectionCSS object-fitCSS object-positionCSS ButtonsCSS PaginationCSS Multiple ColumnsCSS User InterfaceCSS Variables
The var() Function
Overriding Variables
Variables and JavaScript
Variables in Media Queries
CSS Box SizingCSS Media QueriesCSS MQ ExamplesCSS Flexbox
CSS Flexbox
CSS Flex Container
CSS Flex Items
CSS Flex Responsive
Creating CSS3 Animations
In the previous chapter you’ve seen how to do simple animations like animating a property from one value to another via CSS3 transitions feature. However, the CSS3 transitions provide little control on how the animation progresses over time.
The CSS3 animations take it a step further with keyframe-based animations that allow you to specify the changes in CSS properties over time as a set of keyframes, like flash animations. Creating CSS animations is a two step process, as shown in the example below:
- The first step of building a CSS animation is to defining individual keyframes and naming an animation with a keyframes declaration.
- The second step is referencing the keyframes by name using the property as well as adding and other optional to control the animation’s behavior.
However, it is not necessary to define the keyframes rules before referencing or applying it. The following example will show you how to animate a box horizontally from one position to another using the CSS3 animation feature.
Example
Try this code
You must specify at least two properties and the (greater than 0), to make the animation occur. However, all the other are optional, as their default values don’t prevent an animation from happening.
Note: Not all CSS properties are animatable. In general, any CSS property that accepts values that are numbers, lengths, percentages, or colors is animatable.
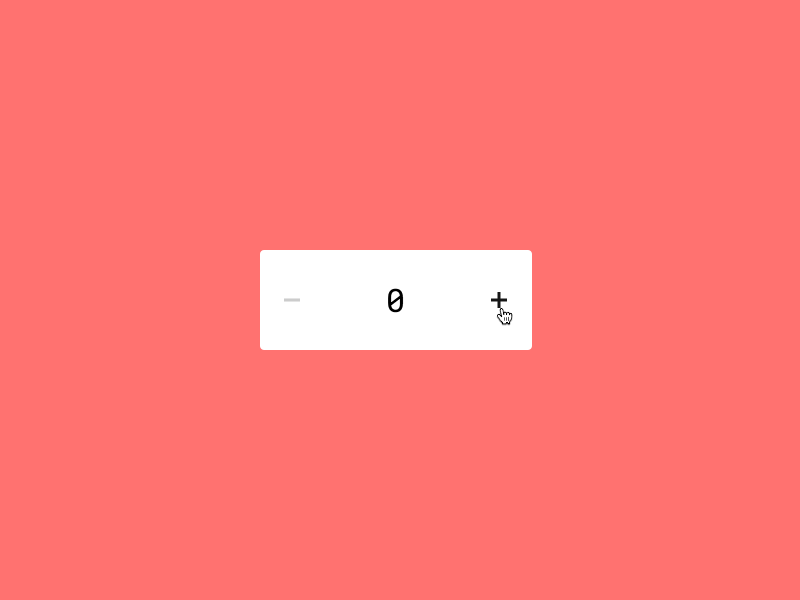
transition-delay
В можно определить задержку перед началом анимации. Например, если , тогда анимация начнётся через 1 секунду после изменения свойства.
Отрицательные значения также допустимы. В таком случае анимация начнётся с середины. Например, если равно , а – , тогда анимация займёт одну секунду и начнётся с середины.
Здесь приведён пример анимации, сдвигающей цифры от до с использованием CSS-свойства со значением :
Результат
script.js
style.css
index.html
Свойство анимируется следующим образом:
В примере выше JavaScript-код добавляет класс к элементу, после чего начинается анимация:
Можно начать анимацию «с середины», с определённого числа, например, используя отрицательное значение , соответствующие необходимому числу.
Если вы нажмёте на цифру ниже, то анимация начнётся с последней секунды:
Результат
script.js
style.css
index.html
JavaScript делает это с помощью нескольких строк кода:
Squigglevision
SVG filters provide a great way to achieve a natural, hand-drawn feel and escape some of the flat-feeling rendering constraints of CSS alone. Animating them can further enhance the effect.
Case in point: Squigglevision. Yeah, this isn’t a technical term known to most animators, but you’ve surely seen it employed in cartoons. The idea is that the edges of these animated elements are not only somewhat jagged and rough-hewn, but these rough edges quickly variate, frame by frame, making them feel as though they’ve been ripped from the pages of a sketchbook and brought to life.
To achieve this effect, we can include an SVG on our page with multiple filters and slight variations in turbulence levels for each. Next, we’ll set up our animation timeline, calling each filter in its own keyframe. It’s important to play with the timing durations as we anticipate the animation will feel ‘jumpy’ but don’t want it so slow as to feel disjointed or so fast as to feel crazy.
To that end, it’s important to note that CSS lacks the ability to smoothly transition between SVG filters as there is no way to access properties such as turbulence and scale, so these types of animations should always be expected to be choppy.
CSS transitions
The idea of CSS transitions is simple. We describe a property and how its changes should be animated. When the property changes, the browser paints the animation.
That is, all we need is to change the property, and the fluid transition will be done by the browser.
For instance, the CSS below animates changes of for 3 seconds:
Now if an element has class, any change of is animated during 3 seconds.
Click the button below to animate the background:
There are 4 properties to describe CSS transitions:
We’ll cover them in a moment, for now let’s note that the common property allows declaring them together in the order: , as well as animating multiple properties at once.
For instance, this button animates both and :
Now, let’s cover animation properties one by one.
Анимация листьев
1. Ключевые кадры
Давайте для начала выясним, как устроена анимация, и какие CSS-свойства нужны, чтобы её создать.
Для объявления анимации и задания ключевых кадров используется правило , после которого указывается название анимации. С помощью ключевых кадров можно задать нужное поведение для элементов на любом этапе. Кадры можно задавать в процентах: например, — это начало анимации, — её конец. Это не единственный способ — можно воспользоваться ключевыми словами и , но проценты позволяют задать любое промежуточное состояние. Код нашей анимации:
Что здесь происходит? Свойство мы уже применяли ранее, но теперь используем функцию , которая позволяет изменять масштаб элемента. В начале анимации масштаб нулевой (параметр ), а затем он должен увеличиться до обычного масштаба (параметр ). И это именно то, что нужно, чтобы имитировать плавный рост наших листьев.
2. Анимирование элементов: теория
Хорошо, мы создали анимацию, а теперь нам нужно её применить к конкретным элементам. Для этого понадобятся несколько CSS-свойств:
- — название анимации. Мы уже задавали название при создании анимации с помощью , именно его и нужно указать.
- — длительность анимации. Измеряется в секундах или миллисекундах.
- — задержка анимации. Свойство позволяет установить время между тем моментом, когда анимация была присвоена элементу, и непосредственно началом анимации.
- — состояние элемента до и после анимации. С помощью этого свойства можно контролировать, как будет себя вести элемент до начала анимации и после её завершения. У свойства есть несколько значений.
Это только некоторые свойства, которые понадобятся нам сейчас, но есть и другие. Познакомиться с остальными можно, изучив MDN или курс по анимации.
3. Анимирование элементов: практика
Теперь мы знаем что делать — нужно задать созданную ранее анимацию листочкам, и они начнут расти. Для этого укажем название анимации и её длительность.
Но для чего мы задали значение свойству ? По умолчанию после окончания анимации элементы возвращаются в исходное состояние, а в данном случае нам это не нужно. Мы хотим, чтобы исходное состояние анимации было как в первом ключевом кадре (), а финальное состояние — как в последнем ().
Кроме самой анимации в этом фрагменте кода мы задаём положение листков относительно родительского элемента и точку применения трансформации с помощью уже знакомого свойства . По умолчанию листки росли бы в центральной точке и увеличивались равномерно во все стороны. Но тогда в начале анимации они бы повисли в воздухе рядом с веткой, что не очень реалистично, поэтому мы переопределили это поведение и заставили их расти от начала ветки.
Возможно, вы обратили внимание, что мы анимировали только нечётные элементы. Для анимации остальных нам понадобится добавить поворот на 90 градусов, чтобы листки росли с обеих сторон ветки
Получается, чётные будут направлены в одну сторону, а нечётные — в другую.
Мы создали ещё одну анимацию, теперь чётные элементы будут увеличиваться в размере также, как и нечётные, но плюс к этому они с самого начала анимации будут повёрнуты под нужным углом.
Остался последних штрих — добавим задержку анимации для каждого ряда листьев, чтобы они появлялись не одновременно, а по очереди. Вот эти три листка появятся на концах веток и будут последними, так как у них самая большая задержка. Для всех остальных задержка будет уменьшаться с шагом :
Ура-ура, дерево готово!
Весь код анимации, который мы написали в этом туториале, доступен на CodePen.
See the Pen
tree by sasha_htmlacademy (@sasha-sm)
on CodePen.
CSS Reference
CSS ReferenceCSS Browser SupportCSS SelectorsCSS FunctionsCSS Reference AuralCSS Web Safe FontsCSS Font FallbacksCSS AnimatableCSS UnitsCSS PX-EM ConverterCSS ColorsCSS Color ValuesCSS Default ValuesCSS Entities
CSS Properties
align-content
align-items
align-self
all
animation
animation-delay
animation-direction
animation-duration
animation-fill-mode
animation-iteration-count
animation-name
animation-play-state
animation-timing-function
backface-visibility
background
background-attachment
background-blend-mode
background-clip
background-color
background-image
background-origin
background-position
background-repeat
background-size
border
border-bottom
border-bottom-color
border-bottom-left-radius
border-bottom-right-radius
border-bottom-style
border-bottom-width
border-collapse
border-color
border-image
border-image-outset
border-image-repeat
border-image-slice
border-image-source
border-image-width
border-left
border-left-color
border-left-style
border-left-width
border-radius
border-right
border-right-color
border-right-style
border-right-width
border-spacing
border-style
border-top
border-top-color
border-top-left-radius
border-top-right-radius
border-top-style
border-top-width
border-width
bottom
box-decoration-break
box-shadow
box-sizing
break-after
break-before
break-inside
caption-side
caret-color
@charset
clear
clip
clip-path
color
column-count
column-fill
column-gap
column-rule
column-rule-color
column-rule-style
column-rule-width
column-span
column-width
columns
content
counter-increment
counter-reset
cursor
direction
display
empty-cells
filter
flex
flex-basis
flex-direction
flex-flow
flex-grow
flex-shrink
flex-wrap
float
font
@font-face
font-family
font-feature-settings
font-kerning
font-size
font-size-adjust
font-stretch
font-style
font-variant
font-variant-caps
font-weight
gap
grid
grid-area
grid-auto-columns
grid-auto-flow
grid-auto-rows
grid-column
grid-column-end
grid-column-gap
grid-column-start
grid-gap
grid-row
grid-row-end
grid-row-gap
grid-row-start
grid-template
grid-template-areas
grid-template-columns
grid-template-rows
hanging-punctuation
height
hyphens
@import
isolation
justify-content
@keyframes
left
letter-spacing
line-height
list-style
list-style-image
list-style-position
list-style-type
margin
margin-bottom
margin-left
margin-right
margin-top
max-height
max-width
@media
min-height
min-width
mix-blend-mode
object-fit
object-position
opacity
order
outline
outline-color
outline-offset
outline-style
outline-width
overflow
overflow-x
overflow-y
padding
padding-bottom
padding-left
padding-right
padding-top
page-break-after
page-break-before
page-break-inside
perspective
perspective-origin
pointer-events
position
quotes
resize
right
row-gap
scroll-behavior
tab-size
table-layout
text-align
text-align-last
text-decoration
text-decoration-color
text-decoration-line
text-decoration-style
text-indent
text-justify
text-overflow
text-shadow
text-transform
top
transform
transform-origin
transform-style
transition
transition-delay
transition-duration
transition-property
transition-timing-function
unicode-bidi
user-select
vertical-align
visibility
white-space
width
word-break
word-spacing
word-wrap
writing-mode
z-index
25 Cool CSS Animation Examples for Your Inspiration
Let’s take a look at 25 of the best and newest CSS/CSS3 Animation examples for your inspiration:
1. Flying Birds

Rating: ★★★★★
The flying bird in this CSS animation example is very natural and vivid, making the entire website engaging and vibrant.
It is an ideal option for some websites that are related to green products or offer travel services.
2. Morphing Cube Animation

Rating: ★★★★★
This example creates a very gorgeous web animation for designers and developers to display the most important or interesting content to attract users. The 3D effects are very eye-catching.
3. Dragon Loading Animation
Rating: ★★★★★
The loading animation is an important element for designers and developers to engage users and make them enjoy waiting. This cute dragon loading animation is a great choice for a children’s website.
4. Falling Snow

Rating: ★★★★
The falling snow is very eye-catching.
This animation example can be used on websites that plan to launch winter/Christmas/New Year promotions.
5. Poster Circle Animation

Rating: ★★★★
This CSS rotating animation is another good choice for designers and developers to display their most important web contents.
6. CSS3 Image Accordion
Rating: ★★★★★
Animated image accordion design has been very trendy in recent years.
This animated CSS3 image accordion can be a cool choice for you to create impressive fashion, clothing or portfolio websites.
7. CSS3 Hover Animation
Rating: ★★★
An excellent hover animation or interaction is an easy way to make websites look outstanding. This hover animation example offers a series of hover effects for designer and developers to choose from based on their own needs.
It is a perfect choice for you to improve your website.
8. Store Loading Animation
Rating: ★★★★★
This loading animation is very impressive thanks to its unique illustrated design style.
If you are designing a website with an illustration theme, this CSS loading animation is an excellent example for you.
9. Login Eye Animation

Rating: ★★★★★
This CSS animation is especially designed for a stunning web sign up form. When a user fills the sign up form, the eye on the top will open or close correspondingly, creating an impressive interactive web form design.
Rating: ★★★★
This CSS animation features a 3D transition, making a very engaging and cool animation.

Rating: ★★★★
This animation example displays a smooth navigation process. (You can learn 9 best principles to design website navigation menu, if necessary.)
It is a good resource for you if you are coincidentally looking for a good navigator design made in CSS3.
12. Animated CSS Card
Rating: ★★★★
Card UI design helps create a clear web layout and enhance user experience. That’s why designers and developers use card designs often in their web/app design.
This card design animation offers a good example of what an outstanding web card UI design is.
13. Perspective Split Text Menu Animation

Rating: ★★★★★
Interesting font animation can help improve web designs effectively.
If you want to spice up your website design with font animations, this text menu animation is a good example for you.
14. Retro Clickable Accordion Menu

Rating: ★★★★
This clickable accordion menu is very user-friendly. It is a good choice for designers/developers to create a minimalist website with the best ux.
15. CSS Ghost Loading Animation

Rating: ★★★★
The floating ghost in this CSS loading animation is very cute and a good choice for some children websites.
Summary
CSS animations allow smoothly (or not) animated changes of one or multiple CSS properties.
They are good for most animation tasks. We’re also able to use JavaScript for animations, the next chapter is devoted to that.
Limitations of CSS animations compared to JavaScript animations:
Merits
- Simple things done simply.
- Fast and lightweight for CPU.
Demerits
- JavaScript animations are flexible. They can implement any animation logic, like an “explosion” of an element.
- Not just property changes. We can create new elements in JavaScript as part of the animation.
The majority of animations can be implemented using CSS as described in this chapter. And the event allows JavaScript to be run after the animation, so it integrates fine with the code.
But in the next chapter we’ll do some JavaScript animations to cover more complex cases.
Функция плавности вывода анимируемых кадров
Свойство `animation-timing-function` позволяет задать специальную функцию, отвечающую за скорость воспроизведения анимации. Стоит учесть, что по умолчанию анимация начинается медленно, разгоняется быстро и замедляется в конце. Сейчас существуют следующие предопределённые значения: `ease`, `ease-in`, `ease-out`, `ease-in-out`, `linear`, `step-start`, `step-end.`
Однако вы можете создавать такие функции самостоятельно. Значение `animation-timing-function: cubic-bezier(P1x, P1y, P2x, P2y);` принимает на вход 4 аргумента и строит кривую распределения процесса анимации. Попрактиковаться в создании этих функций можно и matthewlein.com.
И, наконец, анимацию можно разбить на набор дискретных значений при помощи функции `steps (amount of steps, direction)`, которая принимает на вход количество шагов и направление (`start` или `end`). В следующем примере анимация состоит из 7 шагов, последний из которых произойдёт прямо перед завершением анимации:
See the Pen Direction of animation within time by Dash Bouquet (@dashbouquetdevelopment) on CodePen.