Класс local() модуля threading в python
Содержание:
- Hands-On on this Python Threading Tutorial
- Шаг 3 — Обработка исключений функций, выполняемых в потоках
- Измерение производительности кода.
- A detailed example
- Communicating With Worker QThreads
- Использование Queues
- Когда нужен Daemon Thread?
- Настраиваем многопоточность
- Поля
- 17.1.6. Semaphore Objects
- Python Threading Tutorial Theory
- Timer Threads
- Запуск
- Barrier Objects
Hands-On on this Python Threading Tutorial
Python threading library
Python has several ways to implement multithreading. The modern way to do it is using the library, which contains the class. As we will see, working with this library is extremely intuitive. We also want to use the library to experiment threads, but this is not strictly needed in production. Thus, at the very beginning of your script, add the following lines.
import threading
import time
Now we can start working with threads!
Define a test function to run in threads
First thing, we need to define a function we want to run in a thread. Our function will do almost nothing, but we will use the function to emulate a huge workload. The function makes your program (or thread) stop and wait for a given amount of seconds.
When you have a function that you want to run in a thread, it is best practice to use a thread identifier as the first parameter. This way, you know what thread you are running from inside the function as well. However, you also need to pass this value when creating the thread, but we will get to that. For now, just create this function.
def do_something(id, message=''):
  time.sleep(4)
  print("Thread #" + str(id) + " finished with message: " + message)
This function simply waits 4 seconds sand then prints the given message with the thread ID.
Running it synchronously “the standard way”
At this point, we can create a global list of messages that we want to print. Here is an example.
messages =
If we were to run the function with all the messages synchronously we would roughly need 16 seconds (4 seconds per message). In fact, we can do a simple test using the function. This returns the epoch time in seconds, and we can use it twice to see how much time elapsed from the beginning to the end of the script.
start = time.time()

for i, msg in enumerate(messages):
  do_something(i, msg)

print("It took " + str(time.time()-start) + " seconds")
And here is the output. The time elapsed between printing lines, of course, was about 4 seconds.
Running it with threads
Now we can dive in the real python threading tutorial. We can rewrite this part of the script to work with threads, and distribute the load among them. Here we need to work with three different functions.
Creating the thread
To create a thread, you need to instantiate a object. The constructor wants to know a target function: the function that you want to run within the thread. It also want to know a list of parameters you want to pass to the function, if you need it. You provide the function name as , and the parameters as a tuple for the parameter. Below, a sample code to create a thread.
thread = threading.Thrad(target=function_name, args=(arg1, arg2, arg3))
From now on, you can perform operation on this thread object you just created.
Starting and joining the thread
Once you have a thread object, you can decide to start it with the function, and to join it with the function, as simple as that. The code is pretty straight forward, as you can see below.
thread.start()
thread.join()
In order to call , you need to call first. However, you don’t need to call the two one after the other. In fact, you might want to perform some code after starting the thread, and before joining it. Even more, you may not join a thread all.
The whole script
Combining the commands above, we can create a way more efficient snippet that leverages threads. Here it is.
start = time.time()
threads = []

for i, msg in enumerate(messages):
  threads.append(threading.Thread(target=do_something, args=(i, msg,)))
  threads.start()
for thread in threads:
  thread.join()

print("It took " + str(time.time()-start) + " seconds")
As you can see, we first create and start all the threads. Then, with another loop, we join all of them. We didn’t join each thread just after starting on purpose. If we did, the script would have waited for the first thread to finish before starting the second. Of course, we don’t want that. If we run this script you won’t see any output for about 4 seconds, then all four lines of the output will appear together. It will run in a little more than 4 seconds, take a look.
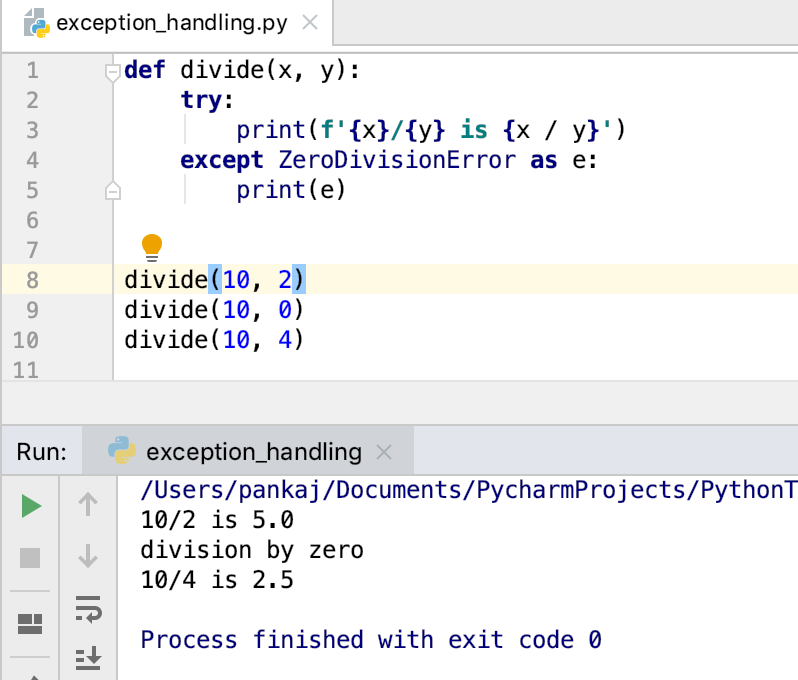
Шаг 3 — Обработка исключений функций, выполняемых в потоках
На предыдущем шаге функция успешно вернула значения во всех случаях вызова. На этом шаге мы увидим, что также может выводить исключения при вызове функций в потоках.
Рассмотрим в качестве примера следующий блок кода:
wiki_page_function.py
Этот блок кода практически идентичен использованному нами на шаге 2, но имеет два важных отличия:
- Теперь мы передаем аргумент для функции . Поскольку пакет не может выполнить веб-запрос сайта Wikipedia за секунды, он выдаст исключение .
- Мы собираем исключения , выдаваемые , и выводим строку в каждом таком случае.
Если мы запустим программу снова, мы получим следующий результат:
Выведено четыре сообщения , по одному для каждого из четырех значений , поскольку ни один запрос не мог быть выполнен за секунды, и каждый из четырех вызовов завершился исключением .
Мы увидели, что если вызов функции, отправленный в , завершается исключением, это исключение может быть выведено обычным образом посредством вызова . Вызов для всех вызванных функций гарантирует, что ваша программа не пропустит никаких исключений при выполнении функции в потоке.
Измерение производительности кода.
Описание:
Класс модуля предназначен для измерения скорости выполнения небольших фрагментов кода.
Конструктор класса принимает аргумент заявления , которое будет измерено и дополнительный аргумент , используемый для настройки выполнения заявления , а так же функцию таймера . Оба оператора по умолчанию имеют значение .
Функция таймера зависит от платформы, дополнительно смотрите документацию к вашей OS и модуль .
Аргументы и также могут содержать несколько операторов, разделенных или переводы строк, если они не содержат многострочных строковых литералов.
Выражение, переданное в по умолчанию будет выполняться в пространстве имен . Этим поведением можно управлять, передавая пространство имен в аргумент .
Чтобы измерить время выполнения выражения , используйте метод . Методы и являются вспомогательными методами для вызова несколько раз.
Время выполнения кода настройки исключается из общего времени запуска.
Параметры и также могут принимать объекты, которые можно вызывать без аргументов. Это встроит вызовы в них в функцию таймера, которая затем будет выполнена методом
Обратите внимание, что временные издержки в этом случае немного больше из-за дополнительных вызовов функций
Методы объекта .
- ,
- ,
- ,
- ,
Метод возвращает время выполнения основного выражения . Метод выполняет выражение настройки один раз, а затем возвращает время, необходимое для выполнения основного выражения количество раз, измеренное в секундах как число с плавающей запятой. Аргумент — это число раз в цикле, по умолчанию равное одному миллиону. Основное выражение , выражение настройки и функция таймера передаются в конструктор класса .
Примечание. По умолчанию метод во время выполнения временно отключает сборку мусора. Преимущество этого подхода в том, что он делает независимые тайминги более сопоставимыми. Недостатком является то, что может быть важным компонентом производительности измеряемой функции. Если это так, то может быть повторно включен в качестве первого оператора в строке установки.
>>> import timeit
>>> timeit.Timer('for i in range(10): oct(i)', 'gc.enable()').timeit()
# 0.7002408580010524
Метод автоматически определяет, сколько раз нужно вызвать .
Это удобная функция, которая вызывает несколько раз, так что общее время >= 0.2 секунд и возвращая возможное количество циклов, время, затраченное на это количество циклов. Вызывает с возрастающими числами из последовательности 1, 2, 5, 10, 20, 50,… до тех пор, пока время не станет не менее 0,2 секунды.
Если обратный вызов задан и не равен , то он будет вызываться после каждого испытания с двумя аргументами:
callback(number, time_taken)
Метод вызывает несколько раз.
Это удобная функция, которая вызывает метод несколько раз, возвращая список результатов. Первый аргумент указывает, сколько раз вызывать метод . Второй аргумент указывает число циклов выполнения проверяемого кода.
Примечание. Это не очень полезно. В типичном случае самое низкое значение дает нижнюю границу для того, насколько быстро ваша машина может выполнить данный фрагмент кода. Более высокие значения в векторе результатов, как правило, вызваны не изменчивостью скорости Python, а другими процессами, влияющими на точность синхронизации. Таким образом, результата, вероятно, является единственным числом, которое вас должно заинтересовать. После этого вы должны смотреть на весь вектор и применять здравый смысл, а не статистику.
Метод помощник для печати трассировки из временного кода.
Типичное использование:
t = Timer(...)
try
    # или t.repeat(...)
    t.timeit(...)
except Exception
    t.print_exc()
Преимущество по сравнению со стандартным отслеживанием заключается в том, что будут отображаться исходные строки в скомпилированном шаблоне. Необязательный аргумент указывает, куда отправляется трассировка. По умолчанию это .
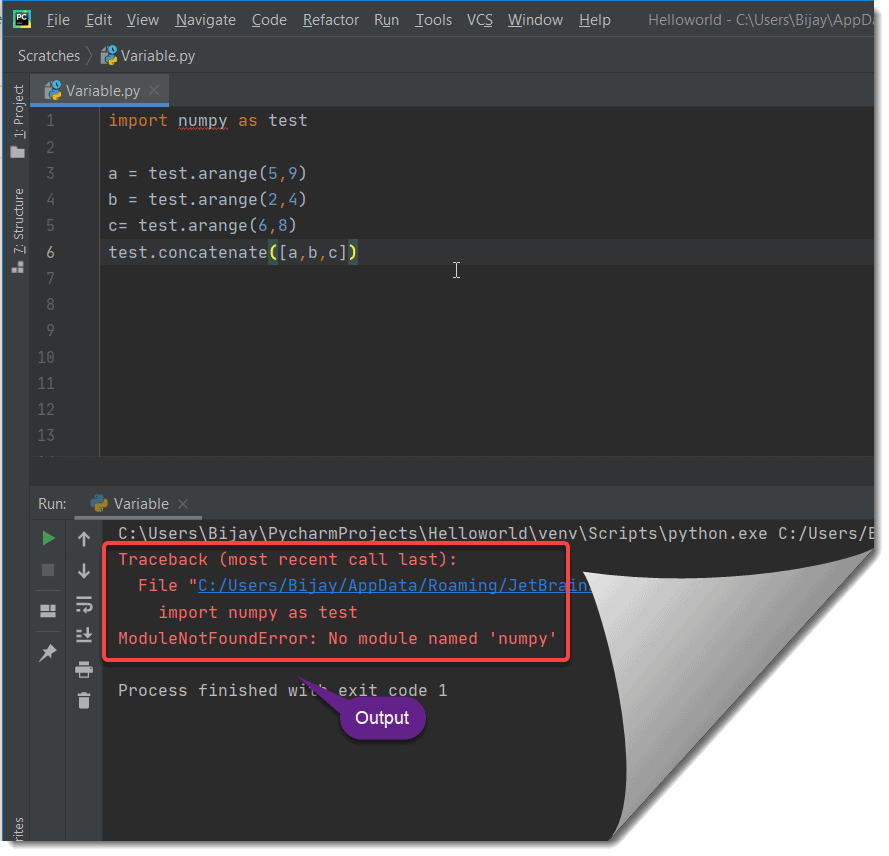
A detailed example
As said before, by default, the Python code is not provisioned with threading- we need to import the threading library to do so.
Take a look at the code.
import threading
import time

def sleepy_man(secs):
    print('Starting to sleep inside')
    time.sleep(secs)
    print('Woke up inside')

x = threading.Thread(target = sleepy_man, args = (1,))
x.start()
print(threading.activeCount())
time.sleep(1.2)
print('Done')
If you execute the above code, you will get the following output.
Output-
Starting to sleep inside
2
Woke up inside
Done
First, let me explain the code step by step. Then we will analyze the output.
- You import the library’s threading and time. threading is the library that will allow us to create threads and time is the library that contains the function sleep.
- The function sleepy_man takes in the one argument- secs. It first prints ‘Starting to sleep inside’. Then it sleeps for the secs seconds and then it prints ‘Woke up inside’.
- This is the part where we start creating threads. We need to define by calling the class threading.Thread. We need to pass two arguments- target which is the function block that needs to be threaded, args which are the arguments that need to be passed to the function. A thread object is returned which is now stored in x.
x = threading.Thread(target = sleepy_man, args = (10,))
Now after defining the thread class, we need to call the function start() so as to initiate the threading
x.start()
- Note- Now we have two threads. One default thread for the program and a
new thread which we defined. Thus the active thread count is two. - Thus the statement should print ‘2’.
print(threading.activeCount())
Now let us look at the flow of control. Once you call the start() method, it triggers sleepy_man() and it runs in a separate thread. The main program will also run in parallel as another thread. The flow is shown in the image below.

Now let us increase the time in which the program sleeps inside the function.
import threading
import time

def sleepy_man(secs):
    print('Starting to sleep inside')
    time.sleep(secs)
    print('Woke up inside')

x = threading.Thread(target = sleepy_man, args = (4,))
x.start()
print(threading.activeCount())
time.sleep(1.2)
print('Done')
The output is as follows-
Starting to sleep inside
2
Done
Woke up inside
The flow is given in the diagram below-

Now let’s spice things a bit. Let us run a for loop that triggers multiple threads.
import threading
import time

def sleepy_man(secs):
    print('Starting to sleep inside - Iteration {}'.format(5-secs))
    time.sleep(secs)
    print('Woke up inside - Iteration {}'.format(5-secs))

for i in range(3):
    x = threading.Thread(target = sleepy_man, args = (5-i,))
    x.start()

print('Active threads- ', threading.activeCount())
At every iteration, we trigger a thread. Note that we pass the arguments 5, 4, 3 at 1st, 2nd, and 3rd iteration respectively. Thus the sleepy_man() sleeps 5 seconds, 4 seconds, and 3 seconds respectively.
Thus the output is as shown-
Starting to sleep inside - Iteration 0
Starting to sleep inside - Iteration 1
Starting to sleep inside - Iteration 2
Active threads-  4
Woke up inside - Iteration 2
Woke up inside - Iteration 1
Woke up inside - Iteration 0
Thus we have seen how multiple threads can be defined and triggered, ensuring a better way of processing which is very essential for heavy I/O operations.
The media shown in this article are not owned by Analytics Vidhya and is used at the Author’s discretion.
Communicating With Worker QThreads
If you’re doing multithreaded programming with PyQt, then you might need to establish communication between your application’s main thread and your worker threads. This allows you to get feedback on the progress of worker threads and update the GUI accordingly, send data to your threads, allow the users to interrupt the execution, and so on.
PyQt’s signals and slots mechanism provides a robust and safe way of communicating with worker threads in a GUI application.
On the other hand, you might also need to establish communication between worker threads, such as sharing buffers of data or any other kind of resource. In this case, you need to make sure that you’re properly protecting your data and resources from concurrent access.
Использование Queues
Очередь(Queues Python) может быть использована для стековых реализаций «пришел первым – ушел первым» (first-in-first-out (FIFO)) или же «пришел последним – ушел последним» (last-in-last-out (LILO)) , если вы используете их правильно.
В данном разделе, мы смешаем потоки и создадим простой скрипт файлового загрузчика, чтобы продемонстрировать, как работает Queues Python со случаями, которые мы хотим паралеллизировать. Чтобы помочь объяснить, как работает Queues, мы перепишем загрузочный скрипт из предыдущей секции для использования Queues. Приступим!
Python
# -*- coding: utf-8 -*-
import os
import threading
import urllib.request
from queue import Queue
class Downloader(threading.Thread):
«»»Потоковый загрузчик файлов»»»
def __init__(self, queue):
«»»Инициализация потока»»»
threading.Thread.__init__(self)
self.queue = queue
def run(self):
«»»Запуск потока»»»
while True:
# Получаем url из очереди
url = self.queue.get()
# Скачиваем файл
self.download_file(url)
# Отправляем сигнал о том, что задача завершена
self.queue.task_done()
def download_file(self, url):
«»»Скачиваем файл»»»
handle = urllib.request.urlopen(url)
fname = os.path.basename(url)
with open(fname, «wb») as f:
while True:
chunk = handle.read(1024)
if not chunk:
break
f.write(chunk)
def main(urls):
«»»
Запускаем программу
«»»
queue = Queue()
# Запускаем потом и очередь
for i in range(5):
t = Downloader(queue)
t.setDaemon(True)
t.start()
# Даем очереди нужные нам ссылки для скачивания
for url in urls:
queue.put(url)
# Ждем завершения работы очереди
queue.join()
if __name__ == «__main__»:
urls = [«http://www.irs.gov/pub/irs-pdf/f1040.pdf»,
«http://www.irs.gov/pub/irs-pdf/f1040a.pdf»,
«http://www.irs.gov/pub/irs-pdf/f1040ez.pdf»,
«http://www.irs.gov/pub/irs-pdf/f1040es.pdf»,
«http://www.irs.gov/pub/irs-pdf/f1040sb.pdf»]
main(urls)
|
1 2 3 4 5 6 7 8 9 10 11 12 13 14 15 16 17 18 19 20 21 22 23 24 25 26 27 28 29 30 31 32 33 34 35 36 37 38 39 40 41 42 43 44 45 46 47 48 49 50 51 52 53 54 55 56 57 58 59 60 61 62 63 64 65 66 67 |
# -*- coding: utf-8 -*- importos importthreading importurllib.request fromqueueimportQueue classDownloader(threading.Thread) «»»Потоковый загрузчик файлов»»» def__init__(self,queue) «»»Инициализация потока»»» threading.Thread.__init__(self) self.queue=queue defrun(self) «»»Запуск потока»»» whileTrue # Получаем url из очереди url=self.queue.get() # Скачиваем файл self.download_file(url) # Отправляем сигнал о том, что задача завершена self.queue.task_done() defdownload_file(self,url) «»»Скачиваем файл»»» handle=urllib.request.urlopen(url) fname=os.path.basename(url) withopen(fname,»wb»)asf whileTrue chunk=handle.read(1024) ifnotchunk break f.write(chunk) defmain(urls) «»» Запускаем программу queue=Queue() # Запускаем потом и очередь foriinrange(5) t=Downloader(queue) t.setDaemon(True) t.start() # Даем очереди нужные нам ссылки для скачивания forurl inurls queue.put(url) # Ждем завершения работы очереди queue.join() if__name__==»__main__» urls=»http://www.irs.gov/pub/irs-pdf/f1040.pdf», «http://www.irs.gov/pub/irs-pdf/f1040a.pdf», «http://www.irs.gov/pub/irs-pdf/f1040ez.pdf», «http://www.irs.gov/pub/irs-pdf/f1040es.pdf», «http://www.irs.gov/pub/irs-pdf/f1040sb.pdf» main(urls) |
Давайте притормозим. В первую очередь, нам нужно взглянуть на определение главной функции для того, чтобы увидеть, как все протекает. Здесь мы видим, что она принимает список url адресов. Далее, функция main создаете экземпляр очереди, которая передана пяти демонизированным потокам. Основная разница между демонизированным и недемонизированным потоком в том, что вам нужно отслеживать недемонизированные потоки и закрывать их вручную, в то время как поток «демон» нужно только запустить и забыть о нем. Когда ваше приложение закроется, закроется и поток. Далее мы загрузили очередь (при помощи метода put) вместе с переданными url. Наконец, мы указываем очереди подождать, пока потоки выполнят свои процессы через метод join. В классе download у нас есть строчка self.queue.get(), которая выполняет функцию блока, пока очередь делает что-либо для возврата. Это значит, что потоки скромно будут дожидаться своей очереди. Также это значит, чтобы поток получал что-нибудь из очереди, он должен вызывать метод очереди под названием get. Таким образом, добавляя что-нибудь в очередь, пул потоков, поднимет или возьмет эти объекты и обработает их. Это также известно как dequeing. После того, как все объекты в очередь обработаны, скрипт заканчивается и закрывается. На моем компьютере были загружены первые 5 документов за секунду.
Когда нужен Daemon Thread?
В большом проекте некоторые потоки предназначены для выполнения фоновых задач, таких как отправка данных, периодическая сборка мусора и т.д. Это может быть выполнено no-Daemon. Но если используется no-Daemon, основной поток должен отслеживать их вручную. Однако, используя Daemon Thread, основной поток может полностью забыть об этой задаче, и эта задача будет либо завершена, либо уничтожена при выходе из основного потока.
Обратите внимание, что вы должны использовать Daemon Thread только для несущественных задач, когда вы не возражаете, если она не завершится или останется между ними
Настраиваем многопоточность
А теперь самое интересное! Внеся всего лишь несколько изменений в код нашего сценария, мы можем ускорить процесс его выполнения:
import datetime
import sys
from concurrent.futures import ThreadPoolExecutor, wait
from time import sleep, time

from scrapers.scraper import connect_to_base, get_driver, parse_html, write_to_file


def run_process(page_number, filename, headless):

    # инициализируем веб драйвер
    browser = get_driver(headless)

    if connect_to_base(browser, page_number):
        sleep(2)
        html = browser.page_source
        output_list = parse_html(html)
        write_to_file(output_list, filename)

        # закрываем соединие
        browser.quit()
    else:
        print("Error connecting to hacker news")
        browser.quit()


if __name__ == "__main__":

    # устанавливаем headless mode?
    headless = False
    if len(sys.argv) > 1:
        if sys.argv == "headless":
            print("Running in headless mode")
            headless = True

    # инициализируем переменные
    start_time = time()
    output_timestamp = datetime.datetime.now().strftime("%Y%m%d%H%M%S")
    output_filename = f"output_{output_timestamp}.csv"
    futures = []

    # перебираем страницы и получаем информацию о них
    with ThreadPoolExecutor() as executor:
        for number in range(1, 21):
            futures.append(
                executor.submit(run_process, number, output_filename, headless)
            )

    wait(futures)
    end_time = time()
    elapsed_time = end_time - start_time
    print(f"Elapsed run time: {elapsed_time} seconds")
В модуле класс используется для создания пула потоков и асинхронного выполнения вызовов функций . Метод принимает функцию вместе с аргументами, передаваемыми при ее вызове, и возвращает результат выполнения функции . Метод используется для блокировки запущенного асинхронно кода до завершения всех выполняемых им задач.
Стоит отметить, что вы можете легко использовать в вашем коде многопроцессорность, используя класс , поскольку и , и реализуют для один и тот же интерфейс:
# перебираем страницы и получаем информацию о них
with ProcessPoolExecutor() as executor:
    for number in range(1, 21):
        futures.append(
            executor.submit(run_process, number, output_filename, headless)
        )
Запустим наш усовершенствованный парсер:
(env)$ python script_concurrent.py

Elapsed run time: 38.73605298995972 seconds
Чтобы еще более ускорить процесс, мы можем запустить Chrome в headless режиме, передав в качестве аргумента в командной строке значение :
(env)$ python script_concurrent.py headless

Running in headless mode

Elapsed run time: 35.12011382590508 seconds
Поля
| Aborted | 256 |
Состояние потока включает в себя значение , и поток теперь не выполняет работу, но его состояние еще не изменилось на .The thread state includes and the thread is now dead, but its state has not yet changed to . |
| AbortRequested | 128 |
Метод был вызван для потока, но поток еще не получил исключение ThreadAbortException, которое попытается завершить его.The method has been invoked on the thread, but the thread has not yet received the pending ThreadAbortException that will attempt to terminate it. |
| Background | 4 |
Поток выполняется как фоновый поток, в противоположность потокам переднего плана.The thread is being executed as a background thread, as opposed to a foreground thread. Это состояние управляется заданием свойства .This state is controlled by setting the property. |
| Running |
Поток был запущен, но не останавливался.The thread has been started and not yet stopped. |
|
| Stopped | 16 |
Поток был остановлен.The thread has stopped. |
| StopRequested | 1 |
Поток получает запрос на остановку.The thread is being requested to stop. Предназначено только для внутреннего использования.This is for internal use only. |
| Suspended | 64 |
Поток был приостановлен.The thread has been suspended. |
| SuspendRequested | 2 |
Запрашивается приостановка работы потока.The thread is being requested to suspend. |
| Unstarted | 8 |
Метод не был вызван для потока.The method has not been invoked on the thread. |
| WaitSleepJoin | 32 |
Поток заблокирован.The thread is blocked. Это может произойти в результате вызова метода или метода , в результате запроса блокировки, например при вызове метода или или в результате ожидания объекта синхронизации потока, такого как ManualResetEvent.This could be the result of calling or , of requesting a lock — for example, by calling or — or of waiting on a thread synchronization object such as ManualResetEvent. |
17.1.6. Semaphore Objects
This is one of the oldest synchronization primitives in the history of computer
science, invented by the early Dutch computer scientist Edsger W. Dijkstra (he
used the names and instead of and
).
A semaphore manages an internal counter which is decremented by each
call and incremented by each
call. The counter can never go below zero; when
finds that it is zero, it blocks, waiting until some other thread calls
.
Semaphores also support the .
- class (value=1)
-
This class implements semaphore objects. A semaphore manages an atomic
counter representing the number of calls minus the number of
calls, plus an initial value. The method
blocks if necessary until it can return without making the counter negative.
If not given, value defaults to 1.The optional argument gives the initial value for the internal counter; it
defaults to . If the value given is less than 0, is
raised.Changed in version 3.3: changed from a factory function to a class.
- (blocking=True, timeout=None)
-
Acquire a semaphore.
When invoked without arguments:
-
If the internal counter is larger than zero on entry, decrement it by
one and return true immediately. -
If the internal counter is zero on entry, block until awoken by a call to
. Once awoken (and the counter is greater
than 0), decrement the counter by 1 and return true. Exactly one
thread will be awoken by each call to . The
order in which threads are awoken should not be relied on.
When invoked with blocking set to false, do not block. If a call
without an argument would block, return false immediately; otherwise, do
the same thing as when called without arguments, and return true.When invoked with a timeout other than , it will block for at
most timeout seconds. If acquire does not complete successfully in
that interval, return false. Return true otherwise.Changed in version 3.2: The timeout parameter is new.
-
- ()
-
Release a semaphore, incrementing the internal counter by one. When it
was zero on entry and another thread is waiting for it to become larger
than zero again, wake up that thread.
- class (value=1)
-
Class implementing bounded semaphore objects. A bounded semaphore checks to
make sure its current value doesn’t exceed its initial value. If it does,
is raised. In most situations semaphores are used to guard
resources with limited capacity. If the semaphore is released too many times
it’s a sign of a bug. If not given, value defaults to 1.Changed in version 3.3: changed from a factory function to a class.
Python Threading Tutorial Theory
Before we can dive into parallelism, we should cover some theory. In fact, this section will explain why you need parallelism. After that, it will cover the basic jargon you need to know.
Why do we need parallelism?
Parallelism is a simple concept. It means that your program runs some of its parts at the same time. They might be different parts or even multiple instances of the same part. However, each is running independently from the other.
This, of course, adds a little bit of complexity, so why would we do that? Couldn’t we just use a monolithic program that does everything in sequence? We could, but the performance will be far lower. In fact, parallelism has two main benefits.
- Horizontal scalability: you can distribute tasks among cores on your PC, or even among different computers. This means you can access more power, and you can have more just by adding computers in the cluster. This is the opposite of vertical scalability, where you need to upgrade the hardware of the same computer.
- Efficiency: imagine that parts of your script need to wait for something, but some parts do not. You can have only the parts that really need to wait do the waiting, while the others move forward.
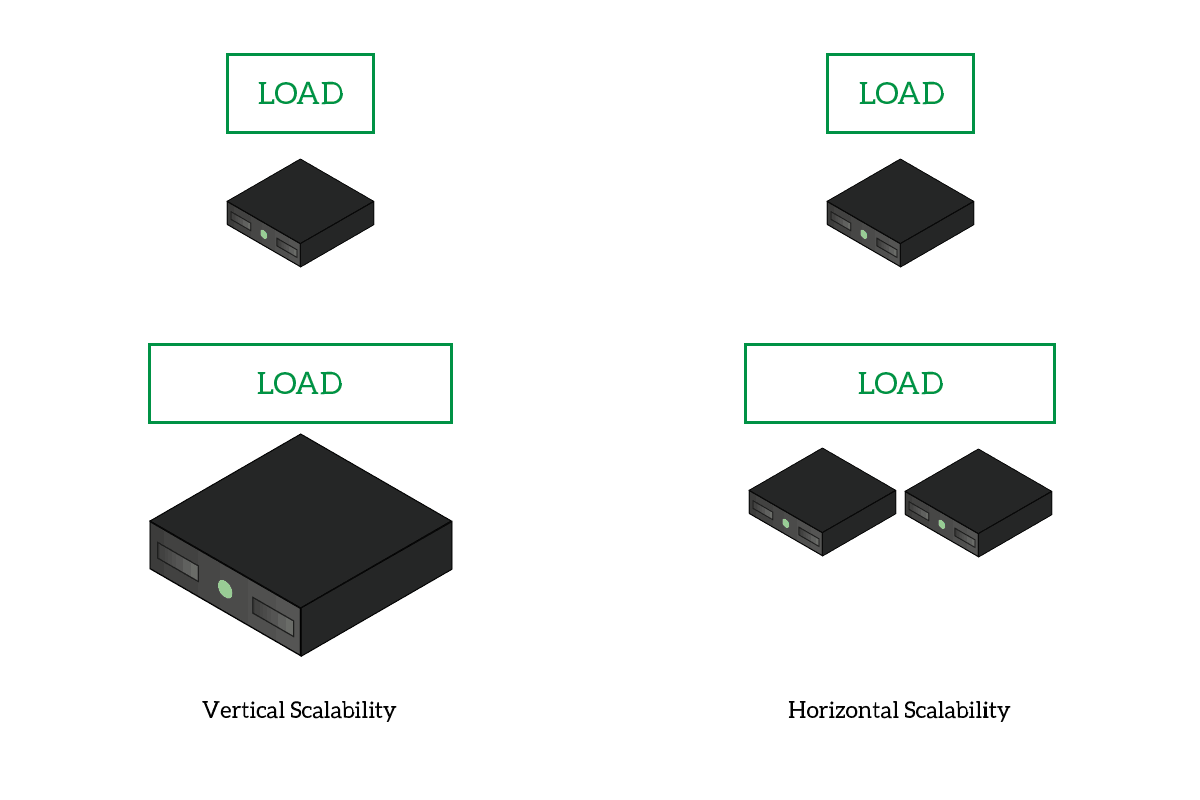 With vertical scalability, you need to enhance the power of your PC. With horizontal scalability, you can add more PCs.
We have different ways of implementing parallelism in Python. Since this is a python threading tutorial, we are going to cover multithreading. However, you should know that other options exist.
Multithreading and Multiprocessing
When it comes to parallelism, we have two main ways to go: multithreading and multiprocessing. The two can achieve similar results in two different ways.
A process is a program running on a computer. The operating system will dedicate some RAM to that process, and allocate some meta-information that it needs to work with that process. You can literally see this as a whole program in execution. Instead, a thread is somehow a lightweight version of a process. It is not a program in execution, but part of it. It is part of a process and shares the memory with other threads in the same process. On top of that, the operating system doesn’t have to allocate the meta-information for the thread.
For a simple task, like running a function, working with multiple threads is the best way to go. In fact, this python threading tutorial will cover how to achieve parallelism with threads. You could apply the same concepts to multiprocessing as well.
Multithreading Jargon
This section of this python threading tutorial is important. If you get the jargon right, understanding the whole article will be a lot easier. Despite being a complex topic, the jargon of python threading is not complex at all.
Sync and Async
 With an async thread, some instructions may be executed concurrently.
Asynchronous is the buzzword here. A simple program is going to be synchronous, which means instructions will be executed in order. The program will run each instruction after another, in the order you prepared. However, with threading, you can run parts of the programs asynchronously. This means parts of the code may run before or after some other parts, as they are now unrelated.
This of course is the behavior we require, but we might need to have some thread waiting for the execution of another. In that case, we need to sync the threads. No worries, we will explain how to do it.
Running threads
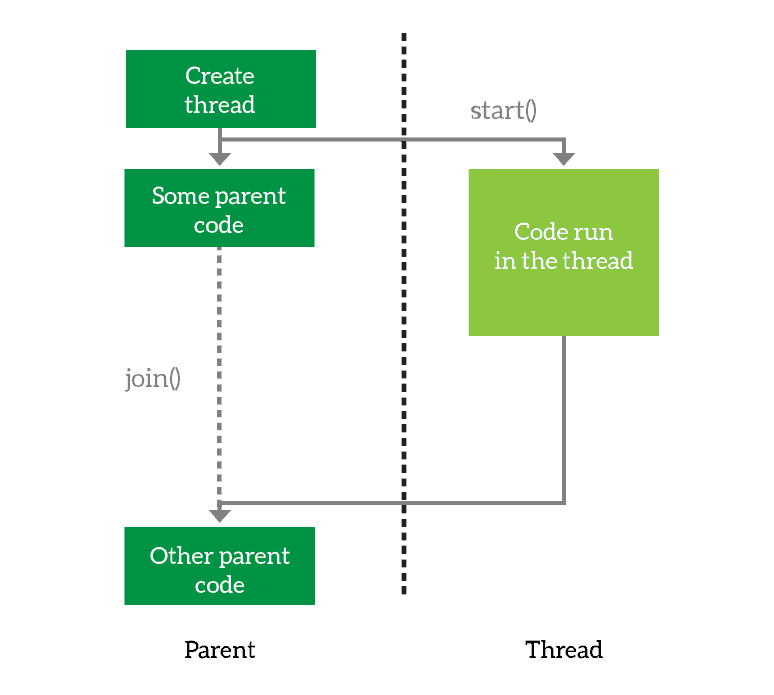 You create a thread, then you launch it. Optionally, you can join it, which means wait for it to finish.
When working with threads, but also with processes, we need to know some common operations.
The first thing you need to do is to define the thread. You basically prepare it for execution and tell it what it will have to do. However, you are not executing the thread just yet. When you want the thread to start working, you simply start it. Then, the thread will run asynchronously from your main program. However, you may want your program to wait for the thread to finish. In that case, you join the thread. This tells your program to wait for its thread to terminate, and you can join multiple threads as well.
Looking at the above example, we create the thread and launch it. Then, we run some code in the parent and after that, we wait for the thread to finish.
Timer Threads
One example of a reason to subclass is provided by
, also included in . A
starts its work after a delay, and can be canceled at any point within
that delay time period.
threading_timer.py
import threading
import time
import logging


def delayed():
    logging.debug('worker running')


logging.basicConfig(
    level=logging.DEBUG,
    format='(%(threadName)-10s) %(message)s',
)

t1 = threading.Timer(0.3, delayed)
t1.setName('t1')
t2 = threading.Timer(0.3, delayed)
t2.setName('t2')

logging.debug('starting timers')
t1.start()
t2.start()

logging.debug('waiting before canceling %s', t2.getName())
time.sleep(0.2)
logging.debug('canceling %s', t2.getName())
t2.cancel()
logging.debug('done')
The second timer in this example is never run, and the first timer
appears to run after the rest of the main program is done. Since it is
not a daemon thread, it is joined implicitly when the main thread is
done.
Запуск
Поток запускается путем вызова метода модуля передачи объекта Thread.
t1.start()
Он должен вызываться не более одного раза для каждого объекта потока. Он организует вызов метода объекта в отдельном потоке управления.
Этот метод вызовет если будет вызван более одного раза для одного и того же объекта потока.
Поток вызывается в программе, которая сама по себе является процессом. Таким образом, во время выполнения потока основная программа также продолжает свое выполнение.
Следовательно, мы можем приостановить деятельность основной программы (выполняемой основным потоком) до завершения созданного потока.
Barrier Objects
New in version 3.2.
This class provides a simple synchronization primitive for use by a fixed number
of threads that need to wait for each other. Each of the threads tries to pass
the barrier by calling the method and will block until
all of the threads have made their calls. At this point,
the threads are released simultaneously.
The barrier can be reused any number of times for the same number of threads.
As an example, here is a simple way to synchronize a client and server thread:
b = Barrier(2, timeout=5)

def server():
    start_server()
    b.wait()
    while True
        connection = accept_connection()
        process_server_connection(connection)

def client():
    b.wait()
    while True
        connection = make_connection()
        process_client_connection(connection)
- class (parties, action=None, timeout=None)
-
Create a barrier object for parties number of threads. An action, when
provided, is a callable to be called by one of the threads when they are
released. timeout is the default timeout value if none is specified for
the method.- (timeout=None)
-
Pass the barrier. When all the threads party to the barrier have called
this function, they are all released simultaneously. If a timeout is
provided, it is used in preference to any that was supplied to the class
constructor.The return value is an integer in the range 0 to parties – 1, different
for each thread. This can be used to select a thread to do some special
housekeeping, e.g.:i = barrier.wait() if i == # Only one thread needs to print this print("passed the barrier")If an action was provided to the constructor, one of the threads will
have called it prior to being released. Should this call raise an error,
the barrier is put into the broken state.If the call times out, the barrier is put into the broken state.
This method may raise a exception if the
barrier is broken or reset while a thread is waiting.
- ()
-
Return the barrier to the default, empty state. Any threads waiting on it
will receive the exception.Note that using this function may require some external
synchronization if there are other threads whose state is unknown. If a
barrier is broken it may be better to just leave it and create a new one.
- ()
-
Put the barrier into a broken state. This causes any active or future
calls to to fail with the . Use
this for example if one of the threads needs to abort, to avoid deadlocking the
application.It may be preferable to simply create the barrier with a sensible
timeout value to automatically guard against one of the threads going
awry.
-
The number of threads required to pass the barrier.
-
The number of threads currently waiting in the barrier.
-
A boolean that is if the barrier is in the broken state.