Hotkeys (mouse, joystick and keyboard shortcuts)
Содержание:
- SendInput [v1.0.43+]
- Отключение клавиш Num Lock, Scroll Lock и Caps Lock
- Installer Options
- Скрипты AutoHotKey для CS:GO
- 4 — Running Programs & Websites
- The Top of the Script (the Auto-execute Section)
- Context-sensitive Hotkeys
- AutoHotkey автоматизация процессов 1.1.33.00
- 8 — Other Helpful Goodies
- Создать скрипт AutoHotkey с нуля
- Introduction and Simple Examples
- Repeating or Holding Down a Key
- Tray Icon
SendInput [v1.0.43+]
SendInput is generally the preferred method to send keystrokes and mouse clicks because of its superior speed and reliability. Under most conditions, SendInput is nearly instantaneous, even when sending long strings. Since SendInput is so fast, it is also more reliable because there is less opportunity for some other window to pop up unexpectedly and intercept the keystrokes. Reliability is further improved by the fact that anything the user types during a SendInput is postponed until afterward.
Unlike the other sending modes, the operating system limits SendInput to about 5000 characters (this may vary depending on the operating system’s version and performance settings). Characters and events beyond this limit are not sent.
Note: SendInput ignores SetKeyDelay because the operating system does not support a delay in this mode. However, when SendInput reverts to under the conditions described below, it uses (unless SendEvent’s KeyDelay is , in which case is used). When SendInput reverts to , it uses SendPlay’s KeyDelay.
If a script other than the one executing SendInput has a low-level keyboard hook installed, SendInput automatically reverts to (or if is in effect). This is done because the presence of an external hook disables all of SendInput’s advantages, making it inferior to both SendPlay and SendEvent. However, since SendInput is unable to detect a low-level hook in programs other than , it will not revert in these cases, making it less reliable than SendPlay/Event.
When SendInput sends mouse clicks by means such as , and is in effect (the default), every click will be relative to the window that was active at the start of the send. Therefore, if SendInput intentionally activates another window (by means such as alt-tab), the coordinates of subsequent clicks within the same command will be wrong because they will still be relative to the old window rather than the new one.
Отключение клавиш Num Lock, Scroll Lock и Caps Lock
Три клавиши, предназначенные для фиксации определенных режимов, в настоящее время утратили свое значение и практически не используются в повседневной работе. Возможно для ввода цифр, вы иногда нажимаете «Num Lock», а «Caps Lock» — разве что случайно и, скорее всего, вообще не знаете, для чего нужна клавиша «Scroll Lock». Чтобы установить для них режим по умолчанию, можно написать такой скрипт:
Скачать его вы можете здесь.
В результате клавиша «Num Lock» будет всегда включена (если понадобится отключить ее, просто измените соответствующую строку кода либо удалите ее), а «Caps Lock» и «Scroll Lock» – отключены.
Installer Options
To silently install AutoHotkey into the default directory (which is the same directory displayed by non-silent mode), pass the parameter /S to the installer. For example:
AutoHotkey110800_Install.exe /S
A directory other than the default may be specified via the /D parameter (in the absence of /S, this changes the default directory displayed by the installer). For example:
AutoHotkey110800_Install.exe /S /D=C:\Program Files\AutoHotkey
Version: If AutoHotkey was previously installed, the installer automatically detects which version of AutoHotkey.exe to set as the default. Otherwise, the default is Unicode 32-bit or Unicode 64-bit depending on whether the OS is 64-bit. To override which version of AutoHotkey.exe is set as the default, pass one of the following switches:
- or : ANSI 32-bit.
- or : Unicode 64-bit (only valid on 64-bit systems).
- : Unicode 32-bit.
For example, the following installs silently and sets ANSI 32-bit as the default:
AutoHotkey110800_Install.exe /S /A32
Uninstall: To silently uninstall AutoHotkey, pass the parameter to Installer.ahk. For example:
"C:\Program Files\AutoHotkey\AutoHotkey.exe" "C:\Program Files\AutoHotkey\Installer.ahk" /Uninstall
For AutoHotkey versions older than 1.1.08.00, use . For example:
"C:\Program Files\AutoHotkey\uninst.exe" /S
Note: Installer.ahk must be run as admin to work correctly.
Extract: Later versions of the installer include a link in the bottom-right corner to extract setup files without installing. If this function is present, the switch can be used to invoke it from the command line. For example:
AutoHotkey110903_Install.exe /D=F:\AutoHotkey /E
Restart scripts : In silent install/uninstall mode, running scripts are closed automatically, where necessary. Pass the switch to automatically reload these scripts using whichever EXE they were running on, without command line args. Setup will attempt to launch the scripts via Explorer, so they do not run as administrator if UAC is enabled.
Taskbar buttons : On Windows 7 and later, taskbar buttons for multiple scripts are automatically grouped together or combined into one button by default. The Separate taskbar buttons option disables this by registering each AutoHotkey executable as a .
: For command-line installations, specify or to enable the option and to disable it.
Run with UI Access
The installer GUI has an option «Add ‘Run with UI Access’ to context menus». This context menu option provides a workaround for common by allowing the script to automate administrative programs — without the script running as admin. To achieve this, the installer does the following:
- Copies AutoHotkeyA32.exe, AutoHotkeyU32.exe and (if present) AutoHotkeyU64.exe to AutoHotkey*_UIA.exe.
- Sets the uiAccess attribute in each UIA file’s embedded manifest.
- Creates a self-signed digital certificate named «AutoHotkey» and signs each UIA file.
- Registers the context menu option to run the appropriate exe file.
If any these UIA files are present before installation, the installer will automatically update them even if the UI Access option is not enabled.
For command-line installations, specify or to enable the option and to disable it. By default, the installer will enable the option if UAC is enabled and the UI Access context menu option was present before installation.
Scripts which need to run other scripts with UI access can simply Run the appropriate UIA.exe file with the normal .
Known limitations:
- UIA is only effective if the file is in a trusted location; i.e. a Program Files sub-directory.
- UIA.exe files created on one computer cannot run on other computers without first installing the digital certificate which was used to sign them.
- UIA.exe files cannot be started via CreateProcess due to security restrictions. ShellExecute can be used instead. Run tries both.
- UIA.exe files cannot be modified, as it would invalidate the file’s digital signature.
- Because UIA programs run at a different «integrity level» than other programs, they can only access objects registered by other UIA programs. For example, will fail because Word is not marked for UI Access.
- The script’s own windows can’t be automated by non-UIA programs/scripts for security reasons.
- Running a non-UIA script which uses a mouse hook (even as simple as ) may prevent all mouse hotkeys from working when the mouse is pointing at a window owned by a UIA script, even hotkeys implemented by the UIA script itself. A workaround is to ensure UIA scripts are loaded last.
For more details, see Enable interaction with administrative programs on the archive forum.
Скрипты AutoHotKey для CS:GO
Bhop
Bhop (распрыжка) — это крутой скрипт для отработки упражнений, когда вы освоите его, подумайте о распрыжке с колесом прокрутки.
F11 для включения и отключения. Кнопка End дял полного отключения.
VAC вас НИКОГДА не обнаружит.
Autofire
Autofire не очень практичен для конкурентного игрового процесса, но с DM и Casual это интересно.
Они безопасны для VAC, но их не рекомендуется использовать в конкурентных состязаниях или на пользовательских серверах, их обнаруживает пользовательский античит.
Чтобы поставить скрипт на паузу нажмите F6.
Ultimate CS:GO Multiscript
Это НЕ чит, он не будет вводить или делать что-либо с CS:GO, он просто симулирует события мыши/клавиатуры.

Характеристики
- Удивительный графический интерфейс для быстрого и простого отображения.
- Авто-купить оружие, можно настроить в графическом интерфейсе
- Burst, 1x Tap, 2x режима огня
- Rapid Fire (Autofire) для ваших пистолетов/ружей
- Вертикальный контроль отдачи (в сочетании с автопожаром для пистолета Norecoil)
- Bhop (распрыжка)
- Медленный авто огонь для Deagles
- Авто нож для лучших ножевых комбо!
Горячие кнопки
- На цифровом блоке клавиатуры 1-3: Выберите пресет для автоматической покупки
- На цифровом блоке клавиатуры 4: авто огонь
- На цифровом блоке клавиатуры 5: авто нож
- На цифровом блоке клавиатуры 6: одно нажатие = взрыв, удерживайте мышь для спрея с катушкой
- На цифровом блоке клавиатуры 7-9: 1x Tap, 2x Tap, Взрыв
- Правый Ctrl: режим огня по умолчанию
- Правый Alt: переключить «без отдачи»
- CapsLock: переключить Bhop (раскрыжка)
- Правый Shift: сделать norecoil (без отдачи) непротиворечивым (только для cz auto)
Пролистните до Code: и разверните Spoiler:
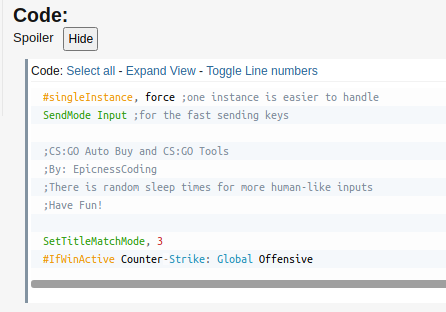
Скрипт длинный, поэтому убедитесь, что полностью скопировали его.
4 — Running Programs & Websites
mspaint.exe, calc.exe, script.ahkRunhttps://www.autohotkey.com/
; Run a program. Note that most programs will require a FULL file path:
Run, %A_ProgramFiles%\Some_Program\Program.exe

; Run a website:
Run, https://www.autohotkey.com
There are some other advanced features as well, such as command line parameters and CLSID. If you want to learn more about that stuff, visit the Run page.
Here are a few more samples:
; Several programs do not need a full path, such as Windows-standard programs:
Run, notepad.exe
Run, mspaint.exe

; Run the "My Documents" folder using a :
Run, %A_MyDocuments%

; Run some websites:
Run, https://www.autohotkey.com
Run, https://www.google.com
For more in-depth information and examples, check out the Run page.
The Top of the Script (the Auto-execute Section)
After the script has been loaded, it begins executing at the top line, continuing until a Return, Exit, hotkey/hotstring label, or the physical end of the script is encountered (whichever comes first). This top portion of the script is referred to as the auto-execute section.
Note: While the script’s first hotkey/hotstring label has the same effect as return, other hotkeys and labels do not.
If the script is not persistent, it will terminate after the auto-execute section has completed. Otherwise, it will stay running in an idle state, responding to events such as hotkeys, hotstrings, , custom menu items, and timers. A script is automatically persistent if it contains hotkeys, hotstrings, OnMessage() or GUI, and in a few other cases. The #Persistent directive can also be used to explicitly make the script persistent.
Every thread launched by a hotkey, hotstring, menu item, , or timer starts off fresh with the default values for the following attributes as set in the auto-execute section. If unset, the standard defaults will apply (as documented on each of the following pages): AutoTrim, CoordMode, Critical, DetectHiddenText, DetectHiddenWindows, FileEncoding, ListLines, SendLevel, SendMode, SetBatchLines, SetControlDelay, SetDefaultMouseSpeed, SetFormat, SetKeyDelay, SetMouseDelay, SetRegView, SetStoreCapsLockMode, SetTitleMatchMode, SetWinDelay, StringCaseSense, and Thread.
If the auto-execute section takes a long time to complete (or never completes), the default values for the above settings will be put into effect after 100 milliseconds. When the auto-execute section finally completes (if ever), the defaults are updated again to be those that were in effect at the end of the auto-execute section. Thus, it’s usually best to make any desired changes to the defaults at the top of scripts that contain hotkeys, hotstrings, timers, or custom menu items. Also note that each thread retains its own collection of the above settings. Changes made to those settings will not affect other threads.
Context-sensitive Hotkeys
The directives #IfWinActive/Exist and #If can be used to make a hotkey perform a different action (or none at all) depending on a specific condition. For example:
#IfWinActive, ahk_class Notepad
^a::MsgBox You pressed Ctrl-A while Notepad is active. Pressing Ctrl-A in any other window will pass the Ctrl-A keystroke to that window.
#c::MsgBox You pressed Win-C while Notepad is active.

#IfWinActive
#c::MsgBox You pressed Win-C while any window except Notepad is active.

#If MouseIsOver("ahk_class Shell_TrayWnd") ; For MouseIsOver, see .
WheelUp::Send {Volume_Up}     ; Wheel over taskbar: increase/decrease volume.
WheelDown::Send {Volume_Down} ;
AutoHotkey автоматизация процессов 1.1.33.00
AutoHotkey — бесплатная программа с открытым исходным кодом для создания макросов и автоматизации, позволяющая упростить повторяющиеся задачи. Она поддерживает собственный язык программирования сценариев (скриптов), приспособленный к лёгкому назначению и переназначению горячих клавиш.Системные требования:Windows XP/Vista/7/8/8.1/10Торрент AutoHotkey автоматизация процессов 1.1.33.00 подробно:Возможности программы:·Автоматизировать почти все процессы лишь нажатием клавиши или кликом мыши. Вы можете писать макросы вручную или с использованием макрорегистраторов.·Задавать «горячие» клавиши для клавиатуры, джойстика и мыши. Практически любая клавиша, кнопка или комбинация может стать «горячей» клавишей.·Использовать автозамену при печатании. Например, аббревиатура «btw» может автоматически заменяться на «by the way».·Создавать пользовательские формы ввода данных, пользовательские интерфейсы и меню. Чтобы получить дальнейшую информацию, см. раздел, посвященный GUI.·Переназначать клавиши и кнопки на клавиатуре, джойстике или мыши.·Передавать сигналы ручного пульта дистанционного управления через клиентский скрипт WinLIRC.·Пользоваться уже существующими скриптами AutoIt v2, а также добавлять в них новые возможности.·Конвертировать любой скрипт в EXE-файл, который затем можно запустить даже на компьютерах, где не установлен AutoHotkey.·Изменение громкости, приглушение звука (mute) и другие настройки любой звуковой карты.·Возможность делать окна прозрачными, устанавливать поверх других окон или изменять их форму.·Использование джойстика или клавиатуры в качестве мыши.·Мониторинг вашей системы. Например, возможность закрывать нежелательные окна при их появлении.·Чтение и изменение содержимого буфера обмена, включая имена файлов, скопированные из окна Explorer.·Запрет или замена собственных «быстрых» клавиш Windows, таких, как Win+E и Win+R.·Уменьшение травм от работы на клавиатуре путем замены комбинации Alt-Tab на другие клавиши, ролик или кнопки мыши.·Настройка меню трея собственными пиктограммами, всплывающими подсказками, пунктами меню и субменю.·Отображение диалоговых окон, подсказок и всплывающих меню, обеспечивающих взаимодействие с пользователем.·Выполнение заданных сценарием операций в ответ на завершение работы системы или конец сеанса.·Определение продолжительности простоя в работе пользователя. Например, запуск объемных задач CPU только в отсутствие пользователя.·Автоматизация игровых действий путем распознавания изображений и цветов пикселов.·Более простое, чем в других языках, чтение, запись и анализ текстовых файлов.·Выполнение операций с файлами с использованием подстановочных символов.·Работа с реестром и INI-файлами.Что нового:·Added #ErrorStdOut Encoding parameter.·Added /ErrorStdOut=Encoding command line switch.·Added #Warn Unreachable (warning mode).·Added #Requires AutoHotkey vVersion (directive).·Added detection of program-terminating SEH exceptions, to display an error dialog.·Fixed a possible bug where Input causes undefined behaviour. ·Fixed WinKill.·Fixed A_WinDir to always return the system Windows directory.·Fixed FileGetShortcut/FileCreateShortcut to return and accept negative icon indices without modification.·Fixed InputBox Locale option to not focus the Cancel button.·Fixed menu bar keyboard shortcuts not working when GUI has no controls.·Fixed LoadPicture to use 256×256 graphic when available in a DLL/EXE.·Fixed DBGp stderr copy mode to not suppress error dialogs.·Fixed ControlGet Line setting ErrorLevel=1 when line is just empty.Fixed Send causing unwanted hotkey buffering.
Скриншоты AutoHotkey автоматизация процессов 1.1.33.00 торрент:
Скачать AutoHotkey автоматизация процессов 1.1.33.00 через торрент:
autohotkey-1_1_33_00.torrent (cкачиваний: 38)
8 — Other Helpful Goodies
We have reached the end of our journey, my good friend. I hope you have learned something. But before we go, here are some other things that I think you should know. Enjoy!
a. The mysterious square brackets
Throughout the documentation, you will see these two symbols ( and ) surrounding code in the yellow syntax box at the top of almost all pages. Anything inside of these brackets are OPTIONAL. Meaning the stuff inside can be left out if you don’t need them. When writing your code, it is very important to NOT type the square brackets in your code.
On the ControlGetText page you will see this:
ControlGetText, OutputVar , Control, WinTitle, WinText, ExcludeTitle, ExcludeText
So you could simply do this if you wanted:
ControlGetText, OutputVar
Or add in some more details:
ControlGetText, OutputVar, Control, WinTitle
What if you wanted to use ExcludeTitle but not fill in WinText or WinTitle? Simple!
ControlGetText, OutputVar, Control,,, ExcludeTitle
Please note that you cannot IGNORE parameters, but you can leave them blank. If you were to ignore , it would look like this and cause issues:
ControlGetText, OutputVar, Control, ExcludeTitle
b. Finding your AHK version
Run this code to see your AHK version:
MsgBox, %A_AhkVersion%
Or look for «AutoHotkey Help File» or «AutoHotkey.chm» in the start menu or your installation directory.
c. Trial and Error
Trial and Error is a very common and effective way of learning. Instead of asking for help on every little thing, sometimes spending some time alone (sometimes hours or days) and trying to get something to work will help you learn faster.
If you try something and it gives you an error, study that error. Then try to fix your code. Then try running it again. If you still get an error, modify your code some more. Keep trying and failing until your code fails no more. You will learn a lot this way by reading the documentation, reading errors and learning what works and what doesn’t. Try, fail, try, fail, try, try, try, fail, fail, succeed!
This is how a lot of «pros» have learned. But don’t be afraid to ask for help, we don’t bite (hard). Learning takes time, the «pros» you encounter did not learn to be masters in just a few hours or days.
«If at first you don’t succeed, try, try, try again.» — Hickson, William E.
d. Indentation
This stuff (indentation) is very important! Your code will run perfectly fine without it, but it will be a major headache for you and other to read your code. Small code (25 lines or less) will probably be fine to read without indentation, but it’ll soon get sloppy. It’s best you learn to indent ASAP. Indentation has no set style, but it’s best to keep everything consistent.
«What is indentation?» you ask? It’s simply spacing to break up your code so you can see what belongs to what. People usually use 3 or 4 spaces or 1 tab per «level».
Not indented:
if (car = "old")
{
MsgBox, The car is really old.
if (wheels = "flat")
{
MsgBox, This car is not safe to drive.
return
}
else
{
MsgBox, Be careful! This old car will be dangerous to drive.
}
}
else
{
MsgBox, My`, what a shiny new vehicle you have there.
}
Indented:
if (car = "old")
{
    MsgBox, The car is really old.
    if (wheels = "flat")
    {
        MsgBox, This car is not safe to drive.
        return
    }
    else
    {
        MsgBox, Be careful! This old car will be dangerous to drive.
    }
}
else
{
    MsgBox, My`, what a shiny new vehicle you have there.
}
See Wikipedia’s Indentation style page for various styles and examples. Choose what you like or learn to indent how you think it’s easiest to read.
e. Asking for Help
Before you ask, try doing some research yourself or try to code it yourself. If that did not yield results that satisfy you, read below.
- Don’t be afraid to ask for help, even the smartest people ask others for help.
- Don’t be afraid to show what you tried, even if you think it’s silly.
- Post anything you have tried.
- Pretend everyone but you is a doorknob and knows nothing. Give as much information as you can to educate us doorknobs at what you are trying to do. Help us help you.
- Be patient.
- Be polite.
- Be open.
- Be kind.
- Enjoy!
If you don’t get an answer right away, wait at least 1 day (24 hours) before asking for more help. We love to help, but we also do this for free on our own time. We might be at work, sleeping, gaming, with family or just too busy to help.
And while you wait for help, you can try learning and doing it yourself. It’s a good feeling, making something yourself without help.
Создать скрипт AutoHotkey с нуля
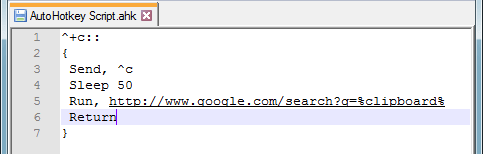
До сих пор вы использовали сценарии других людей. Теперь давайте создадим простой эскиз с нуля, который возьмет все, что есть в нашем буфере обмена, и выполнит поиск в нем с помощью Duck Duck Go. Щелкните правой кнопкой мыши на рабочем столе Windows и выберите New> AutoHotkey Script, Кроме того, вы можете использовать любой текстовый редактор или IDE на ваш выбор
Текстовые редакторы против IDE: какой из них лучше для программистов?
Текстовые редакторы против IDE: какой из них лучше для программистов?Выбор между расширенной IDE и более простым текстовым редактором может быть трудным. Мы предлагаем некоторую информацию, чтобы помочь вам принять это решение.
Прочитайте больше
и введите следующее:
#s ссылается на ярлык для запуска сценария. Символ хеша относится к Ключ Windows, означающий, что Win + S наш выбранный ярлык. Этот ярлык зарезервирован для функции поиска Windows 10. В этом случае мы переопределяем его, то есть поиск DuckDuckGo произойдет на его месте. Если вы используете ярлык поиска Windows, замените его другой буквой.
Бежать Команда является одним из мульти-инструментов AutoHotkeys. Согласно документации откроется «Документ, URL, исполняемый файл (.exe, .com, .bat и т. Д.), Ярлык (.lnk) или системный глагол…». В этом случае AutoHotkey откроет URL в браузер по умолчанию.
Наконец, ? Д =% буфер% part – это команда для добавления URL с содержимым буфера обмена Windows.
Introduction and Simple Examples
Hotkeys are sometimes referred to as shortcut keys because of their ability to easily trigger an action (such as launching a program or keyboard macro). In the following example, the hotkey Win+N is configured to launch Notepad. The pound sign stands for Win, which is known as a modifier key:
#n::
Run Notepad
return
In the final line above, serves to finish the hotkey. However, if a hotkey needs to execute only a single line, that line can be listed to the right of the double-colon. In other words, the is implicit:
#n::Run Notepad
To use more than one modifier with a hotkey, list them consecutively (the order does not matter). The following example uses to indicate Ctrl+Alt+S:
^!s::
Send Sincerely,{enter}John Smith  ; This line sends keystrokes to the active (foremost) window.
return
Repeating or Holding Down a Key
To repeat a keystroke: Enclose in braces the name of the key followed by the number of times to repeat it. For example:
Send {DEL 4}  ; Presses the Delete key 4 times.
Send {S 30}   ; Sends 30 uppercase S characters.
Send +{TAB 4}  ; Presses Shift-Tab 4 times.
To hold down or release a key: Enclose in braces the name of the key followed by the word Down or Up. For example:
Send {b down}{b up}
Send {TAB down}{TAB up}
Send {Up down}  ; Press down the up-arrow key.
Sleep 1000  ; Keep it down for one second.
Send {Up up}  ; Release the up-arrow key.
When a key is held down via the method above, it does not begin auto-repeating like it would if you were physically holding it down (this is because auto-repeat is a driver/hardware feature). However, a Loop can be used to simulate auto-repeat. The following example sends 20 tab keystrokes:
Loop 20
{
    Send {Tab down}  ; Auto-repeat consists of consecutive down-events (with no up-events).
    Sleep 30  ; The number of milliseconds between keystrokes (or use SetKeyDelay).
}
Send {Tab up}  ; Release the key.
By default, Send will not automatically release a modifier key (Control, Shift, Alt, and Win) if that modifier key was «pressed down» by sending it. For example, may behave similar to if the user is physically holding Ctrl, but followed by will produce Ctrl+A. DownTemp and DownR can be used to override this behavior. DownTemp and DownR have the same effect as Down except for the modifier keys (Control, Shift, Alt, and Win).
DownTemp tells subsequent sends that the key is not permanently down, and may be released whenever a keystroke calls for it. For example, followed later by would produce A, not Ctrl+A. Any use of Send may potentially release the modifier permanently, so DownTemp is not ideal for remapping modifier keys.
: DownR (where «R» stands for remapping, which is its main use) tells subsequent sends that if the key is automatically released, it should be pressed down again when send is finished. For example, followed later by would produce A, not Ctrl+A, but will leave Ctrl in the pressed state for use with keyboard shortcuts. In other words, DownR has an effect similar to physically pressing the key.
If a character does not correspond to a virtual key on the current keyboard layout, it cannot be «pressed» or «released». For example, has no effect on most layouts, and is equivalent to .
Tray Icon
By default, each script adds its own icon to the taskbar notification area (commonly known as the tray).
The tray icon usually looks like this (but the color or letter changes when the script is paused or suspended):
Right-click the tray icon to show the tray menu, which has the following options by default:
- Open — Open the script’s .
- Help — Open the AutoHotkey offline help file.
- Window Spy — Displays various information about a window.
- Reload This Script — See Reload.
- Edit This Script — See Edit.
- Suspend Hotkeys — Suspend or unsuspend hotkeys.
- Pause Script — Pause or unpause the script.
- Exit — Exit the script.
By default, double-clicking the tray icon shows the script’s .
The Menu command can be used to customise the tray icon and menu.
The #NoTrayIcon directive can be used to hide the tray icon.